https://edwardmichaellach.zenfolio.com/blog Edward Michael Lach: Blog
https://edwardmichaellach.zenfolio.com/img/s/v-12/u974851010-o133807955-50.jpg 2022-03-01T05:28:00Z (C) Edward Michael Lach Edward Michael Lach https://edwardmichaellach.zenfolio.com/blog/2018/2/new-feature-image-collections-by-lens-used New Feature: Image Collection by Lens Used

An Announcement here two weeks ago introduced a new Search Feature on my VisionLight website in which all images photographed by an individual lens could be displayed. The Search could further be refined to include images from an individual lens/individual camera body combination only. Although this new feature was well received by visitors to this site, there were difficulties in navigating from the displayed large thumbnails in the Search Results to displaying full screen images. Only one full screen image could be loaded at a time, requiring using the browser’s back button to return to the Search Results to load an additional image. This could be cumbersome. In addition, the Search Results were displayed in random order which did not make it easy to find related images. As stated in the Announcement at the time, I would continue to work to alleviate these problems in Phase 2.

Phase 2 is now complete. Today I am announcing the new, always available IMAGE COLLECTION BY LENS USED, displaying images from individual lens/individual camera body combinations. 15 new Galleries are included in the Collection, displaying all website images photographed by interchangeable lenses on three digital cameras from December, 2005 to the present. Five Galleries cover the lenses used on my Samsung NX-1. Five Galleries cover the lenses used on my Canon EOS M5. And Five Galleries cover the lenses used on my original Canon EOS 5D. Note that some of the lenses were used with adapters on two or all three cameras, with a separate Gallery included for that lens on each camera. All Galleries are presented in chronological order with continuous access to full screen images and slideshows, and all original EXIF data associated with the image.

Although the new Search Feature, only two weeks old, is no longer necessary to view all images photographed by a single lens, it was an important step in this process. I could not have accomplished Phase 2 in such a short period without it. I thank my visitors for your encouragement while it was the only solution available.

The New Feature, IMAGE COLLECTION BY LENS USED, is available in MY PORTFOLIO in the Main Menu bar at the top of every page.

Whether you are interested in acquiring one of these lenses, or comparing my copy to your own copy or a similar lens, or just interested in seeing diverse real world characteristics and capabilities of a lens, I hope you find this New Feature a useful and enjoyable addition to my VisionLight website.

Note: The Collection may also be accessed at this link: http://edwardmichaellach.zenfolio.com/f551238473

(C) Edward Michael Lach 2018-02-08T00:56:30Z 2018-02-08T00:56:30Z
https://edwardmichaellach.zenfolio.com/blog/2018/1/new-feature-search-for-all-images-photographed-with-an-individual-lens New Feature: Search for all Website Images Photographed with an Individual Lens

In addition to the many galleries in my VisionLight website displaying photographs from specific places or events, MY PORTFOLIO above also includes Collections in chronological order of all site images grouped by the individual cameras used over the last fifty years. Creating these Collections was originally suggested to me by a number of the regular visitors to my site. They were either already using one or more of the same cameras, or were interested in comparing or buying them, and wanted to see diverse real world results displaying the cameras’ characteristics and capabilities. Since the Collections creation, they have become popular for research by  photographers, beginner and enthusiast as well as seasoned veterans, who view my images and writing on photography websites seen around the world.

Recently, visitors have shown a new interest, not in just the cameras I use to create my images, but also in grouped examples of the specific lenses I use with those cameras. I have now begun a project to add searchable lens data to the features of VisionLight to address those needs.

Today is the formal announcement of the first step in that process. The ability is now available to use the Search feature on the Main Menu to find and display all site images from any individual lens used on an interchangeable lens digital camera. If a lens has been used on multiple cameras, results may be searched on the individual camera or by all cameras combined. Those interchangeable lens digital cameras include the (original) Canon EOS 5D, the Samsung NX-1 and the Canon EOS M5 and images cover the period from December 2005 to the present.

The lenses used with these cameras with Search Keys for each lens or lens/camera combination included in the ( ), e.g. (100mm), are:

Canon EF 24-105mm f/4L IS USM   (24-105mm)

Canon EF 100-400mm f/4.5-5.6L IS USM   (100-400mm) or (100-400mm and 5D) or (100-400mm and M5)

Canon EF 100mm f/2.8 Macro USM   (100mm) or (100mm and 5D) or (100mm and M5)

Sigma 12-24mm f/4.5-5.6 DG HSM   (12-24mm)

Canon EF-M 11-22mm f/4.5-5.6 IS STM   (11-22mm)

Canon EF-M 18-150mm f/3.5-6.3 IS STM   (18-150mm)

Canon FD 80-200mm f/4 SSC   (FD80200)


Samsung 16-50mm f/2-2.8 S ED OIS   (16-50mm)

Samsung 50-150mm f/2.8 S ED OIS   (50-150mm)

Samsung 60mm f/2.8 Macro ED OIS SSA   (60mm)

Rokinon 8mm f/2.8 UMC Fish-Eye II   (8mm)

Canon FD 400mm f/4.5 SSC   (FD400)


Unlike the chronological order of the images displayed in the Collections, the large thumbnails in the Search Result are displayed in random order. Select a thumbnail to view a larger image in its Gallery. Then use your browser’s back button to return to the Search Result to select another image. Time and resources pending, this process should be alleviated by creating new Collections based on lenses only or lens/camera combinations in Phase 2. Large images will then be viewable in a continuous stream.


I hope you find my new lens Search feature useful, whether to research a lens you may be thinking about acquiring, to compare it to the results of your own copy or a similar lens, or just to explore its capabilities or possibilities. Let me know what you think or if you have any suggestions.

Update - Feb 07, 2018: See today's new BLOG post announcing Phase 2 of this project, the creation of an Image Collection by Lens Used. 


(C) Edward Michael Lach 2018-01-22T23:37:00Z 2018-01-22T23:37:00Z
https://edwardmichaellach.zenfolio.com/blog/2017/3/celebrating-the-100th-country-in-the-world-to-visit-my-website The 100th Country in the World Visits My Website (Updated February 24, 2022 to 130)

On March 2, 2017, Algeria became the 100th country in the World from which viewers have visited my VisionLight website (since August 1, 2015). This is now more than half of the sovereign states recognized by World bodies.

I want to thank the thousands of visitors who come here on a regular basis to see what I have been up to in photography, especially in celebration of the beauty and wonders of Nature. My images are meant to promote both the enjoyment and responsible stewardship of the natural world around us and, I hope, inspire others to do the same. Photography is a powerful tool that can remind us of what should be important to us, and protecting and nourishing Nature ultimately protects and nourishes ourselves. I hope to keep providing new images that capture your interest and imagination, and inspire you to capture similar images to share with others.

Here is a list of the 100 countries from which viewers have visited my VisionLight website. The top 25 countries with the highest number of visitors have their ranking (#) shown as well:

1.     Algeria 26.  Finland (#17) 51.  Macao 76.  Romania
2.     Argentina (#14) 27.  France (#10) 52.  Malaysia 77.  Russian Federation
3.     Armenia 28.  Germany (#4) 53.  Maldives 78.  Saint Vincent and the Grenadines
4.     Australia (#6) 29.  Greece (#22) 54.  Mauritius 79.  San Marino
5.     Austria (#18) 30.  Greenland 55.  Mexico 80.  Saudi Arabia
6.     Bahamas 31.  Guam 56.  Montenegro 81.  Serbia
7.     Bangladesh 32.  Hong Kong (#12) 57.  Morocco 82.  Singapore (#25)
8.     Belarus 33.  Hungary 58.  Nepal 83.  Slovakia
9.     Belgium (#15) 34.  Iceland 59.  Netherlands (#5) 84.  Slovenia
10.  Bosnia and Herzegovina 35.  India (#20) 60.  New Caledonia 85.  South Africa (#13)
11.  Brazil (#19) 36.  Indonesia 61.  New Zealand 86.  Spain (#11)
12.  Bulgaria 37.  Iran, Islamic Republic of 62.  Nicaragua 87.  Sweden (#7)
13.  Cambodia 38.  Iraq 63.  Nigeria 88.  Switzerland
14.  Canada (#2) 39.  Ireland 64.  Norway (#16) 89.  Taiwan
15.  Chile 40.  Israel 65.  Oman 90.  Tanzania, United Republic of
16.  China 41.  Italy (#8) 66.  Pakistan 91.  Thailand
17.  Colombia 42.  Japan 67.  Palestinian Territory 92.  Trinidad and Tobago
18.  Costa Rica 43.  Jordan 68.  Panama 93.  Turkey (#24)
19.  Croatia 44.  Kazakhstan 69.  Peru 94.  Ukraine
20.  Curacao 45.  Kenya 70.  Philippines 95.  United Arab Emirates
21.  Cyprus 46.  Korea, Republic of 71.  Poland (#9) 96.  United Kingdom (#3)
22.  Czech Republic (#23) 47.  Kuwait 72.  Portugal 97.  United States (#1)
23.  Denmark (#21) 48.  Latvia 73.  Puerto Rico 98.  Uruguay
24.  El Salvador 49.  Lithuania 74.  Qatar 99.  Venezuela
25.  Estonia 50.  Luxembourg 75.  Reunion 100. Vietnam

Update: On March 30, 2017, the Republic of Seychelles became the 101st country.

Update: On April 2, 2017, the Republic of Malta became the 102nd country.

Update: On June 1, 2017, the Lao People's Democratic Republic became the 103rd country.

Update: On June 9, 2017, Brunei Darussalam became the 104th country.

Update: On July 7, 2017, Lebanon became the 105th country.

Update: On November 22, 2017, Jersey became the 106th country.

Update: On August 17, 2018, Sri Lanka became the 107th country.

Update: On September 3, 2018, Ghana became the 108th country.

Update: On October 10, 2018, Egypt became the 109th country.

Update: On October 13, 2018, Isle of Man became the 110th country.

Update: On December 12, 2018, Georgia became the 111th country.

Update: On January 16, 2019, Swaziland became the 112th country.

Update: On January 20, 2019, Bahrain became the 113th country.

Update: On February 12, 2019, St. Lucia became the 114th country.

Update: On February 27, 2019, Bolivia became the 115th country.

Update: On March 15, 2019, Ecuador became the 116th country.

Update: On March 20, 2019, Dominican Republic became the 117th country.

Update: On March 27, 2019, Fiji became the 118th country.

Update: On March 30, 2019, Jamaica became the 119th country.

Update: On May 30, 2019, Honduras became the 120th country.

Update: On July 28, 2019, Angola became the 121st country.

Update: On October 5, 2019, Cayman Islands became the 122nd country.

Update: On November 6, 2019, Falkland Islands (Malvinas) became the 123rd country.

Update: On February 14, 2020, Zambia became the 124th country.

Update: On March 12, 2020, Yemen became the 125th country.

Update: On May 13, 2021, Albania became the 126th country.

Update: On June 18, 2021, Tunisia became the 127th country.

Update: On December 30, 2021, Republic of Moldova became the 128th country.

Update: On January 8, 2022, Macedonia became the 129th country.

Update: On February 24, 2022, Barbados became the 130th country.


(C) Edward Michael Lach 2017-03-03T16:51:47Z 2017-03-03T16:51:47Z
https://edwardmichaellach.zenfolio.com/blog/2016/5/announcement-new-homepage-slideshow-for-the-one-year-anniversary-of-visionlight Announcement: The Homepage has been Re-designed for the One Year Anniversary of my website.

My VisionLight website is one year old this month and it was time to celebrate by refreshing the Homepage Slideshow. My recent design refresh of the Gallery pages was very well received by visitors, so my new Homepage takes its cues from that design. Unlike the original Homepage which featured a slideshow on a single subject, the new first look at  VisionLight introduces viewers to an eclectic selection of images from each of MY PORTFOLIO's Galleries. 22 advancing pages follow the MY PORTFOLIO menu from Thirty Five Years of 35mm Film all the way through the Collections by Camera or Subject. Although the opening screen is set to 12 seconds and each advancing page is 6 seconds, manual controls allow viewing at each visitor’s own pace. I have to thank my son Erik, a professional Graphic Designer for his guidance on the new design. He specializes in creating Corporate Identities, designed my VisionLight logo and makes sure my site ideas have a cohesive theme and presentation. Erik operates his own business, Envisioned Creations.
 

I have noticed that many of my viewers come directly to my website with Bookmarks to either this BLOG or to the WHAT'S NEW page. Those of you who may have missed the new Homepage can open it from anywhere on the site by clicking the VisionLight logo at the top left of every page (or clicking Home>> below the Menu bar).

I would like to thank all the members and viewers of my website for a wonderful first year. Thousands of you have visited from 75 countries all around the world. The top 15 include my home in the United States, and then in order: United Kingdom, Canada, Germany, Netherlands, Australia, Italy, Sweden, Hong Kong, Poland, South Africa, France, Austria, Czech Republic and Finland. In the early days, viewers usually spent only a short time on the site, but in the 2nd half of April 2016, 1 in 6 visitors spent an hour or more per visit. I have noticed that 96% of you use a computer or tablet for viewing and only 4% use Smartphones. I try to make the website friendly for Smartphones with two different viewing modes, but the optimum experience is still directed at the larger screens for the vast majority of you. Suggestions from viewers though are always welcome. Any other comments you may have are always welcome as well. Drop me a note on the CONTACT page, comment in this BLOG or in any Gallery or on any Image, or of course in my GUESTBOOK.. I appreciate hearing from you. And once again, I would like to thank all of you for a wonderful first year. I hope you continue to come back to see new images and Galleries. The Thirty Fives Years of 35mm Film project will be going on for “years” and my new Gallery for the Teatown Lake Reservation should be growing monthly.  Or come back to review once again your favorite images. Plus I will have some new features in the coming second year. So stay tuned.  


(C) Edward Michael Lach 2016-05-08T20:18:01Z 2016-05-08T20:18:01Z
https://edwardmichaellach.zenfolio.com/blog/2016/4/tutorial-compression/expansion-of-space-in-photography Tutorial: Compression/Expansion of Space in Photography

When displaying images in a photography forum, the resulting discussion can take many directions. One such image allowed me to write about some misunderstood “rules” of compression and expansion of space in photography. The blooms in the following image appear to be very close together, and yet in reality were almost two feet apart. Knowing how different focal lengths at different distances from a subject can produce entirely different presentations of an image can lend to wonderful creativity in photography.
 

  140804_2285_SX50 Honeysuckle140804_2285_SX50 HoneysuckleReturn to the Compression/Expansion of Space Tutorial by clicking here
http://edwardmichaellach.zenfolio.com/blog/2016/4/tutorial-compression/expansion-of-space-in-photography


The appearance of a delicate close relationship of the blooms on this Honeysuckle vine was attained by stepping back and increasing the focal length to extreme telephoto to compress the space while maintaining the desired composition.
 

There is reasoning behind this technique and purists who know about the "science" of our craft will cite the "absolute" rule that stepping forward will always expand the appearance of a subject in space and moving backwards will always compress it. While basically true in a relative sense and when applied to the above image, this rule can be misleading in many practical artistic applications. Every focal length has a focus distance at which the subject appears natural in space. Move closer than this distance and the subject will have a sense of expansion. Move further and the subject will have a sense of compression. Clarifying the misleading part of the "absolute" rule is that as long as the subject is between the minimum focus distance and the focus point where it appears natural in space at any focal length, it is then that the subject will always appear expanded in space. When moving beyond the focus point where it appears natural at any focal length, it is then that the subject will always appear compressed in space. The shorter the focal length, the further away the focus distance at which the subject appears natural in space, thus the greater the focus points that appear expanded. The longer the focal length, the closer the focus distance at which the subject appears natural in space, thus the greater the focus points that appear compressed. This makes sense in application as one usually stands relatively closer to a subject when using a short focal length wide angle lens (expansion), and further away when using a long focal length telephoto (compression). This also answers a question I often get, "I moved back from my subject, why doesn't it look compressed like the rule says it should?" Knowing the rule is one thing. Understanding the application of the "rule" makes for a more creative photographer.
 

Most people use the different focal lengths of a zoom lens to avoid taking steps. But one of its many benefits as shown here, once you've determined a particular composition, is that stepping back and forth with the zoom can be used in a real dance of changing focal lengths and focus distances to choreograph creative senses and emotions in photography.
 

(C) Edward Michael Lach 2016-04-23T05:09:46Z 2016-04-23T05:09:46Z
https://edwardmichaellach.zenfolio.com/blog/2016/4/tutorial-anti-aliasing-low-pass-filters-on-digital-camera-sensors Tutorial: Anti-Aliasing Low Pass Filters on Digital Camera Sensors

Prologue: In December 2013, readers on a dpreview.com forum were having a discussion about whether all digital cameras had AA (anti-aliasing) filters or not. One participant knew for a fact after reading about digital sensors for 15 years that 99.9% of cameras have AA filters and that AA filters are a normal part of all cameras with Bayer-type sensors except some high-end models. Another participant disagreed. From this conversation and others, I realized many people did not understand how the light path is designed between the back element of the lens and a camera’s actual sensor surface. In the following edited tutorial, I attempted to shed some light on that design:
 

Let's try to clarify this a little further in simple terms, since to a degree you are both right. Re:"I know for a fact that 99.9% of cameras have AA filters", it would be more proper to say that 99.9% of cameras have Low Pass filters. When you are looking through the camera lens flange and thinking you are seeing the sensor, you're not, you're looking at a Low Pass filter in front of the sensor. This is what is being shaken when cameras with anti-dust mechanisms start up, and this is what anti-static materials are applied to. Now a Low Pass filter can be configured in two ways (in simple terms) in the light path from the lens to the sensor. The typical way is a horizontal split of the light beams in the first element, Infrared removal in the second element, and a vertical split of each horizontal beam in the third to a four point source. The effect is anti-aliasing (AA) filtering. Newer designs include a vertical split in the first element, Infrared removal in the second, and recombination of the split beam back to a single point source in the third. The effect is NO AA filtering. So "99.9%" of cameras do have low-pass filters, but not necessarily AA filters. Again, this is in simple terms and what's in the secret sauce of each OEM's sensors is not always made public.
 

The first participant replied about previously thinking that the terms "anti-aliasing filter" and "low-pass filter" meant the same thing and along with others appreciated being educated. But a further question was posed that even when a Low Pass filter does not include AA, isn’t there still a blurring effect on the image since anything that manipulates the photons before they reach the sensor must lower image quality. I replied with the following:

Yes, I would generally agree, but consider this. The AA filter works because the grating in the first element splits the light horizontally to two beams, eliminates infrared in the second element, and then splits each horizontal split beam vertically in the third element to now create four beams as a source on the sensor. A beam of light exiting the lens that would have hit only its own real estate on the sensor (again, in simple terms) now shares that real estate with the beams around it that have also been split. This sharing of the same real estate by two or more beams that exited the lens create anti-aliasing because there is now little chance that two beams of opposing frequency will hit the same pixel, a basic cause of aliasing. The splitting and blending do introduce a loss of acuity, as we are all well aware.

When the low pass filter is not designed to include AA, the first element does what the third element of the AA type filter does, splits the beam vertically before having infrared removed in the second element. The third element then is the exact mirror of the first element and vertically recombines the beam to its original state (now ex-infrared). Basically it covers the same real estate that it would have if it didn't pass the filter at all. What now becomes important is the size of the real estate it is illuminating. The smaller the pixel relative to that light, the less chance that two beams of opposing frequency will hit the same pixel. That's why designers can get away with not including AA filtering on very high megapixel sensors. Of course, it does not always work that way in all situations (the quality of the lens as well as photographic technique come into play here), but at least acuity is generally not lost due to the Low Pass filter.
 

(C) Edward Michael Lach 2016-04-22T23:57:26Z 2016-04-22T23:57:26Z
https://edwardmichaellach.zenfolio.com/blog/2016/4/tutorial-creating-successful-180-panoramas Tutorial: Creating Successful 180° Panoramas

Prologue: Many modern digital cameras (and smartphones) have an automated panorama feature. The camera records a video while the photographer is panning across the scene, then internally stitches frames from the video together to create the panorama. The feature is fast and easy to use and gives results that are . . . well, at their best very lackluster. At any degree larger than a minimal magnification on a small screen or print, details are totally lost in a mush of color splotches. The viewer only sees a glancing idea of the original scene. That may be fine for display on a smartphone or tablet screen or in social media. But what about viewing a panorama at the sizes the grandeur that inspired its capture was meant to be shown in the first place, at 3 feet to 10 feet across? That takes a more detailed technique, can be accomplished with any camera (or smartphone) and free stitching software and was the subject of an article I wrote in September 2013, reprised here with some edits:
 

130904_02_1207_1213_SX50 Hudson River from Bear Mountain130904_02_1207_1213_SX50 Hudson River from Bear MountainReturn to the Panorama Tutorial by clicking here http://edwardmichaellach.zenfolio.com/blog/2016/4/tutorial-creating-successful-180-panoramas 180° Panorama of the Lower Hudson Valley in New York from Bear Mountain (click on the image to enlarge it in the Gallery)
 

This 180° panorama took longer to set up than to actually photograph the seven individual images. The most important part was finding a good central point in the view of the projected image to set up a tripod. In this case I was on the edge of a cliff, so it was also very important to find a steady footing and not land up with the camera or myself going over the side. It was a very long way down.
 

After setting up the tripod, it is important to visualize where the horizon line will be on either side of the final panorama, whether that line will be actually seen or not. And also determine how high or low that point will be across the image. If your camera has grid lines on the EVF/LCD, turning them on is very helpful. Next point the camera directly at the center of the scene and make sure it is perfectly level (again very easy with cameras that have an electronic level, though an add-on level attached to the hot shoe is also good). The central horizon should be where you want it. Swing the camera to the left to see how far the horizon diverges up or down from your central point. Then swing all the way in the opposite direction to set how much divergence is on that side. If you are lucky, it will only be a few degrees to either side and you can start the photographing images steps. But that is usually not the case. There are two steps you can take, the combination of which can help to straighten the horizon before taking the images. Using a wide angle zoom lens works best for the first step. Change the focal length of the lens slightly in either direction until the central, left and right points of the horizon are closest to the same level while panning without losing elements of your intended image. The second step is to tilt the lens slightly up or down and go left and right to see if further straightening can be achieved. These steps are followed by raising or lowering your tripod to reacquire a good composition. With the point of the horizon as close as possible to the same plane in all parts of the image, more of each individual image will be used by a software stitching program in a rotating function creating more details and less distortion. Keep in mind that it is not necessary to keep the central horizon point exactly where you intend it to be in the final image. Moving it up or down slightly to average it out with the far edge points can help the stitching process. That central point can be moved back in the final edit of the full stitched image.
 

When photographing the actual individual images it is usually best for stitching software to go from left to right. Carefully choose how many images are to be photographed before taking the first one. Panning left to right with the final focal length already chosen above, add a little extra wiggle room to either side since the edge images will probably have the most distortion. The wiggle room allows this end distortion to be in an unwanted area of the composition that can be cropped out later. Exactly matching up the left side of each following individual image to the right side of the previous one, count the number of images to swing all the way around including the wiggle room. Since stitching software works best when having overlap between images, plan on taking about 25% more images than the count in the last step. The panorama image above only needed 5 images to cover the whole field edge to edge, but was photographed with seven images to provide that overlap .Knowing how many images need to be photographed keeps the segments about even in size which also aids the stitching software. Another tip that is very helpful for stitching software is to try to keep important elements of the panorama in a single individual image. In the above panorama image, I wanted to make sure the bridge and the island in the river had no distortions that may sometimes appear in stitching from two adjacent images. Here I adjusted the amount of overlap a little between the surrounding images to assure they were fully included in their own images. Once again, the less work the stitching program has to do, the more of each image will be used and the better the final results.
 

Finally it's time to photograph the actual individual images and there's another tip. When composing each image, first match up the left side of the next image as close as possible with the right side of the previous image at each point on the EVF/LCD horizontal grid. Then pan back the amount of your overlap chosen above to keep the even sizing or adjust for individual important elements. If the horizon line diverges too much from your intended point as you pan back, adjust the camera up or down slightly on the tripod to keep it closer to the same horizontal grid point. This is what I did in the image above and had relatively little waste to crop from the upper and lower edges for the final stitched image.
 

Now this may seem like a lot of work, but it really doesn't take as long to do as to write and read about it. Stitching software will attempt and be reasonably able to produce good results from almost any consecutive series of images. But the best output still always comes from the best input and these steps can be of help in creating wonderful panoramas with strong details and little distortions that can be enjoyed  at sizes that display their grandeur.
 

Addendum: There are a number of stitching software programs that are easy to use with good results. My favorite is Microsoft Image Composite Editor, commonly called MS ICE, that is not only easy to use but has a number of user controlled parameters for creative stitching. All panoramas in the Galleries on this website have been created using it. The software is a free download from Microsoft and the 64 bit version can be found here:
 

http://research.microsoft.com/en-us/downloads/69699e5a-5c91-4b01-898c-ef012cbb07f7/default.aspx
 

(C) Edward Michael Lach 2016-04-22T19:44:41Z 2016-04-22T19:44:41Z
https://edwardmichaellach.zenfolio.com/blog/2016/4/tutorial-proper-use-of-spot-metering Tutorial: Proper Use of Spot Metering

Prologue: In a prior article re-published from 2012, I mentioned I liked Evaluative metering on the Canon SX50 and at the time the article was originally written was using Evaluative metering 80% of the time and Spot metering 20%. I really like Canon’s Evaluative metering, even today, because as indicated by the above percentages it pretty well nails the exposure often enough that not a lot of post processing is required. That is, as I’ve mentioned before, with -1/3 EC dialed in for daylight as a default. Over the years since that article was written, I’ve switched those percentages to 80% Spot metering and 20% Evaluative on all my cameras. I have become very appreciative of the higher control Spot metering allows with a resulting further reduction in the need for post processing. In May 2013 in response to questions on camera metering, I wrote the now slightly edited following tutorial on spot metering (Note that images may be clicked on to see them enlarged in my Blog Gallery, but may not be downloaded):
 

I like evaluative metering for its ease of use, but many times the lighting may be too difficult for Evaluative mode to properly handle, or the photographer may want to enhance certain qualities of the light. So changing to the Spot mode is necessary. From reading a number of discussions on forums, I see that many people do not have a clear idea on how to properly use the Spot metering mode.
 

Many people believe that placing the Spot meter reading right on their main subject will give a proper exposure for the image. Now if the main subject gives off an 18% middle gray reflectance, they would be correct. This is because camera metering systems are calibrated to properly expose 18% gray. If a camera’s meter is pointed at a pure white (255,255,255 RGB reading) subject that fills the frame, the meter will underexpose to create an 18% gray image. If the camera is pointed at a pure black (0,0,0 RGB reading) subject that fills the frame, the meter will overexpose to create an 18% gray image. So unless the main subject is already 18% gray, it will almost never give a proper exposure when using the Spot meter. Why do I say almost?  We’ll go through the proper three steps in using the Spot meter to find out.
 

The first step is the easiest. Look for an element in your scene that gives off an 18% middle gray reflectance and take the reading off that element. Generally, highlights, shadows and everything in between in the rest of the scene will be properly exposed within the dynamic range of the sensor. Now blacks may not be absolute black (0,0,0) and whites may not be absolute white (255,255,255), but a range of values between (28,28,28) and (245,245,245) is quite acceptable even for the better cameras. But what does 18% gray look like? There are many tools (color pigment cards) available and sources on the net that will give you examples. For my professional work, both studio and outdoors, and many times for my personal work, I include a color checker card  in a test exposure to calibrate the final images to in post. Once you’re used to seeing this color on the cards, you also become used to finding it in nature. And don’t worry if you do not find an exact 18% reflectance. Any of the middle grays in the area surrounding 18% usually work just as well.
 

Step two is necessary when you cannot find any elements in the scene that are at or near 18% gray. Now you must get a little creative and point the Spot meter to an area that has a combination of light and dark tones that average to 18% gray. It may be a combination of medium light tones and medium dark tones that fall under the area of the Spot meter, or a combination of very light tones and very dark tones, as long as the average is around 18% gray. This is what I meant above that pointing the Spot meter at your main subject may sometimes work, because the main subject may have a good mix of tones close to 18% gray.
 

Are we finished? No, there’s a step three that depends on the photographer’s overall vision for the tone of the picture. If the main subject is very light against a dark background, even the spot meter will tend to keep that balance. By changing the mix of tones in step two to include more lighter elements than dark, the exposure will be decreased to better handle the highlights (which is difficult for the sensor) while not detracting too much from the shadow detail (easier for the sensor). By making changes to the mix that the Spot meter reads, you can emphasis the tonal presentation of the light in the whole image, lighter or darker, to reflect your vision.
 

Look again at the process outlined in steps two and three. Re-written slightly, they would be a pretty good description of what the camera is doing to multiple elements across the entire scene in Evaluative metering mode. It’s the reason Evaluative mode works so well and so often.
 

I have two examples of the proper use of Spot metering, one from my files and a new image I photographed this morning for this article. First, here is the older image:
 

130313_0663_SX50 Cattle in the Pasture near Rockefeller Preserve130313_0663_SX50 Cattle in the Pasture near Rockefeller PreserveReturn to the Spot Metering Tutorial by clicking here http://edwardmichaellach.zenfolio.com/blog/2016/4/tutorial-proper-use-of-spot-metering Spot metering was placed on the clouds and trees near the horizon with a little bit of the three right cattle included.
 

Using Evaluative metering for this image with a very bright sky portrayed the pasture and cattle as much too dark with little texture or definition. Although the upper clouds are very close to middle gray and pointing the Spot meter at them lightened the bottom of the scene, it was not enough for the image I wanted to portray. Instead, I pointed the Spot meter at the same color clouds near the horizon to the right of center that were mixed with the darker branches of the trees. I further moved it down slightly to capture a little of the three right cattle. The pasture now would light up enough to give me the image that was in my mind’s eye. The sky may have lost a slight bit of texture, but that was more than compensated for by the detail in the shadows.
 

The second image taken this morning is a portrait of a newly blooming Iris in my eastern gardens, just as the rising sun broke above the cloud covered hills:
 

130517_0810_SX50 Iris130517_0810_SX50 IrisReturn to the Spot Metering Tutorial by clicking here http://edwardmichaellach.zenfolio.com/blog/2016/4/tutorial-proper-use-of-spot-metering This is a case where pointing the Spot meter right at the subject worked. See the text.
 

 Evaluative metering in this case was blowing the delicate yellow highlights. Turning down the EC was helpful but started robbing too much detail and texture from the shadows, especially the stem. Now there is no obvious middle gray, but it turns out that this subject allowed me the creative use of the usual rules by pointing the spot meter right at it. In the middle of the image on the flower was a combination of light yellows and medium violets with a touch of dark shadows. This area produced a Spot meter reading with a very even combination of highlights and shadows with good texture and contrast, a combination close to the tonal values near middle gray. And a combination that would produce the beautiful portrait lighting my eye envisioned.
 

 I hope this has been useful to those who want to get the most from the Spot meters on their cameras. As I said, Evaluative metering is very good in many lighting situations, but sometimes you need that little extra help. And other times, the creative possibilities of Spot metering are endless.
 

Addendum:
 

A reader made a good point in mentioning Exposure Lock while using this process. That was definitely an omission of mine in writing the original article. In the case of the iris above, the correct exposure area was right in the middle of the image and it was not necessary to adjust the composition before pressing the shutter. This is highly unusual in Spot metering. Taking the reading off center like with the above cattle in the pasture is more likely and I did use Exposure Lock. Many digital cameras have an Exposure Lock button (AEL) that is a very helpful feature I would not be without. As its name implies, pressing it locks the Spot exposure reading, allowing the photographer to next choose the focus point of most interest (and a camera with AEL will also have AFL to lock in focus), and finally recompose and capture the image. This process works best by attaining preliminary focus first before metering, then fine tuning the focus with AFL before the final press of the shutter button.
 

(C) Edward Michael Lach 2016-04-22T03:40:00Z 2016-04-22T03:40:00Z
https://edwardmichaellach.zenfolio.com/blog/2016/4/techniques-for-sharp-images-with-the-canon-sx50 Tutorial: Techniques for Sharp Images with the Canon SX50

Prologue: In follow up discussions to my November/December Canon SX50 Review article, many people asked advice on how to get better results with their cameras. I took the opportunity from one such query to write an overall summary of the techniques I employed at the time to achieve consistent high quality images. Ultimately in using the camera, I switched one of those techniques, changing my choice of metering from evaluative mode to spot mode, but that is a topic for a future article. Here is the original discussion:
 

Ketan wrote: I have noted that the Canon SX50 takes very nice images but most of the time, these are post processed. Now, for a guy like me who does not post process much, can you give some simple tips on how to get sharp jpeg images straight out of the camera (SOOC) ? I find that most Canon P&S cameras (including the SX50) give softer images. I appreciate your advice on basic settings for sharper images.
 

Me: With the SX50’s 1/2.3 sensor and a lens with an optical design that even a computer would find intimidating, it's not surprising that many images would come out a bit soft. That's one of the reasons the camera has so many settings, including different levels of sharpness and contrast. In getting the best results, much depends on the mindset of the photographer. In your case, since you prefer not to post process, you would have to play with these settings to see what suits your needs best. For those like me  who consider post a fun and creative part of the whole process, we would tend to turn these settings down and have finer control of them through software after the image is taken. Different strokes for different folks.

That being said, there are a number of techniques I find that help in getting very good images straight out of the camera. Now we have seen many fine images by people who use the AUTO mode. And that's fine. I'm sure from seeing these results that AUTO does a reasonably good job based on the database of subjects written into the SX50’s DIGIC processor. But the way I see it, the best images come when the photographer controls the camera, not when the camera controls the photographer. After many decades of learning to control my equipment, I feel very comfortable not using the AUTO mode. But that doesn't mean I don't use the automatic features of the camera. I just set them up to respond to my input.

The first automatic feature I really like is the evaluative metering mode. I have found very few instances in which it hasn't given me a very good base exposure to work with. From there I can quickly make adjustments to my taste using the EC control. Typically I'll go -1/3 for most sunlit scenes, but I can also go anywhere between -1 to +1/3 depending on the quality of the light I see and the final effect I want on the image.

But what about the primary basis of the exposure? With these tiny sensors, I tend to not worry much about the f-stop. Even wide open, there is usually plenty of depth of field when you're not shooting really close up. So I set my camera to Tv mode. Between the lightness of this camera, the small sensor, and the long lens, these are the ingredients that would cause the slightest shake or vibration of the camera to erode details in the image. If the edge of an element in an image covers only one or two pixels, the image will appear sharp. If camera shake or vibration cause that edge to cover 4 or more pixels, now we're beginning to see a soft picture. The primary answer of course is to use a tripod with a cable release. Good sometimes, but otherwise a real bummer for carefree shooting with a P&S camera. So the secondary answer is to always use the fastest shutter speed available to overcome the movement. My default for Tv mode is 1/500th second with continuous IS turned on. I'll go higher if there's enough light.

The best images also come from using the lowest ISO possible, which usually doesn't play well with high shutter speeds when the light goes down a bit. So in the Menu I set the Safety Shift to ON. When the low ISO can no longer support the chosen Tv shutter speed, this automatically downshifts that shutter speed slower. If I have to take the shot quickly, it'll still come out properly exposed with the highest shutter speed for that ISO. And hopefully the IS keeps it steady. But if I have the time and see the shutter is getting too slow, I compensate by quickly switching to AutoISO. Now the ISO for this camera can get pretty high with acceptable results, but I find 400 to be the top of my "quality" range, so that's where I've set AutoISO not to exceed. And I've also set it to range up slowly so as not to give higher intermediate ISOs than I need. This now gives me up to two full shutter speeds higher to maintain a steady shot in the dimming light. So I'm not in AUTO, but I am using well thought out automatic features to supplement my technique in getting sharp detail in the SOOC image.

Now a bit about shooting technique. The LCD of this camera is nice. But I rarely use it for shooting beyond about 200mm (full frame equivilent). Although 1200mm is the long telephoto, 200mm is still telephoto and a point where camera shake can play a big part in image sharpness. At this magnification, holding the camera out in front of you with no support other than your outstretched arms can add enough "shake" to lose detail at all but very high shutter speed/IS combinations. Instead, I hold the camera to my eye using the EVF, with my elbows firmly but comfortably resting on my chest, a sort of human tripod position. For best results, I also take a full breath, let it half out and then squeeze the shutter (don't press it, squeeze it). I am relaxed, the camera is relaxed, and the least amount of shake or vibration is being introduced to the shot. The result is very sharp details for static subjects. Moving subjects are a whole different ball of wax, but with them sharpness may not be your first concern.

All of this of course takes practice while making changes here or there to suit your own style. But as a baseline, when put into practice, these tips can result in improved results with any camera, big or small. And hopefully for the small camera sensor, results good enough to need little or maybe no post processing at all.
 

(C) Edward Michael Lach 2016-04-20T18:00:25Z 2016-04-20T18:00:25Z
https://edwardmichaellach.zenfolio.com/blog/2016/4/canon-sx50-review-part-4-different-paths-to-up-close-and-personal Canon SX50 Review Part 4: Different Paths to Up Close and Personal

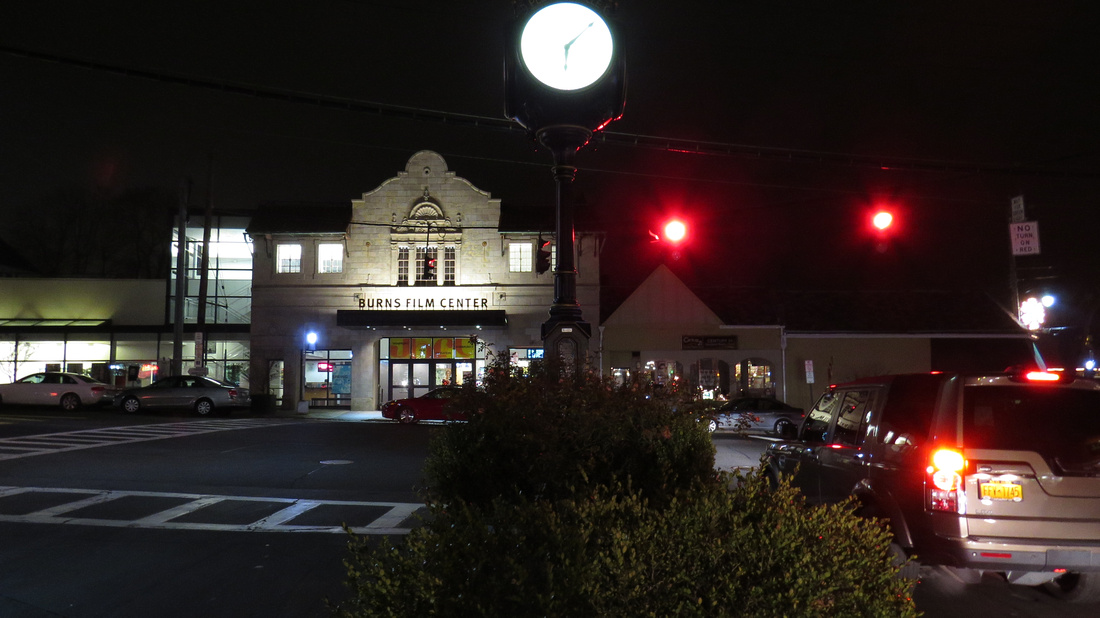
Prologue: This is the fourth in a series of articles I wrote on dpreview.com in November and December 2012 reviewing the Canon SX50 camera and comparing it to its older sibling, the SX40. Parts 1 to 3 are in separate Blog entries below. While the original articles remain on dpreview.com, the links to most of the example images were lost. By request of the readers on that website, I am republishing the articles here in my Blog with all the original example images intact.
 

Note that clicking on a Review image will open it in a Picture Gallery where some may be downloaded. Only test images are downloadable while pictorial images, which are copyrighted, are not. The caption of each image in the Picture Gallery will include a link back to this Article.
 

SX50 Review Part 4: Different Paths to Up Close and Personal
 

I had planned this article to be only about Macro photography with the SX50. But another feature of the camera, the digital extending zoom, kept presenting questions that needed to be addressed. We'll talk about that in a little while. Those who have read many of my articles and replies to others' know that I often illustrate my posts with macro images, many of which are of Mother Nature's tiny living creatures. Because they usually get a bit jittery and disappear if you get too close, taking macros of them requires a bit of distance and respect. While the SX50's 1200mm zoom is great for capturing larger creatures from 400 feet, it is just as capable in getting the little critters from 4.2 feet. We'll call it a "telemacro". And there's no air turbulence to degrade the image. While I have not had the SX50 long enough to put together a collection of live telemacro subjects, here are some examples from the last year from its very capable older sibling, the SX40:
 

120925_1148_SX40 Rockefeller Preserve
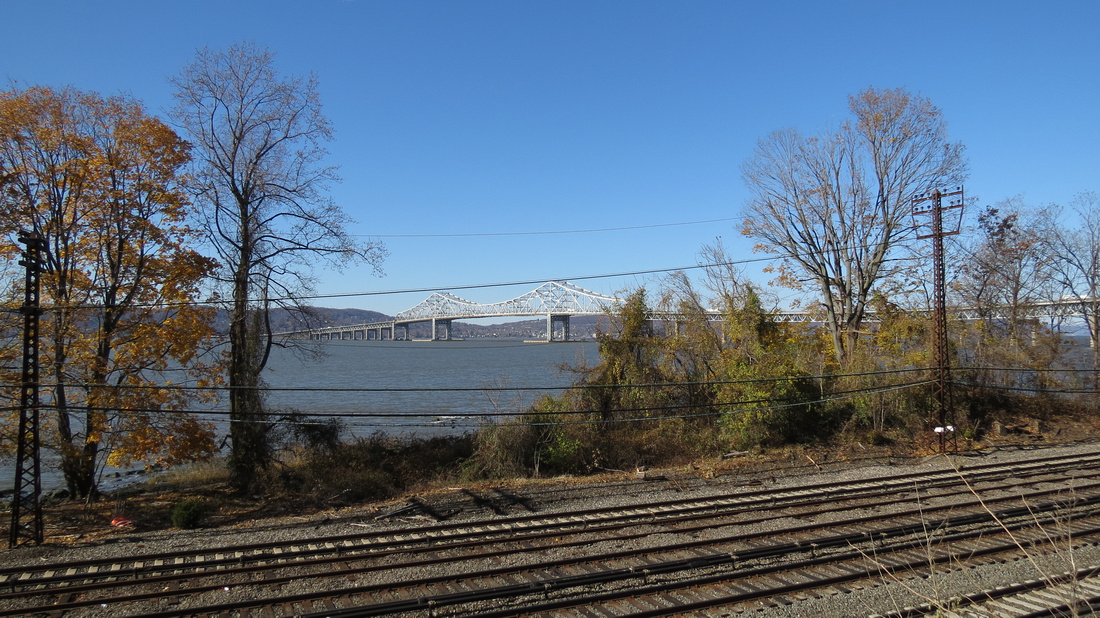
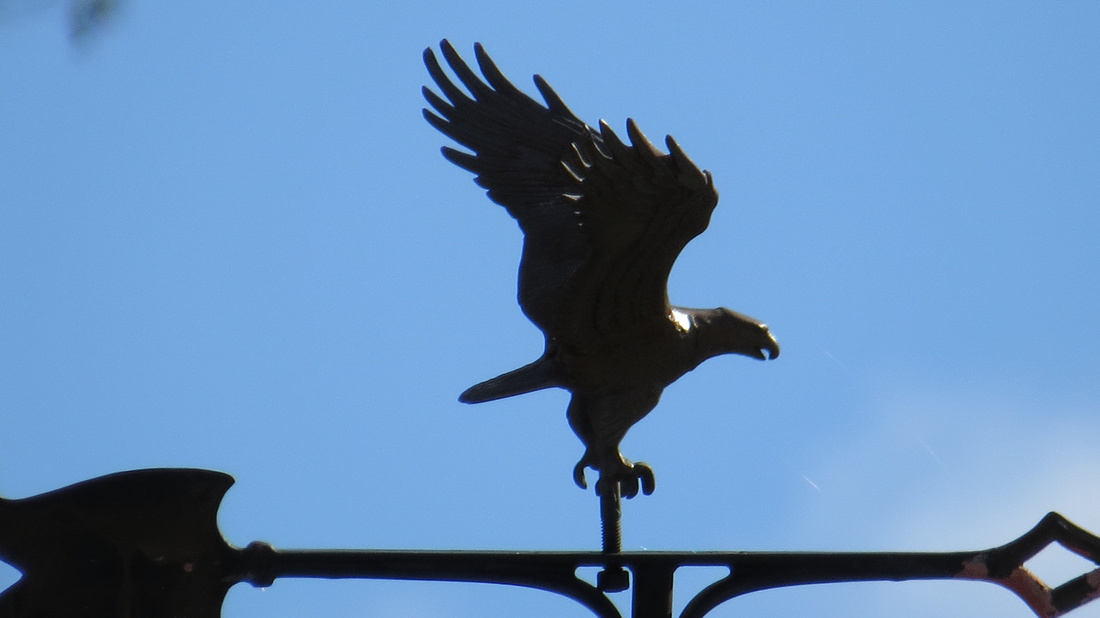
120925_1148_SX40 Rockefeller PreserveTo return to the SX50 Review - Part 4, click the link
http://edwardmichaellach.zenfolio.com/blog/2016/4/canon-sx50-review-part-4-different-paths-to-up-close-and-personal
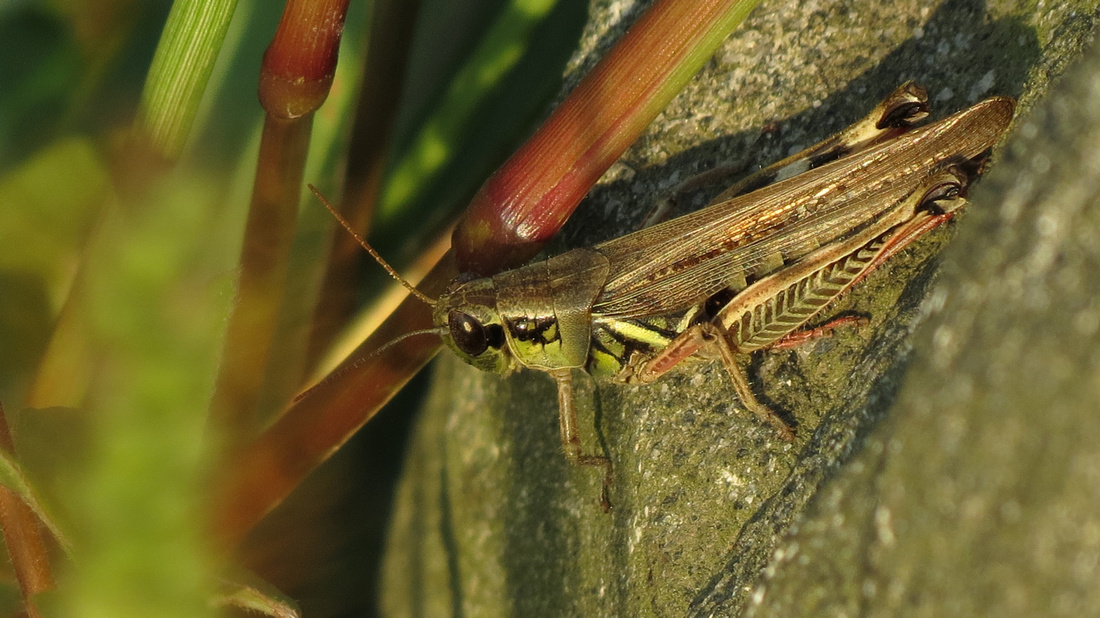
An example of the "telemacro" feature of the SX40's long zoom from 4¼ feet. This 1 inch grasshopper did not like being photographed and kept walking away to try to hide from me.
 

120614_0635_SX40 Orb Weaver
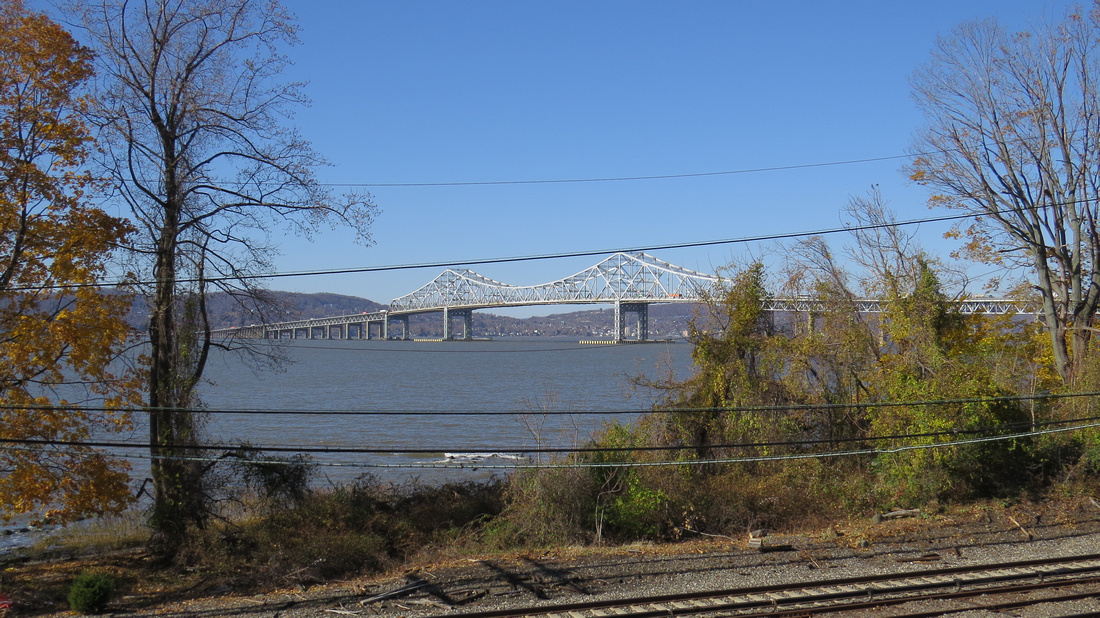
120614_0635_SX40 Orb WeaverTo return to the SX50 Review - Part 4, click the link
http://edwardmichaellach.zenfolio.com/blog/2016/4/canon-sx50-review-part-4-different-paths-to-up-close-and-personal
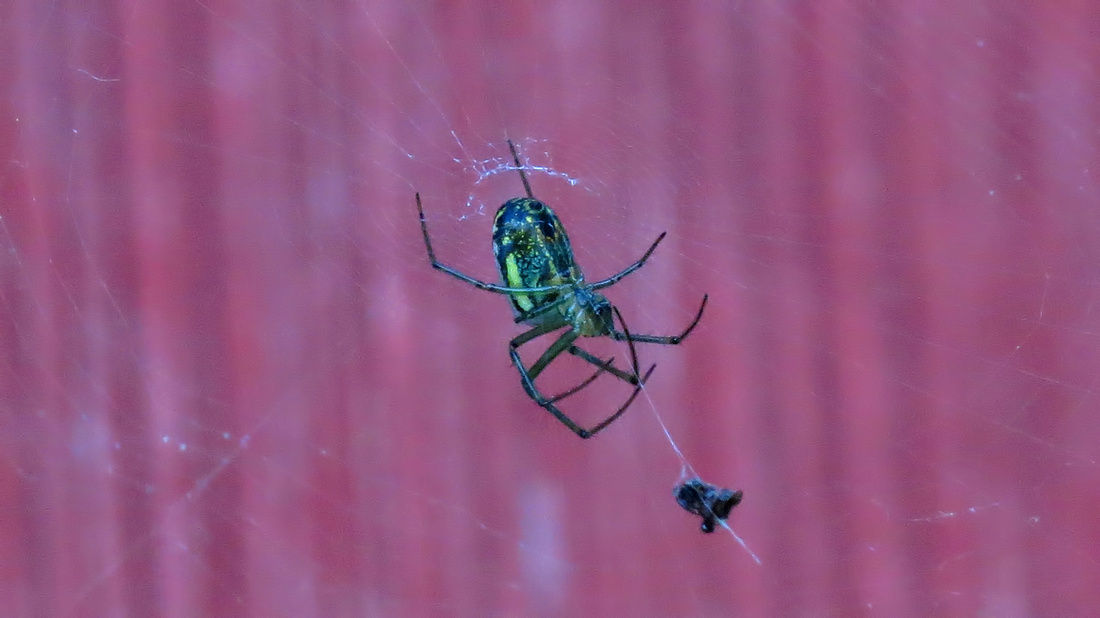
The SX40 "telemacro" caught this very tiny spider with its evening's prey.
 

120709_0896_SX40 Orb Weaver
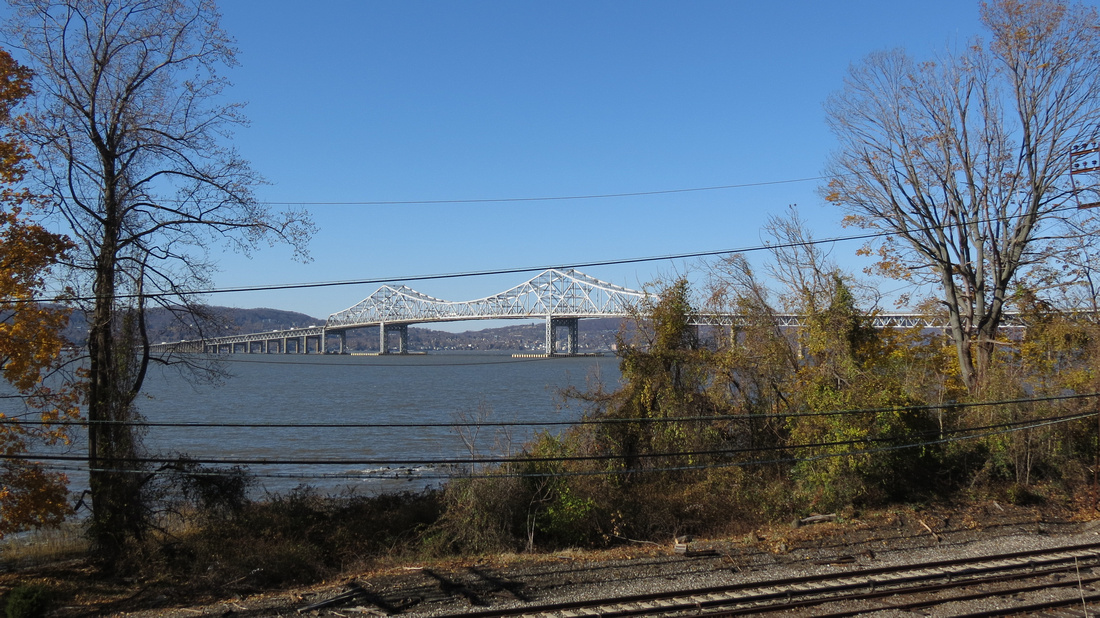
120709_0896_SX40 Orb WeaverTo return to the SX50 Review - Part 4, click the link
http://edwardmichaellach.zenfolio.com/blog/2016/4/canon-sx50-review-part-4-different-paths-to-up-close-and-personal
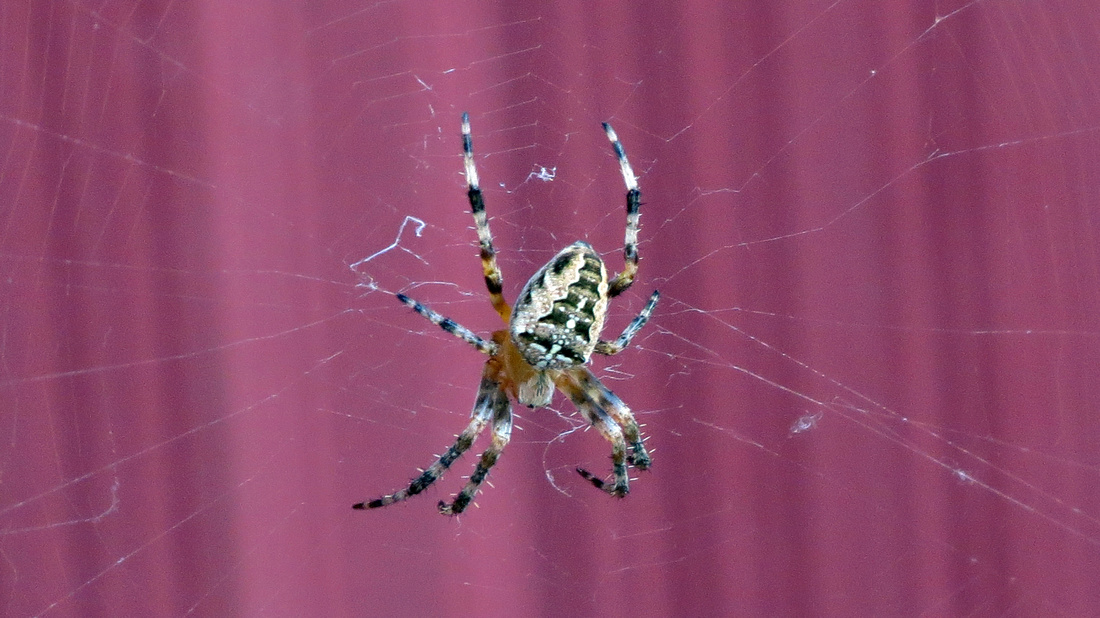
This Orb Weaver scooted away when I originally came too close with a dSLR but actually posed for me when I returned with the SX40 "telemacro" and stayed 4¼ feet away.
 

120630_0742_SX40 Orb Weaver in the Sun
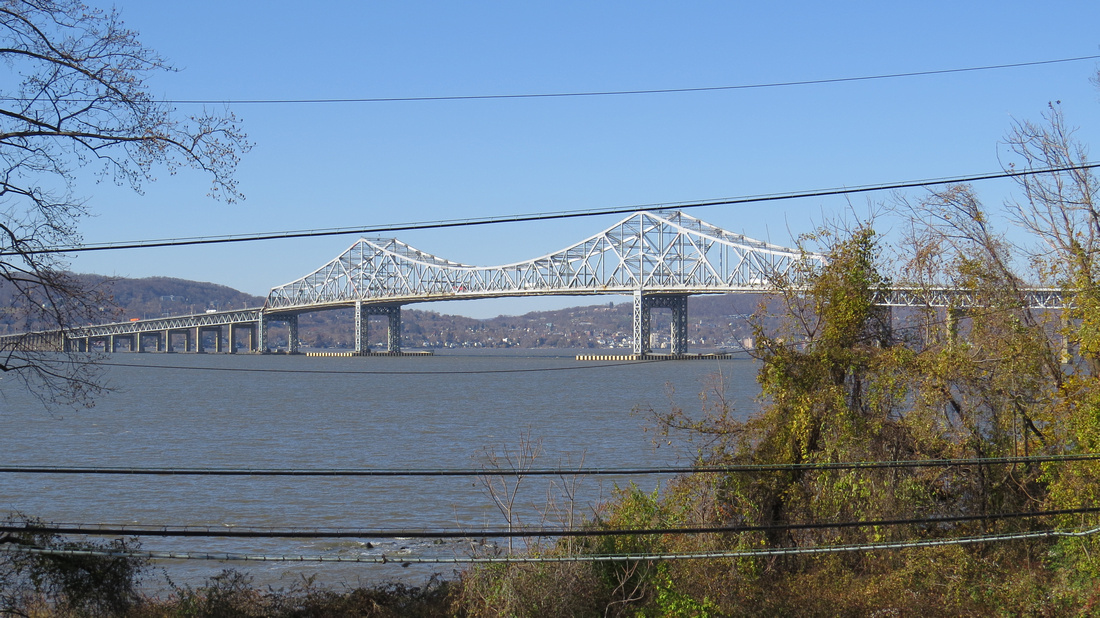
120630_0742_SX40 Orb Weaver in the SunTo return to the SX50 Review - Part 4, click the link
http://edwardmichaellach.zenfolio.com/blog/2016/4/canon-sx50-review-part-4-different-paths-to-up-close-and-personal
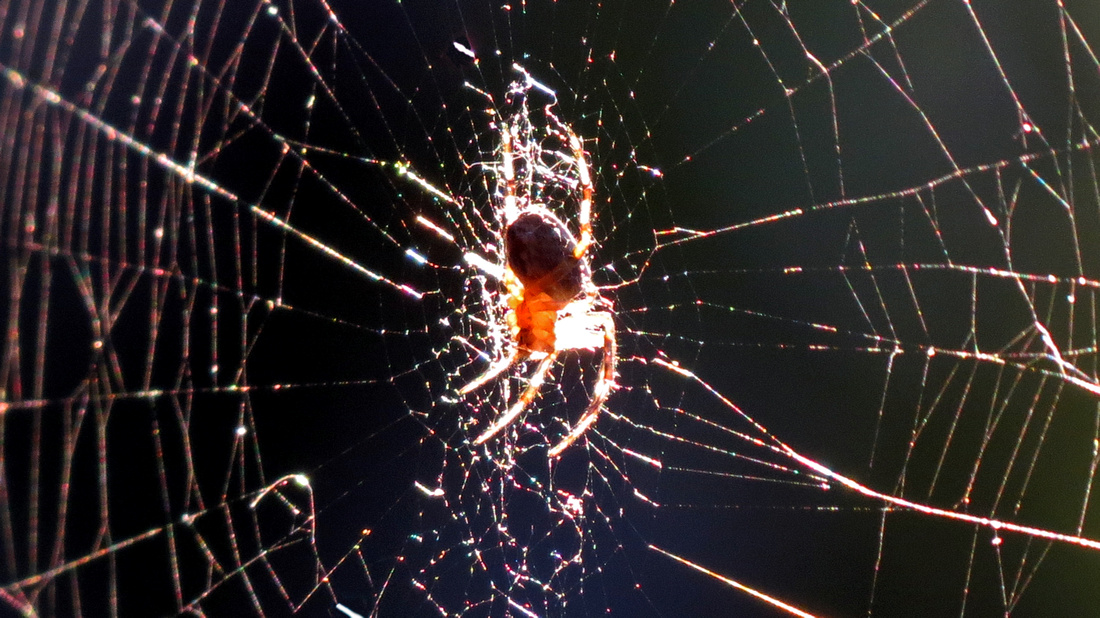
I had previously photographed the same Orb Weaver in the setting sun with the "telemacro" feature.
 

Now before we get underway with the SX50, let's talk a little about the word "macro" in photography. Traditionally, macro lenses have been designed to capture a flat field subject at a 1:1 ratio relative to the size of the film or sensor. For example, a 35mm film negative or a full frame sensor is 36mm (1½ inch) across. A macro lens therefore would have to be able to focus on and fill the frame with an object or scene also only 36mm across. My Canon EF 100mm Macro lens does exactly that. For our P&S cameras with tiny 1/2.3 sensors, the sensor width is only 6.17mm (¼") across. In order to be truly "macro", that is how small a focused frame filling object or scene should be. Yet the optical lens of the SX50 at best can only focus and fill the frame with a 43mm (1¾") scene at 24mm focal length from 0.0" and a 67mm (2¾") scene at both 160mm from 11.8 inches or 1200mm from 4.2 feet. What we have in effect is a "close-up" lens, not a "macro", even though the term "macro" is generally accepted in the P&S world. Now the question becomes how close can we get to true "macro" with the SX50, and more so, can we exceed it. So let's explore the different paths to "macro" with this camera.
 

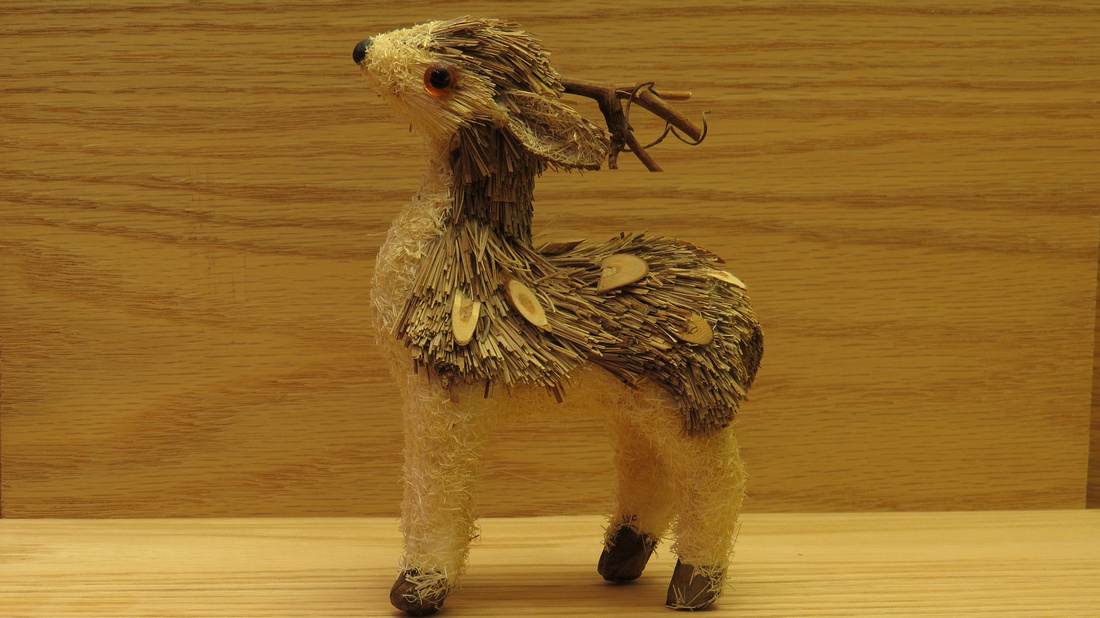
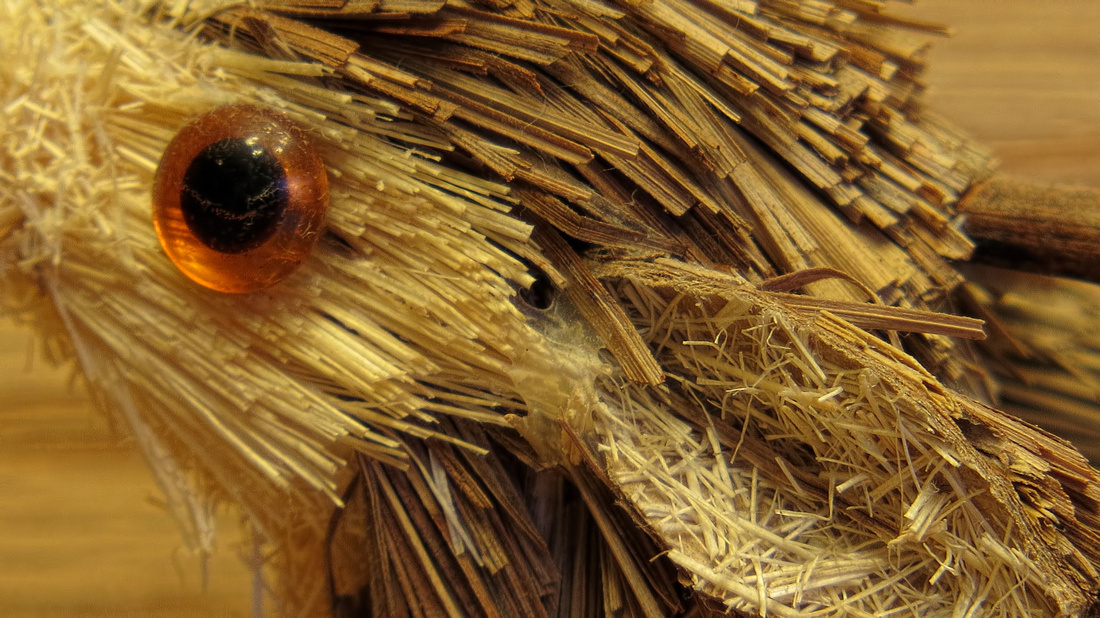
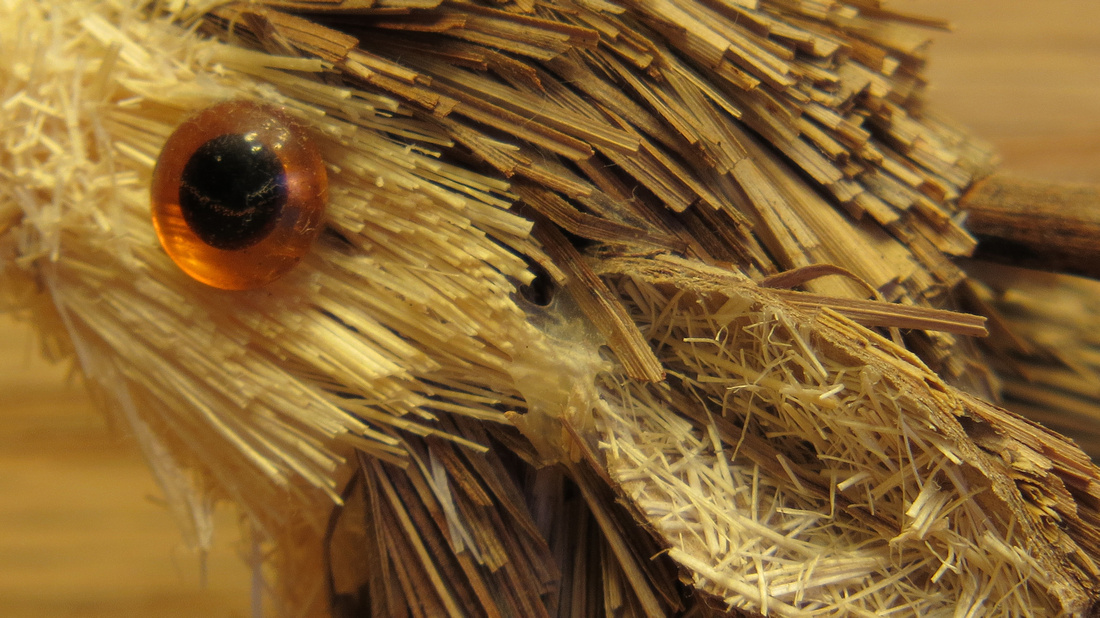
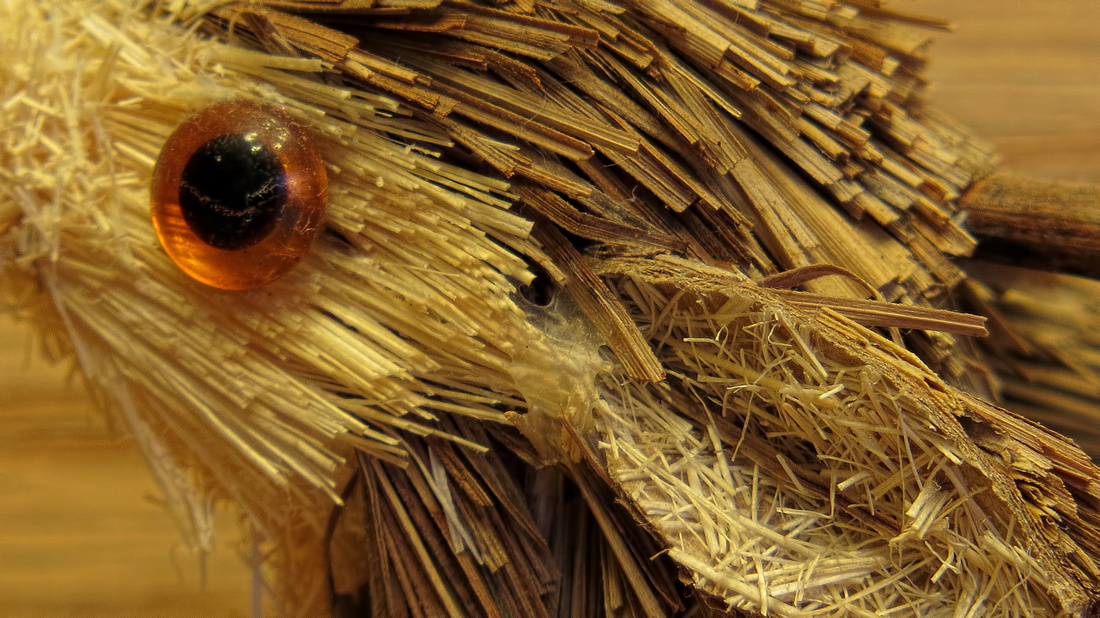
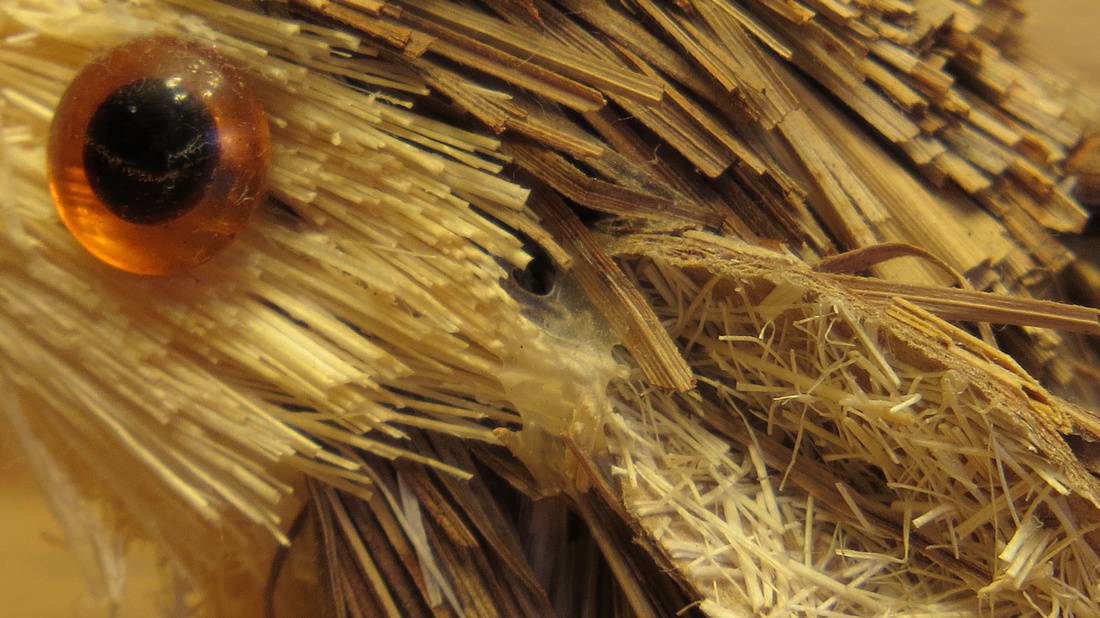
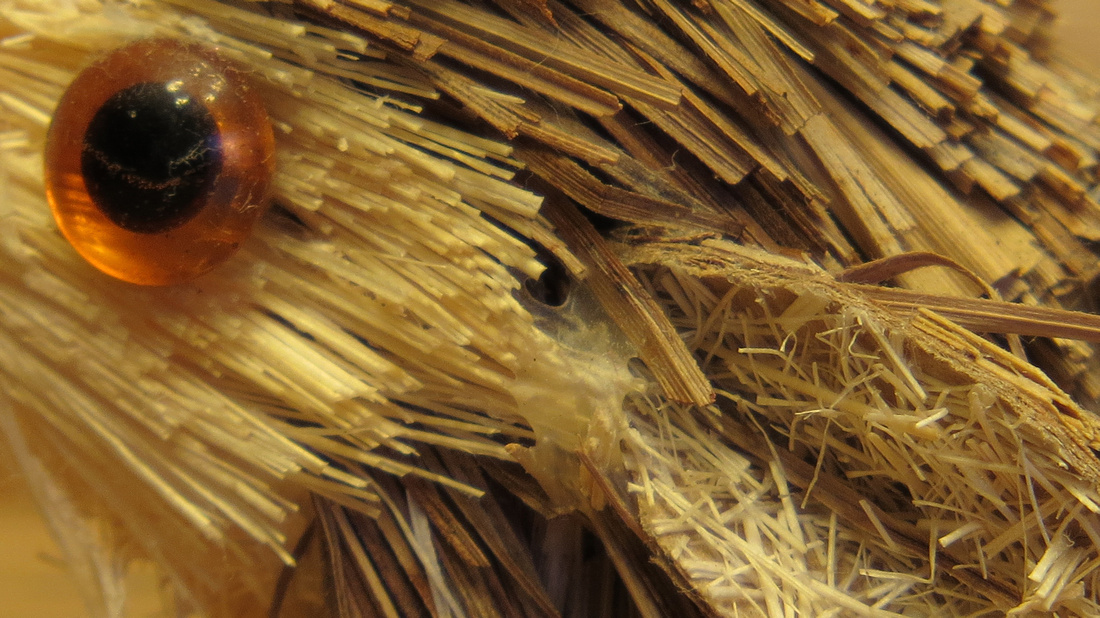
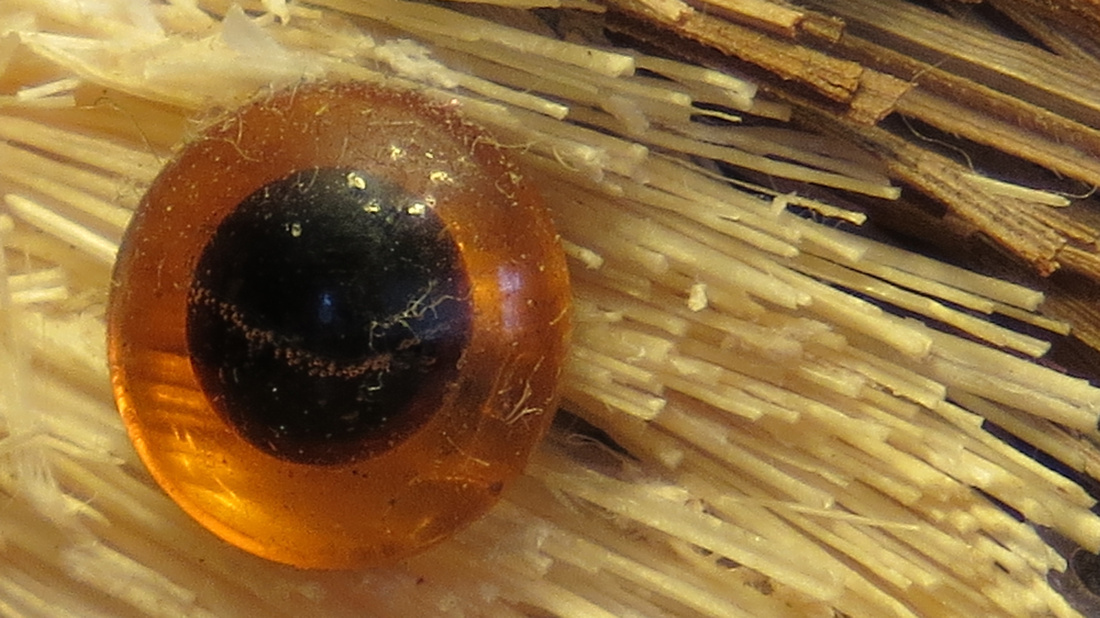
Since it's flu season and that bug caught me this week, our subject today is not alive. No, I wasn't trying to photograph that bug, but that's an idea. Like in the prior article's indoor low light tests, this subject was chosen for its textures and details and even the eye is an important component. The flat lighting is an integral part of the test to eliminate the visual effect high contrast has on the perception of acuity. The actual details are what you see. Here is today's subject:
 

80 121207_0355_SX50 Close-up tests base image80 121207_0355_SX50 Close-up tests base imageTo return to the SX50 Review - Part 4, click the link
http://edwardmichaellach.zenfolio.com/blog/2016/4/canon-sx50-review-part-4-different-paths-to-up-close-and-personal
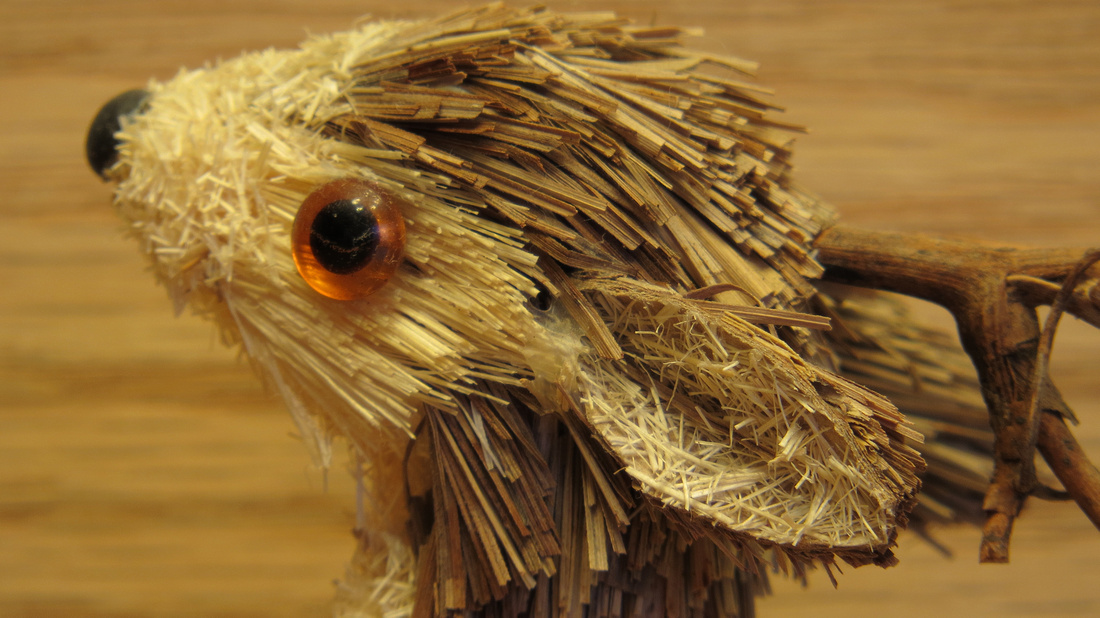
We will be getting up close and personal with this 5" high by 3½" wide very textured and detailed figurine.
 

Getting Close on the Short Side of the Zoom
 

With the lens set to 24mm in macro mode, the SX50 will focus on an object at 0.0 inch from the lens. In non-macro mode, it's 1.9 inches. At 25mm, macro mode also jumps to a 1.9 inch focus distance. Out to 160mm, macro mode focuses at various minimum to maximum ranges and will not go to infinity. The maximum macro mode focus distance range is 11.8-19.6 inches with the lens set between 105mm and 160mm. After that, macro mode has no effect. After 0.0 at 24mm, the SX40 has a single macro range of 11.8-19.6 inches with the lens set between 25mm and 140mm. Viewing the ranges displayed on the LCD, it appears the minimum/maximum focus distances at the longer focal lengths of the SX50 are measured from the sensor, not the lens. Measuring from the focused subject back to the camera puts the sensor under the "PowerShot SX50" badge just behind the pop-up flash.
 

Now 0.0 inches at 24mm may sound exciting for macro work, but it has its challenges besides properly cleaning the lens afterwards. First, the 84° diagonal view means that the smallest scene that can be captured is only 43mm (1¾") across. Not too bad, but the very wide angle distorts the image as wide angles usually do. And lighting an object or scene touching the glass is near impossible. If the subject is alive as well, better hope it doesn't bite. Here's an example photographed ¼" from the front element of the lens:
 

81 121207_0361_SX50 24mm Macro Mode one quarter inch from lens81 121207_0361_SX50 24mm Macro Mode one quarter inch from lensTo return to the SX50 Review - Part 4, click the link
http://edwardmichaellach.zenfolio.com/blog/2016/4/canon-sx50-review-part-4-different-paths-to-up-close-and-personal
SX50 in Macro Mode set to 24mm from only ¼ inch in front of the lens. Unless stated, all images of the test subject are straight out of camera (SOOC). Even as a macro shot, I do not find this image pleasing.
 

Now shooting right at the glass may have some use for some subjects, but none come to my mind. Even a transparent flat subject will still be distorted. The subject's eye in this example may have some interest for some people, but we'll explore other options for that kind of detail in a while. I am not very excited about using this feature of the camera. A better idea to get about the same horizontal field of view at 0.0 inch at 24mm is to back up to six inches from the sensor and zoom out to 100mm. The result will be an image with better lighting and texture and a more natural perspective:
 

81 A 121212_0388_SX50 95mm Macro Mode 6 inchs from sensor81 A 121212_0388_SX50 95mm Macro Mode 6 inchs from sensorTo return to the SX50 Review - Part 4, click the link
http://edwardmichaellach.zenfolio.com/blog/2016/4/canon-sx50-review-part-4-different-paths-to-up-close-and-personal
The same image photographed with the lens set to 95mm from six inches away in macro mode gives as much overall detail but with a better perspective in about the same field of view.
 

Getting Close on the Long Side of the Zoom
 

If our subject was alive, photographing at only 11.8 inches to 19.6 inches from the sensor at a160mm focal length would probably scare it off and we would lose the shot. Here is where the SX50’s close focus distance of 4.2 feet at 1200mm really comes in handy for "macro" work. It may not be as close as the macro mode at 160mm, but is more comfortable for the world of tiny living things. 1200mm is the setting for our first long zoom example giving a horizontal field of view of 2¾ inches:
 

82 121207_0299_SX50 1200mm at 4.2 feet from lens82 121207_0299_SX50 1200mm at 4.2 feet from lensTo return to the SX50 Review - Part 4, click the link
http://edwardmichaellach.zenfolio.com/blog/2016/4/canon-sx50-review-part-4-different-paths-to-up-close-and-personal
The SX50 at 1200mm optical zoom from 4.2 feet gives a horizontal field of view of 2¾ inches.
 

But suppose we want to get closer to the 160mm's field of view and stay four feet away. The SX50 has the answer, like the SX40 before it, by turning on the internal 1.5 teleconverter (TC). The result is a 1¾" field of view. OK, it's a digital TC, not optical, and even optical TCs have compromises. So what are we giving up. The images used in these articles are, unless noted, straight out of camera (SOOC) and posted at original size. In this way you can explore comparisons for yourself. While many of the images I post on this forum have hidden copyrights which are also noted in the EXIFs, I have no problem with anyone downloading comparative tests for their own use. Feel free. But let's look at them together right now. Here is the SX50's 1800mm 1.5TC SOOC image taken from the closest focus distance of 4.2 feet:
 

83 121207_0302_SX50 1800mm with TC15 at 4.2 feet from lens83 121207_0302_SX50 1800mm with TC15 at 4.2 feet from lensTo return to the SX50 Review - Part 4, click the link
http://edwardmichaellach.zenfolio.com/blog/2016/4/canon-sx50-review-part-4-different-paths-to-up-close-and-personal
The SX50 at 1800mm with Digital 1.5 Teleconverter from 4.2 feet gives a horizontal field of view of 1¾ inches.
 

Looking at this example full screen on an full HD monitor produces a very detailed image with a perspective a bit flatter than the 160mm image, but not detrimental. Depth of field is also a bit narrower, even at the smaller f-stop, but again not detrimental. A very good image so far, until one looks closer. At 100%, the difference in fine detail becomes apparent, giving overall lesser sharpness and contrast using the TC. But when photographing the subject instead of scaring it away counts (and doesn't it always), TC from 4.2 feet is a great tool for telemacros. The Superfine images from the SX50 are also very workable in post, so the SOOC details can be further enhanced for a better presentation. Following is the image from above post processed with light noise reduction (which should always be the first step in post when necessary), a boost to both fine and medium details, and a levels reduction to 3-253:
 

83 pp 121207_0302_SX50 1800mm with TC15 post processed83 pp 121207_0302_SX50 1800mm with TC15 post processedTo return to the SX50 Review - Part 4, click the link
http://edwardmichaellach.zenfolio.com/blog/2016/4/canon-sx50-review-part-4-different-paths-to-up-close-and-personal
The image above this one is post processed here with light noise reduction, boost to both fine and medium details, and a minor levels reduction.
 

Another choice to get to a 1¾" field of view is to crop the 1200mm image. After testing, my observations on taking this course of action are that it depends more on one's post processing skills then on the SX50. All of the comparative images for this article were taken three or four times and the "best" image chosen from each set. It was usually a difficult choice as the SX50 operated very consistently. In cropping the "best" 1200mm image and comparing it to the "best" 1800mm TC image, I found little consistent noticeable differences at 400%. One element of one image may have been sharper than in the other image, but the reverse would be true for a different element. At this magnification, using the 1.5 TC or cropping 1200mm is user's choice. Here is the cropped SOOC image, followed by the same image post processed as above:
 

85 121207_0299_SX50 1200mm crop to 1800mm85 121207_0299_SX50 1200mm crop to 1800mmTo return to the SX50 Review - Part 4, click the link
http://edwardmichaellach.zenfolio.com/blog/2016/4/canon-sx50-review-part-4-different-paths-to-up-close-and-personal
This is the 1200mm optical image cropped to show the same field of view when using the 1.5 TC at 1800mm. In the crop, horizontal total pixels are maintained at 4000 and 180 ppi as in the original.
 

85 pp 121207_0299_SX50 1200mm crop to 1800mm post processed85 pp 121207_0299_SX50 1200mm crop to 1800mm post processedTo return to the SX50 Review - Part 4, click the link
http://edwardmichaellach.zenfolio.com/blog/2016/4/canon-sx50-review-part-4-different-paths-to-up-close-and-personal
The same post processing was applied here to the crop image right above it as was applied to the prior 1.5 TC image further up.
 

Of course, if we want to get an even higher magnification from 4.2 feet, we can increase the TC to 2.0 for a 1 3/8" field of view at 2400mm. Once again, we can also crop the 1200mm image to this level. The difference this time is that at 400%, I saw more consistent clarity across the field in the 2400mm 2.0 TC image. Not a great deal of difference from the cropped image, but enough to make the 2.0 TC my preference at this level. Here are the images for your own review, first at 2400mm 2.0 TC SOOC followed by the 1200mm crop to 2400mm with no additional post:
 

86 121207_0308_SX50 2400mm with TC20 at 4.2 feet from lens86 121207_0308_SX50 2400mm with TC20 at 4.2 feet from lensTo return to the SX50 Review - Part 4, click the link
http://edwardmichaellach.zenfolio.com/blog/2016/4/canon-sx50-review-part-4-different-paths-to-up-close-and-personal
The SX50 at 2400mm with Digital 2.0 TC from 4.2 feet gives a horizontal field of view of 1 3/8 inches.
 

88 121207_0299_SX50 1200mm crop to 2400mm88 121207_0299_SX50 1200mm crop to 2400mmTo return to the SX50 Review - Part 4, click the link
http://edwardmichaellach.zenfolio.com/blog/2016/4/canon-sx50-review-part-4-different-paths-to-up-close-and-personal
This is a crop of the 1200mm optical image to show the same field of view as when using the 2.0 TC at 2400mm.
 

Again in the crop, horizontal total pixels are maintained at 4000 and 180 ppi as in the original. I find more consistent clarity and detail in the 2.0 TC image above it over this cropped image.
 

In camera, the SX50 can go even closer to true macro performance from 4.2 feet by using the Digital Zoom. It can go to an equivalent of 4800mm and a horizontal field of view of 11/16". This is now down to about a 1:2.7 macro ratio on the 1/2.3 sensor, quite a feat for a P&S. Here is the SOOC image at 4800mm Digital Zoom. Yes it is soft, but when need be, added post can make it rather usable. There is no crop shown from the 1200mm optical image to 4800mm. With my best post processing efforts, anything I could come up with was only just short of mush.
 

89 121210_0367_SX50 4800mm with 200x Digital Zoom at 4.2 feet from lens89 121210_0367_SX50 4800mm with 200x Digital Zoom at 4.2 feet from lensTo return to the SX50 Review - Part 4, click the link
http://edwardmichaellach.zenfolio.com/blog/2016/4/canon-sx50-review-part-4-different-paths-to-up-close-and-personal
The SX50 at 4800mm with full Digital Zoom from 4.2 feet gives a horizontal field of view of 11/16 inch. A crop of the 1200mm image to this level is not shown because it gives a mushy presentation.
 

Further Exploration of Digital Zoom
 

At the beginning of this article, I raised a topic related to the digital zoom needing to be addressed. With the SX40, I used the Digital TCs often and placed access to them on the "S" button. I did likewise with my SX50. And I never used the Digital Zoom. I had this idea that the digital TCs had some "special sauce" that made them work better in all circumstances compared to the digital zoom. Now according to Canon, additional stabilization is employed when using the TCs, so this may be the "special sauce" when handheld. Digital zoom makes no mention of this additional stabilization. But what about when used on a tripod? I decided to test for any difference. For every set of images taken above with the 1.5 and 2.0 TC, without moving the camera I immediately followed with the exact same set of images with the digital zoom set to the same magnifications. I also took out my SX40 and performed the same test, three pictures in each set at each magnification. Both cameras were tripod mounted for this article. What followed was a surprise. For both cameras at both 1.5 and 2.0, choosing the "best" image from each set, I could not tell which image was from the TC and which was with the Digital Zoom. In all cases, they were equal. So when tripod mounted, I will be changing my camera settings to include Digital Zoom more often now to refine my in-camera compositions beyond 1200mm. I'll of course have to do further tests for hand held situations. But a new world has opened up on the tripod. A year later and I'm still learning new things about these versatile little cameras.
 

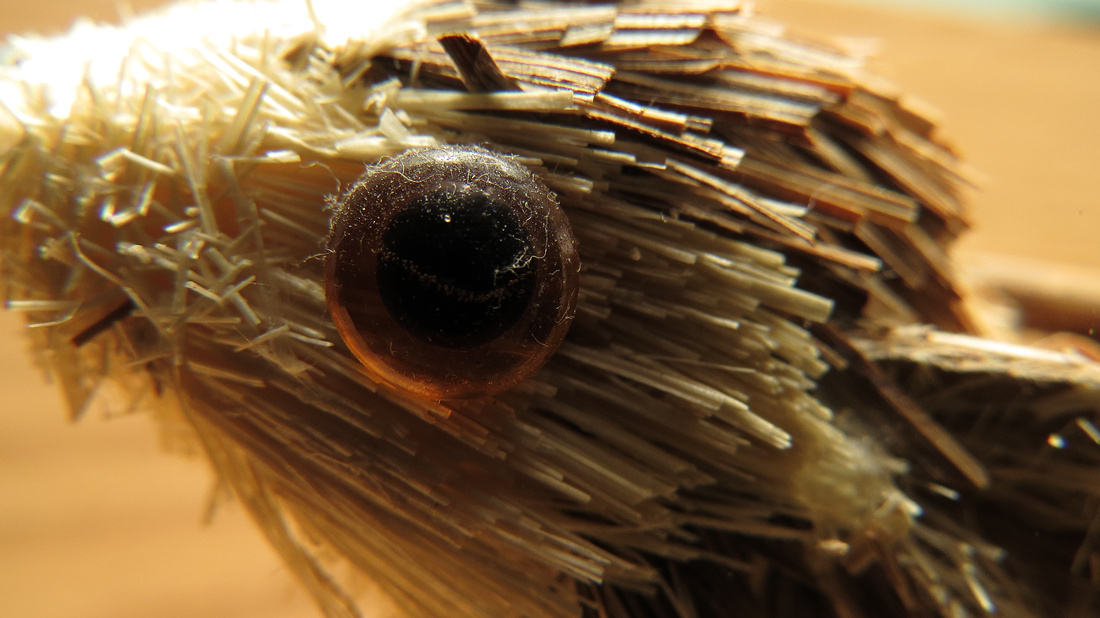
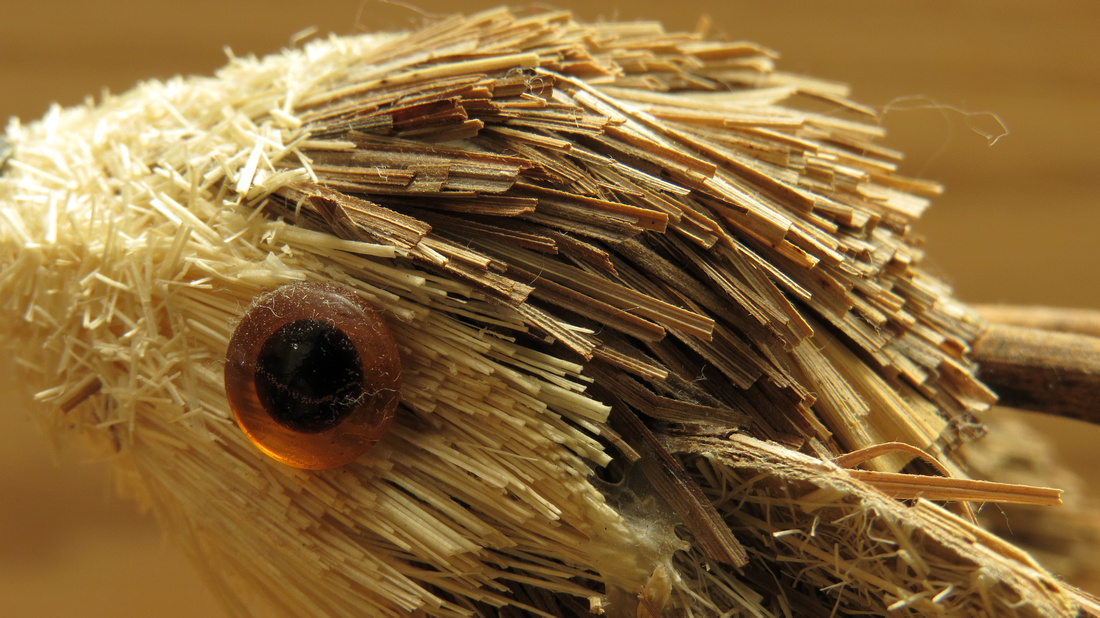
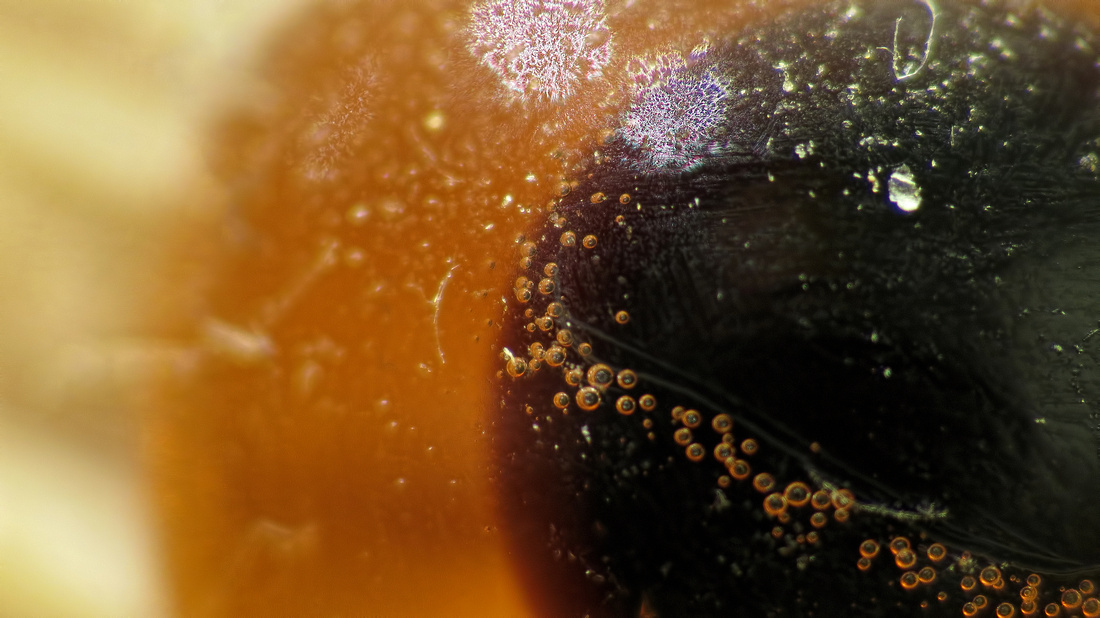
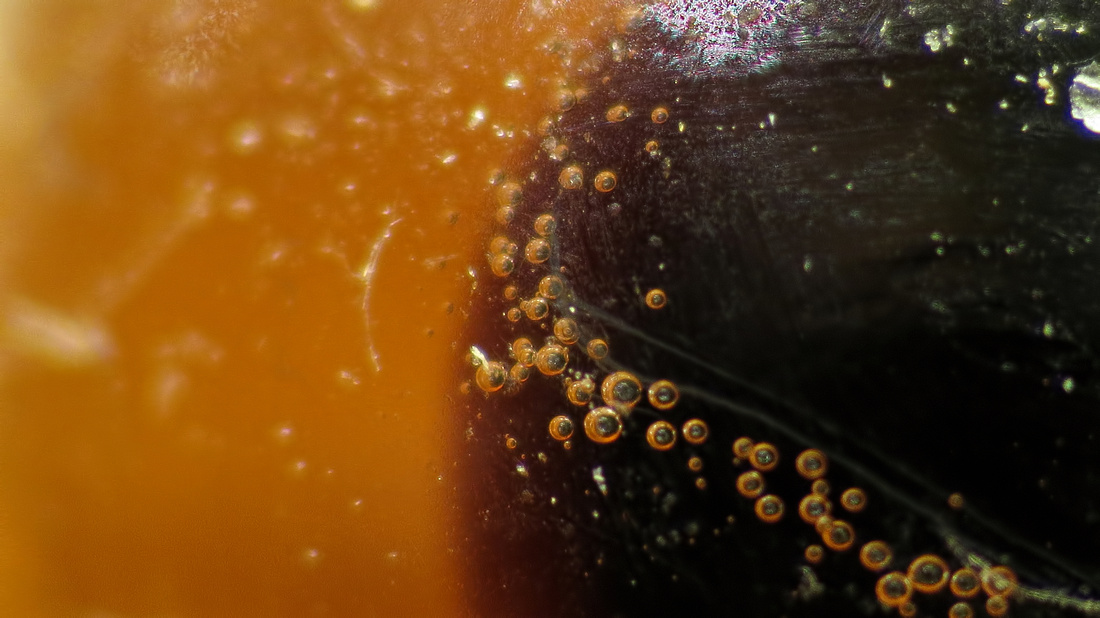
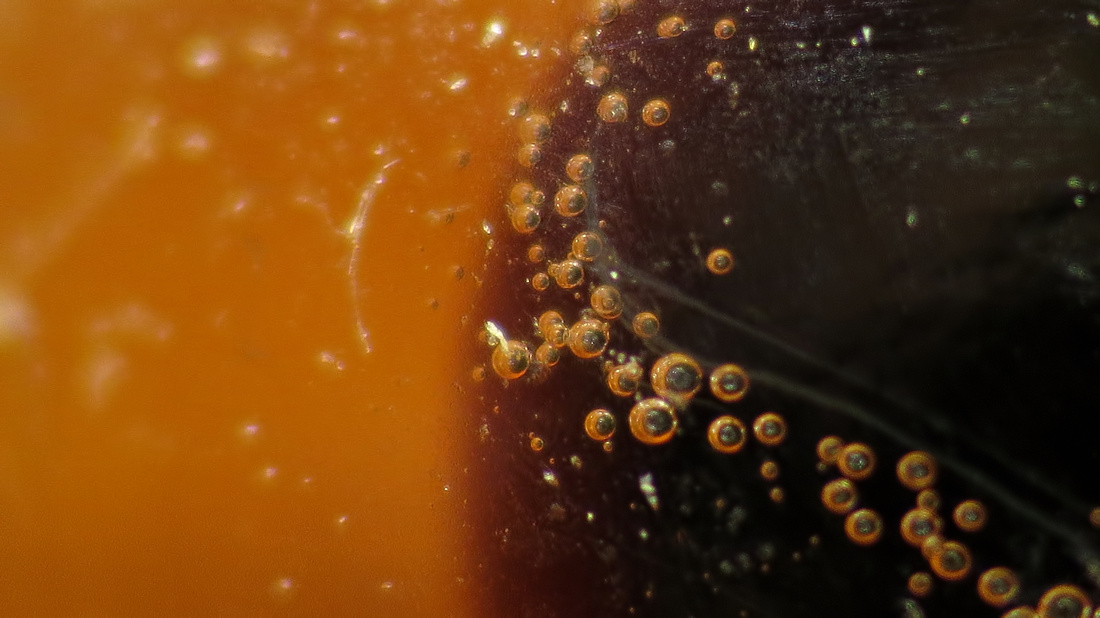
Can We Break the 1:1 Macro Barrier?
 

Easily, but not without help from an auxiliary lens. In my recent fun thread "SX50 Captures Other Worldly Creatures Trying to Escape the Event Horizon of a Black Hole", I posted the following three images. As you may have now figured out, they are from the eye of today's macro subject figurine. The light was at just the right angle to reflect back an image of the eye in each of the air bubbles.
 

93 121207_0340_SX50_RAYNOX250 1200mm at 4 inchs from lens93 121207_0340_SX50_RAYNOX250 1200mm at 4 inchs from lensTo return to the SX50 Review - Part 4, click the link
http://edwardmichaellach.zenfolio.com/blog/2016/4/canon-sx50-review-part-4-different-paths-to-up-close-and-personal
"SX50 Captures Other Worldly Creatures Trying to Escape the Event Horizon of a Black Hole" uncropped but with some help at 1200mm.
 

94 121207_0346_SX50_RAYNOX250 1800mm at 4 inchs from lens94 121207_0346_SX50_RAYNOX250 1800mm at 4 inchs from lensTo return to the SX50 Review - Part 4, click the link
http://edwardmichaellach.zenfolio.com/blog/2016/4/canon-sx50-review-part-4-different-paths-to-up-close-and-personal
"SX50 Captures Other Worldly Creatures Trying to Escape the Event Horizon of a Black Hole" uncropped but with some help at 1800mm 1.5TC.
 

95 121207_0348_SX50_RAYNOX250 2400mm at 4 inchs from lens95 121207_0348_SX50_RAYNOX250 2400mm at 4 inchs from lensTo return to the SX50 Review - Part 4, click the link
http://edwardmichaellach.zenfolio.com/blog/2016/4/canon-sx50-review-part-4-different-paths-to-up-close-and-personal
"SX50 Captures Other Worldly Creatures Trying to Escape the Event Horizon of a Black Hole" uncropped but with some help at 2400mm 2.0 TC.
 

So how was this possible? The secret is that I attached my newly acquired Raynox250 macro lens to the front of the SX50. The images were my first tests of the lens and taken at 1200mm, 1800mm 1.5 TC and 2400mm 2.0 TC. I had not perfected its use yet and the 2400mm 2.0 TC image gave a 4 millimeter field of view, not less. But I was having fun (I know, especially with the thread title), and had broken the 1:1 true macro barrier by going to 1.5:1.
 

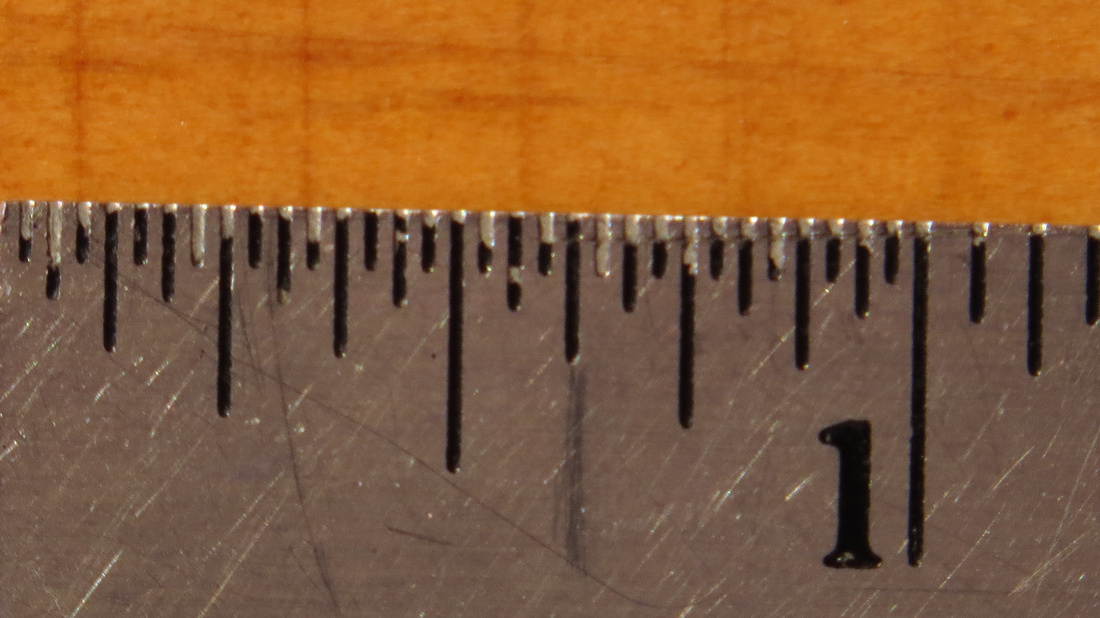
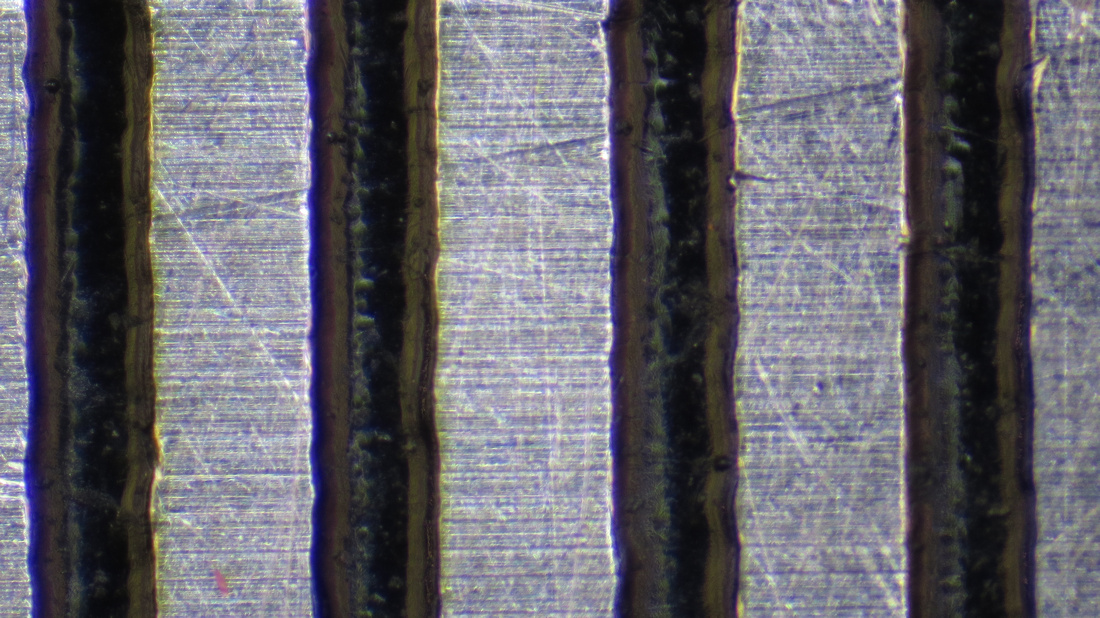
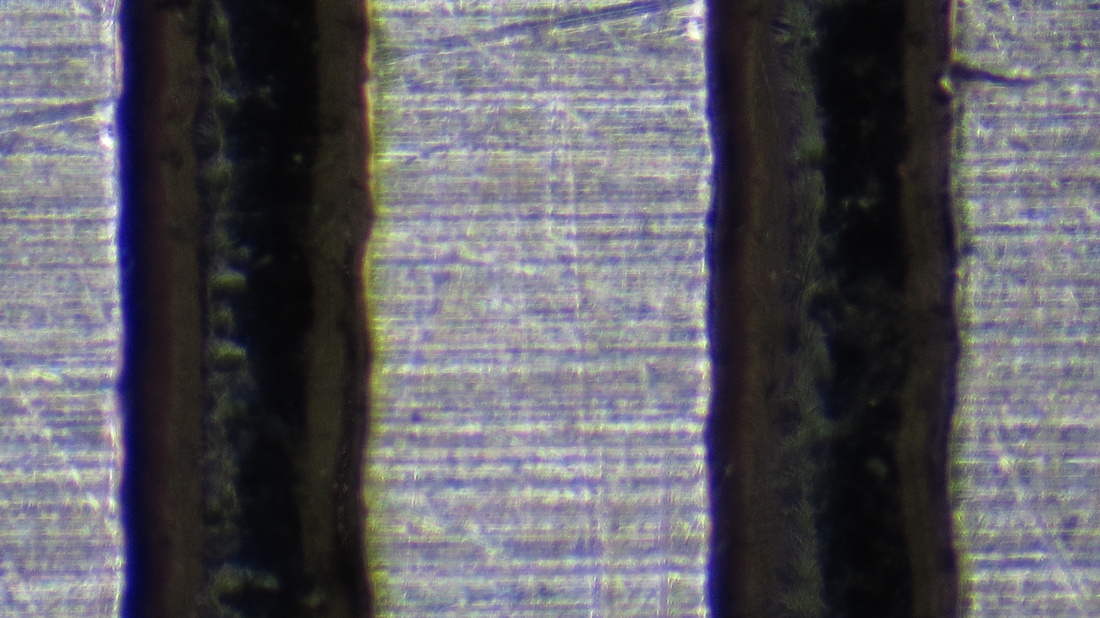
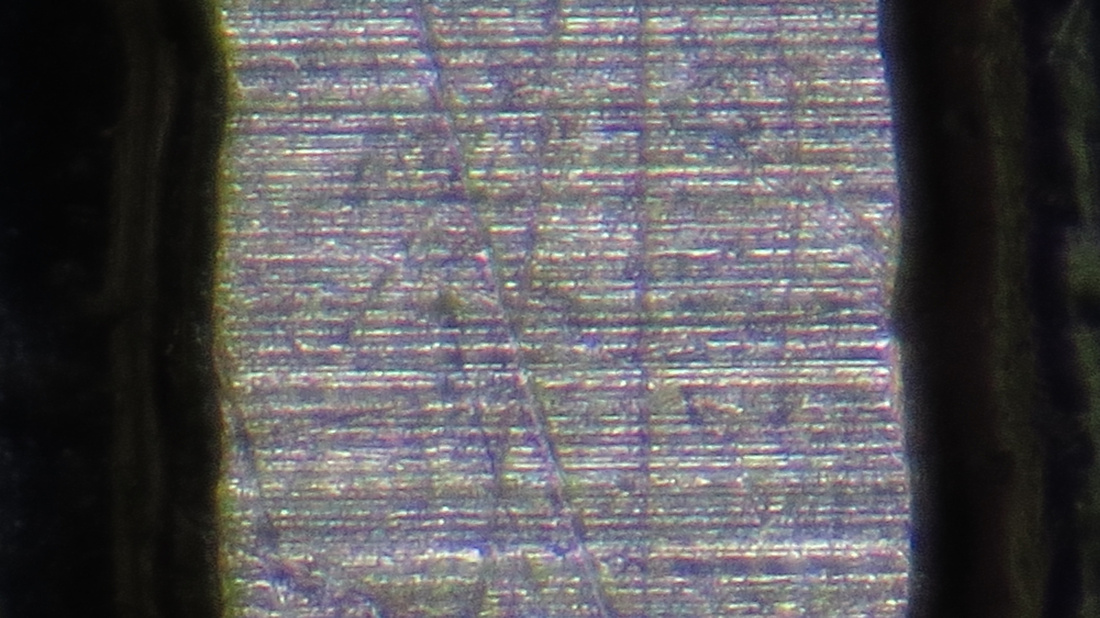
But now I've had some practice with the Raynox250 lens and found out that the best results not only come at the highest zoom on the SX50, but also at the (manual) infinity focus setting. My new subject is the millimeter markings on the ruler I've used for my tests here (the fractional inch settings were shown in Part 1 of this series). At a distance of 4¼" from the lens, I was able to take the following images at 1200mm optical, 2400mm 2.0 TC and 4800mm Digital Zoom. The resultant horizontal fields of view are 3.76 mm, 1.87 mm and .94 mm. The macro factor on the last image is 6:1 on the 1/2.3 sensor. While the acuity from the 4800mm image is lacking, there is enough to be able to calculate that the horizontal scratch pattern on the stainless steel ruler has an average width of 9 microns from ridge to ridge. We are near leaving the world of macro photography and entering microphotography. With a P&S camera no less.
 

96 121211_0368_SX50_RAYNOX250 millimeter scale 1200mm at closest focus distance96 121211_0368_SX50_RAYNOX250 millimeter scale 1200mm at closest focus distanceTo return to the SX50 Review - Part 4, click the link
http://edwardmichaellach.zenfolio.com/blog/2016/4/canon-sx50-review-part-4-different-paths-to-up-close-and-personal
This uncropped image shows the millimeter markings on a stainless steel ruler, giving a total horizontal field of view of 3.76mm. The SX50 at 1200mm optical is coupled with the RAYNOX250 macro lens.
 

97 121211_0372_SX50_RAYNOX250 millimeter scale 2400mm at closest focus distance97 121211_0372_SX50_RAYNOX250 millimeter scale 2400mm at closest focus distanceTo return to the SX50 Review - Part 4, click the link
http://edwardmichaellach.zenfolio.com/blog/2016/4/canon-sx50-review-part-4-different-paths-to-up-close-and-personal
Increasing the SX50 focal length to 2400mm with the 2.0 TC and the RAYNOX250 give a field of view of 1.87mm.
 

98 121211_0375_SX50_RAYNOX250 millimeter scale with 9 micron horizontal ridges 4800mm at closest focus distance98 121211_0375_SX50_RAYNOX250 millimeter scale with 9 micron horizontal ridges 4800mm at closest focus distanceTo return to the SX50 Review - Part 4, click the link
http://edwardmichaellach.zenfolio.com/blog/2016/4/canon-sx50-review-part-4-different-paths-to-up-close-and-personal
Closer still at 4800mm with the SX50's full Digital Zoom and the RAYNOX250, the horizontal field of view is now only .94 millimeter for a macro ratio of 6:1.
 

Without remotely coupling my SX50 to a laptop to view and photograph tiny little creatures without scaring them away from 4¼", this will be a challenge with the SX50/RAYNOX combination. Not that I won't try to figure something out. But maybe I will be able to challenge my spidermite image taken with my Canon 5D which I adapted to an old FL bellows with a Canon FD 50mm Macro lens attached:
 

060207_0499_5D_FL Bellows Spidermites on Rosemary
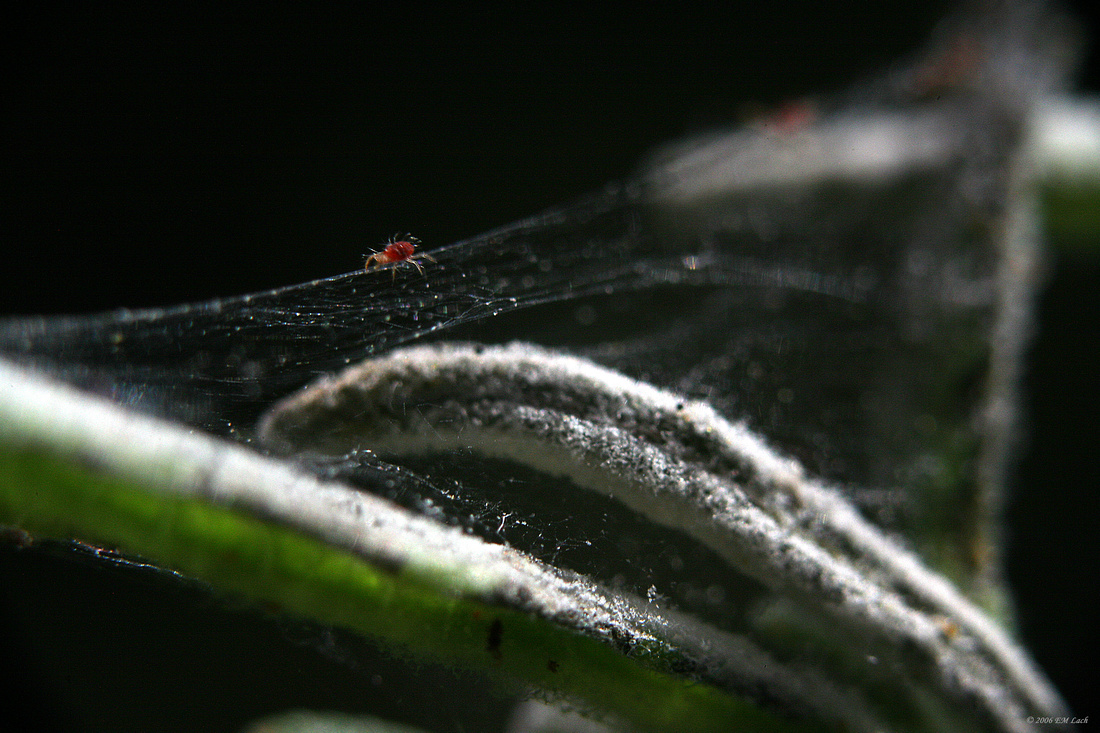
060207_0499_5D_FL Bellows Spidermites on RosemaryTo return to the SX50 Review - Part 4, click the link
http://edwardmichaellach.zenfolio.com/blog/2016/4/canon-sx50-review-part-4-different-paths-to-up-close-and-personal
This uncropped image from my 5D adapted to an old Canon FL Bellows shows a field of view of 9mm by 6mm of spidermites racing along their web. Their speed is so fast that precise shutter delay affects the image. Trying to recreate it with the SX50/RAYNOX could be a worthy challenge.
 

The Bottom Line:
 

I hope you have enjoyed our search for paths to up close and personal with the SX50 (or SX40) camera and found useful information to assist in your own macro photography. This is the last article I planned in this series. Now it's time to go out and create new, fun and hopefully artistic images with my SX50 and possibly find other new features to explore.
 

So, what's the bottom line on the SX50, especially compared to its older sibling, the SX40? Both cameras are very versatile with a tremendous array of features. They can be set up to aim, zoom, shoot and let the processors react to what you are photographing with very good results for many people. And, if you're like me, they can also be set up so the photographer can control any part or every part of the entire process. As a tech person, I worked in the early days of developing and writing AI software. And yet it still amazes me what current technology in these cameras is capable of. But before being a tech, I was a photographer. In doing this I learned about the nuances of light and composition and how slight changes in camera technique can mean the difference between an image with vision or just a nice snapshot. Since photography for me is now mostly for fun and for teaching, more and more I use the automated features of these cameras and they can work very well (though I still haven't broken down and used full AUTO mode on any camera - I'll get there). But when I need to catch just that right light at just the right moment, I appreciate having all the controls right at my fingertips. All are easy to get to, most times even without having to take my eye away from the EVF.
 

Now the sensors on these cameras are small. Currently there's no getting around that in a package this size with a long zoom. Some people will be fine with that and some will not. I am constantly asked by people what camera to get and the first thing I always ask is what do they intend to use it for. I do not yet talk about what size camera or brand, just how they intend to use the final output. And of course what size is their budget. If they talk about viewing output on computer or TV screens or for web use, and maybe some 4x6 to even 11x14 prints, I have no problem recommending these small sensor cameras. I also let them know that the larger the print, the better they will have to be with learning camera technique. But if they start talking about larger prints with wide range and minute detail, the conversation certainly goes a different way. But most people these days are in the first group, so in the vast majority of cases the small sensors give highly useful results. If someone is in the second group, he or she will not be happy with any of these small sensors too high a percentage of the time. Now the differences in results between Canon's small sensor technology and other brands' can be discussed and opinions will be many. But for all the variances both in favor or against one vendor or the other, those variances become less and less apparent in the end results for the people above who would be happy with these cameras. Ease of use, portability and features tend to carry much more importance. And with practice and good technique, a lot can be pulled from these little sensors.
 

Now to the SX50 versus the SX40. If you're looking for great big changes that shout "take the SX50" and leave the SX40 behind, then you will be disappointed. But the SX50 is a true evolution of the camera in which everything is changed just enough to make it interesting. Yes it has the same sensor and same processor, but the software that runs them has been much more refined. Focus speed has been improved and exposure controls have been expanded. A little new feature here and a little improvement there. And of course there's that 1200mm zoom. And raw files if you're a fan.
 

I can understand that some people have returned their SX50 because they felt it was no better than the SX40 they already had. For some that's valid, but others I feel just didn't take the time to figure out how those changes make the camera a little easier and quicker to use. Are the final pictures better because of these changes? Under some conditions, actually yes; in others, no. But they may be better because the new features helped to capture them in the first place. The SX40 is in no way an inferior camera to its new sibling. I still love it and use it along with the SX50. If you don't already have the SX40, then I'd call the SX50 a no brainer when choosing between the two. If you're thinking of upgrading, that's a harder choice. That's one of the reasons I've written these review articles comparing the two cameras. I've been looking for all those differences, laying them out and telling it like I see it. The rest is up to you to decide which one may suit your needs better. They're both wonderfull, versatile and fun P&S cameras.
 

SX50 Not a Review - Time to take some pictures
 

My review was over and it was time to see what I have learned while doing them, both from the tests and from your discussions that followed. It was time to take out the camera and try to capture some images for their own sake. I did not want to be thinking about the camera anymore, just attempting to capture light and texture and details and hopefully together something worthwhile. My main focus lately, other than wildlife, has been landscapes, both near and far, both miniature and grand. There are many moods that nature shows and it becomes a challenge to try to understand them and try to present them to others. In winter many people put down their cameras, but I think it's more of a time for imagination to try to meet that challenge. So my SX50 and I went down the ridge to the lake to give it a try. First will be the scenics, but then some wildlife. All images were taken handheld and, except for the last one, are uncropped straight from the camera. All have had some post to attempt to bring out the vision I saw in my mind's eye at the time of exposure.
 

First, here are the landscapes:
 

121214_0414_SX50 Grasses in the Setting Sun at Rockefeller Preserve
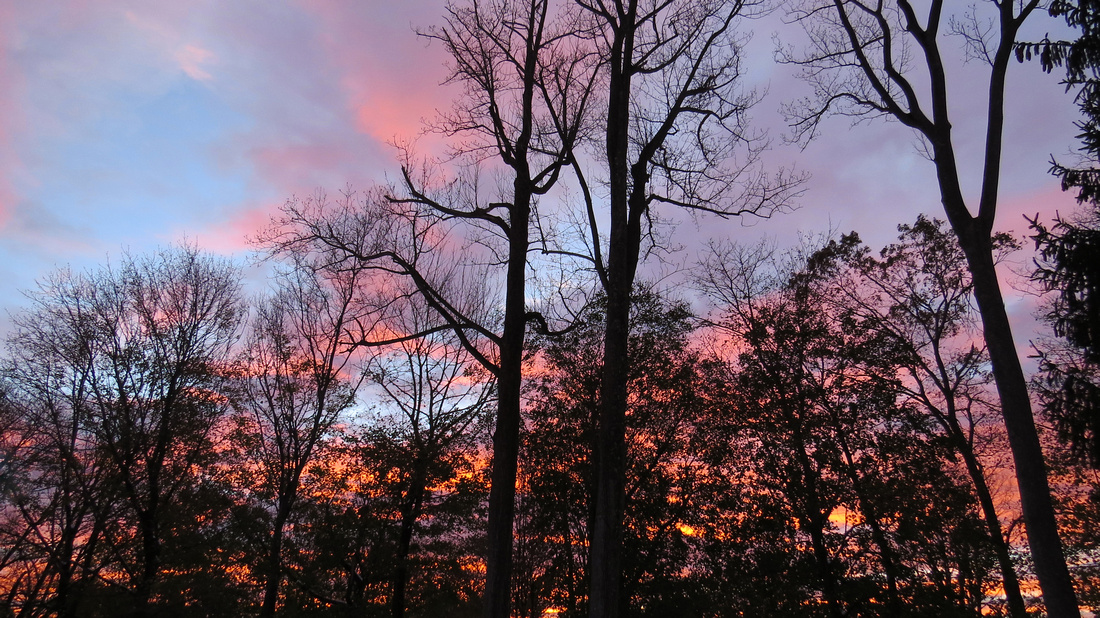
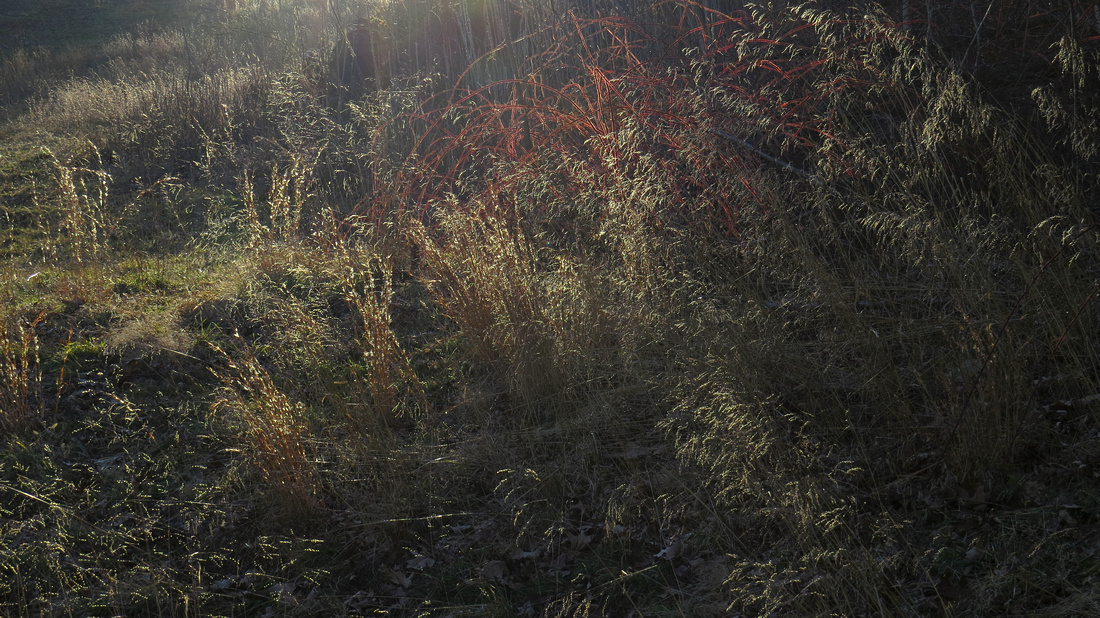
121214_0414_SX50 Grasses in the Setting Sun at Rockefeller PreserveTo return to the SX50 Review - Part 4, click the link
http://edwardmichaellach.zenfolio.com/blog/2016/4/canon-sx50-review-part-4-different-paths-to-up-close-and-personal
As I turned into the light, the grasses were a cacophony of bright highlights and somber shadows, of nuanced colors and shifting movements. I knew the exposure needed to be perfect to capture the many moods of this snippet of nature in the glare of the oncoming sun.
 

121214_0420_SX50 Swan Lake at Rockefeller Preserve
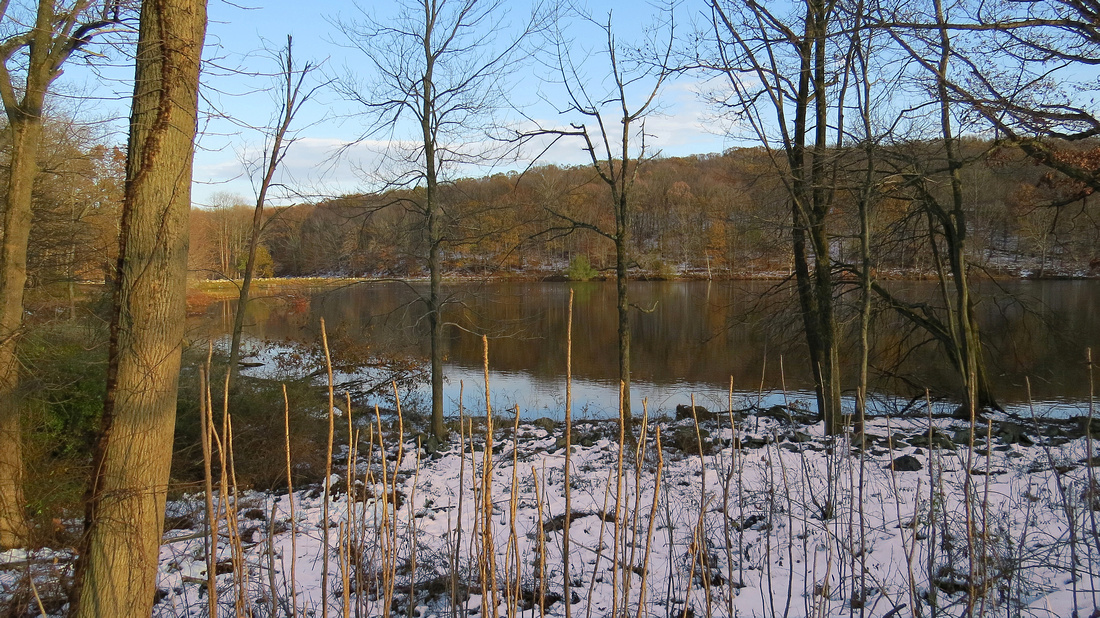
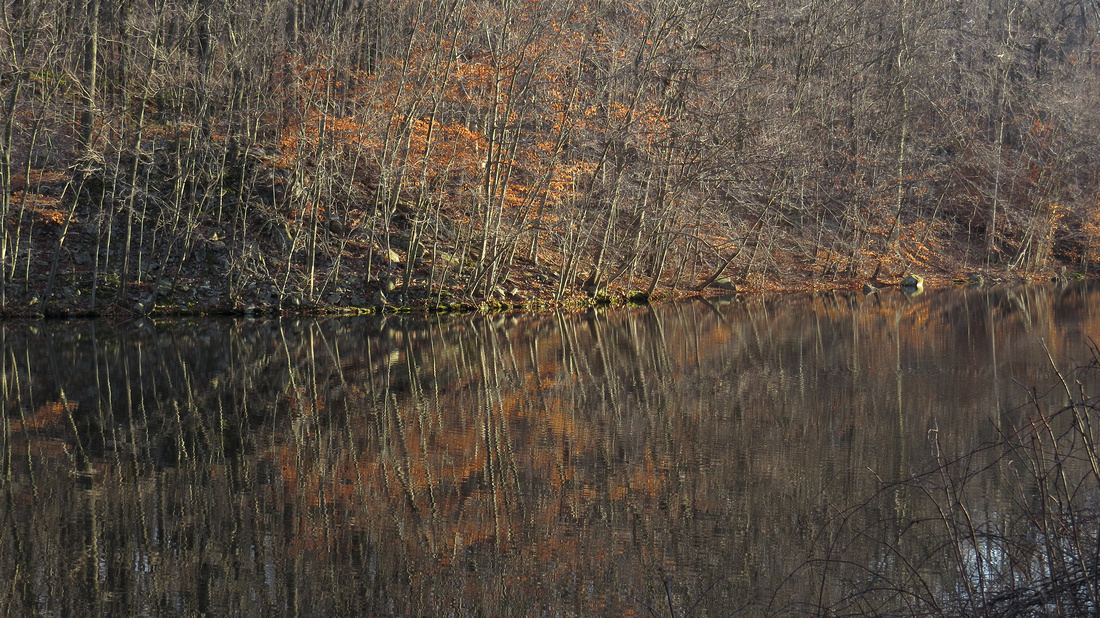
121214_0420_SX50 Swan Lake at Rockefeller PreserveTo return to the SX50 Review - Part 4, click the link
http://edwardmichaellach.zenfolio.com/blog/2016/4/canon-sx50-review-part-4-different-paths-to-up-close-and-personal
What were once bright royal reds continued to proudly hold on as they aged in the fade of late fall into winter, reflecting stark contrast in the bright low sun against the monochromatic details of the forest.
 

121214_0418_SX50 Swan Lake at Rockefeller Preserve
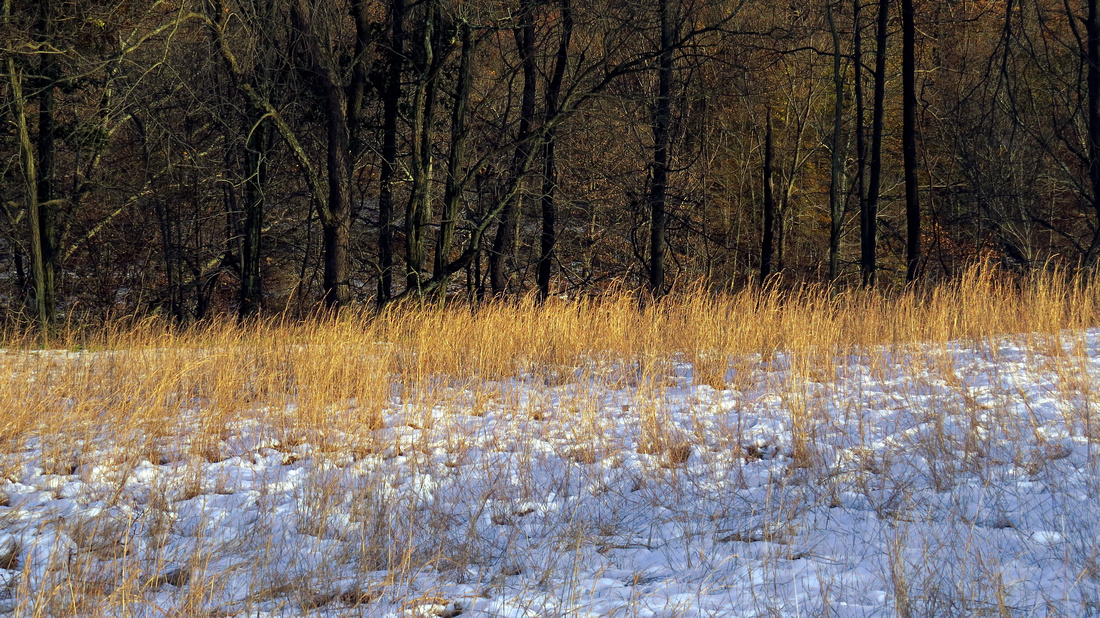
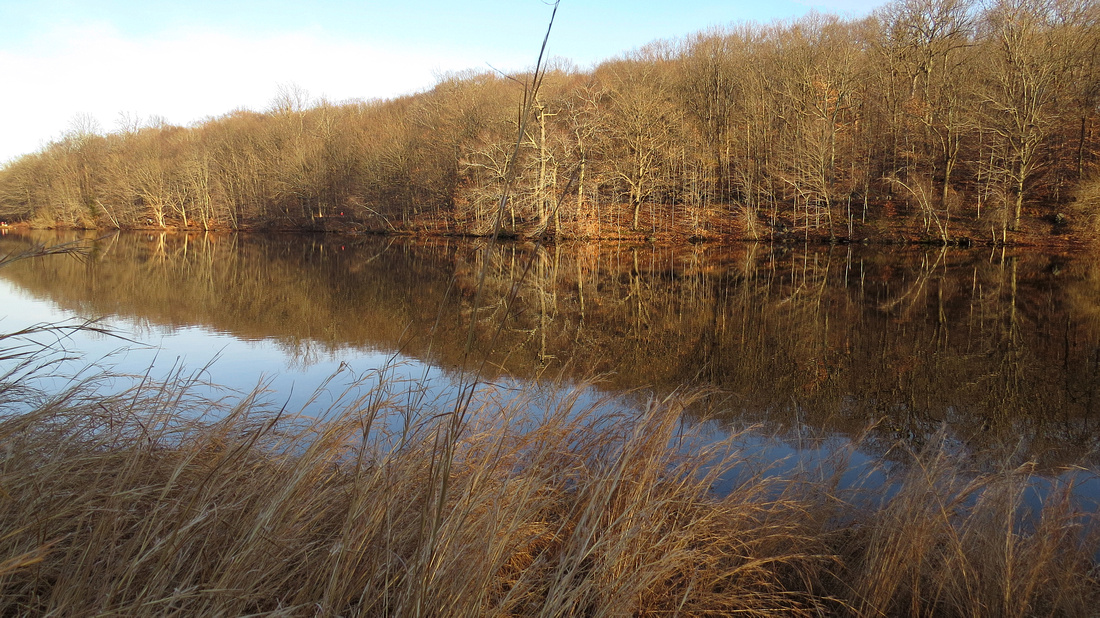
121214_0418_SX50 Swan Lake at Rockefeller PreserveTo return to the SX50 Review - Part 4, click the link
http://edwardmichaellach.zenfolio.com/blog/2016/4/canon-sx50-review-part-4-different-paths-to-up-close-and-personal
The warmth from the low sun under almost cloudless skies lit up this traditional landscape, lending texture to the bright details dancing among the shadows and giving life to a tranquil scenic.
 

And now some wildlife:
 

121214_0390_SX50 Young Buck at Sundown in Rockefeller Preserve
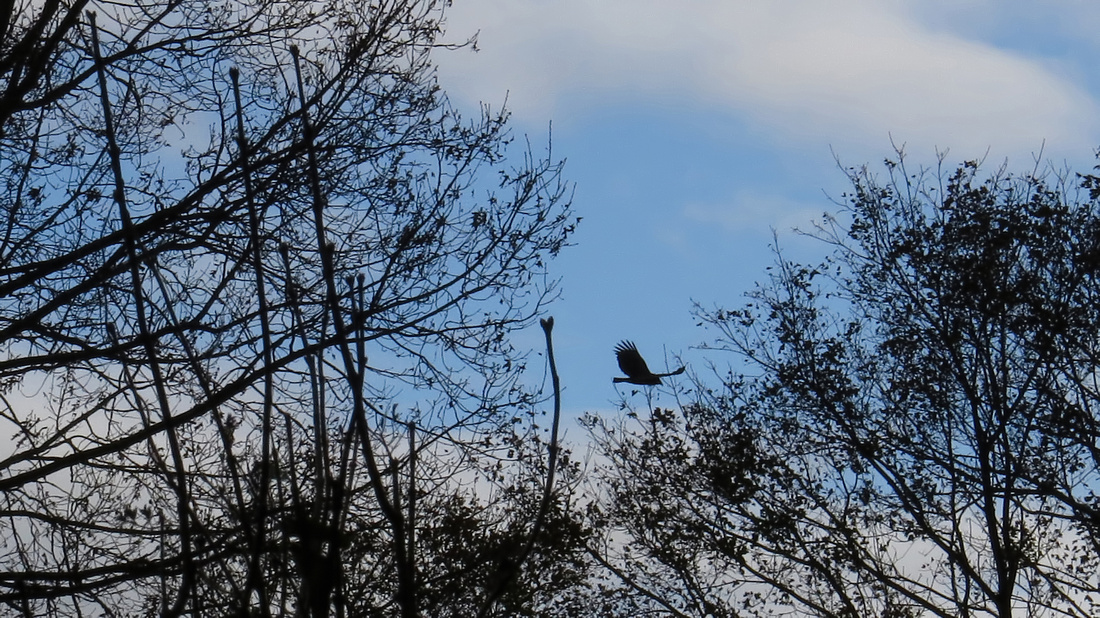
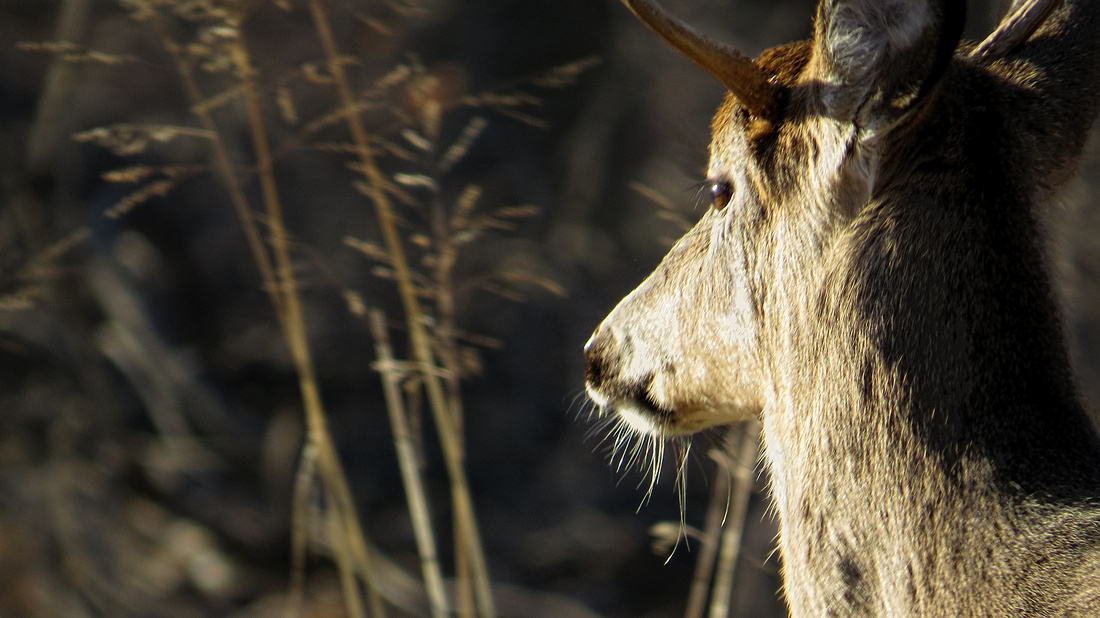
121214_0390_SX50 Young Buck at Sundown in Rockefeller PreserveTo return to the SX50 Review - Part 4, click the link
http://edwardmichaellach.zenfolio.com/blog/2016/4/canon-sx50-review-part-4-different-paths-to-up-close-and-personal
This young buck was wary of me as I followed it foraging in the woods and it kept trotting away from me. As it broke into the bright light of the field, I was moving at the same pace while tracking it through the long zoom. As this image appeared in the EVF, I snapped and hoped I had caught it the way I saw it. I stopped to take a breath, looked at the LCD review, and was happy.
 

121214_0404_SX50 Young Buck Feeding at Rockefeller Preserve
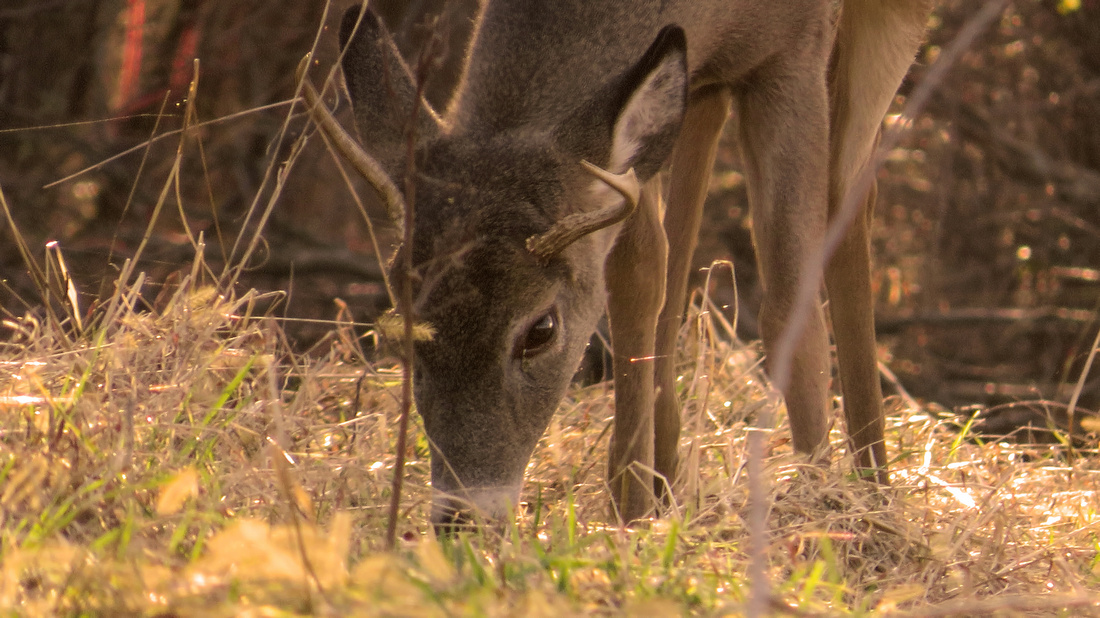
121214_0404_SX50 Young Buck Feeding at Rockefeller PreserveTo return to the SX50 Review - Part 4, click the link
http://edwardmichaellach.zenfolio.com/blog/2016/4/canon-sx50-review-part-4-different-paths-to-up-close-and-personal
The young buck finally stopped to forage in the speckled light at the edge of the woods far away from me. Passing hikers wondered what I was aiming at and were amazed to see the deer in the viewfinder that they didn't otherwise notice in the distance. This gave me the chance to capture this more tranquil scene in the warm sunlight.
 

121214_0437_SX50 Male Bufflehead Dive
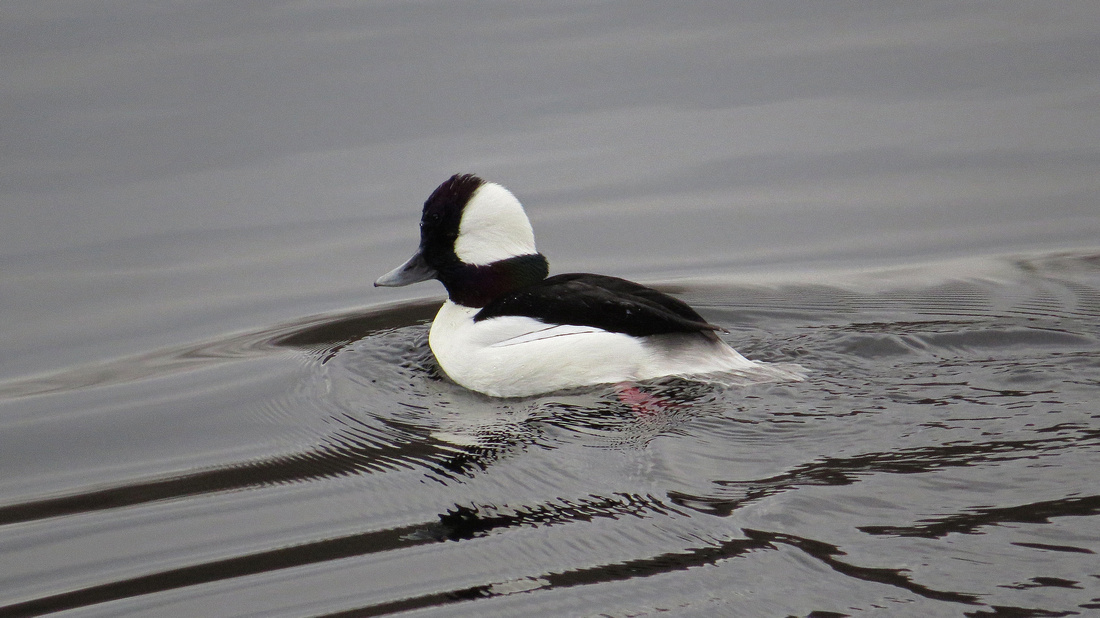
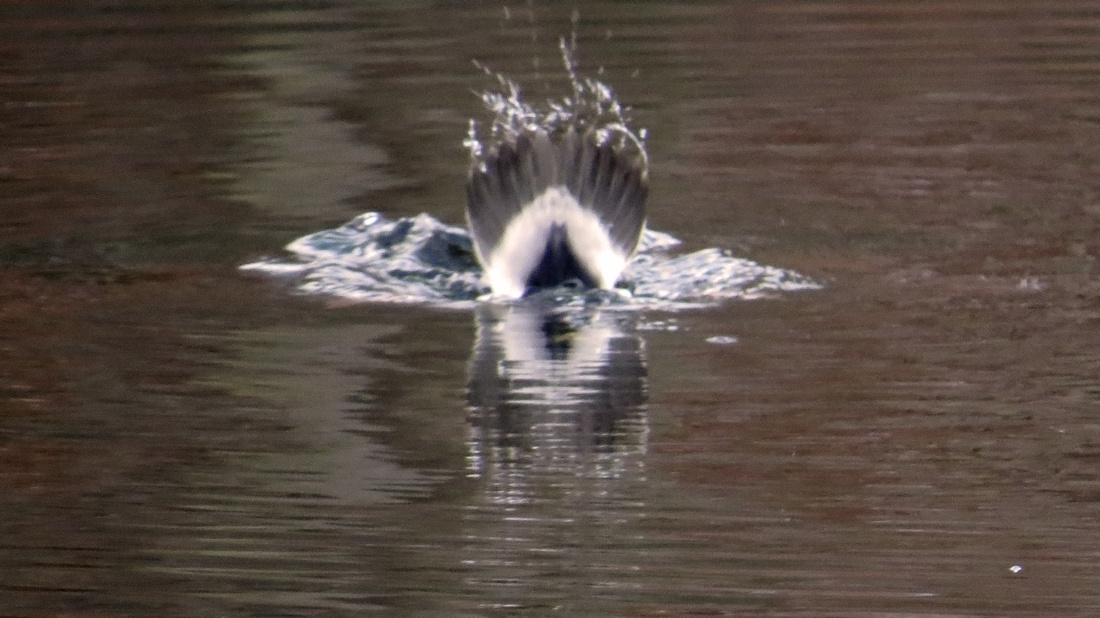
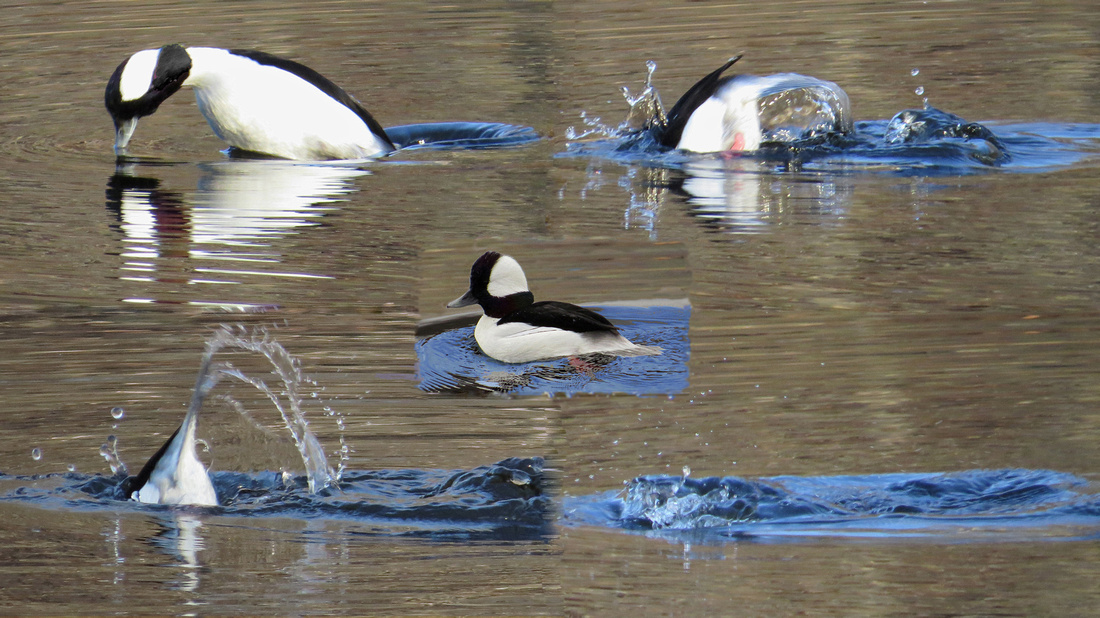
121214_0437_SX50 Male Bufflehead DiveTo return to the SX50 Review - Part 3, click the link
http://edwardmichaellach.zenfolio.com/blog/2016/4/canon-sx50-review-part-3-when-the-light-goes-down
Back at the lake, I turned to sports mode when I saw a male Bufflehead searching and diving for food. I studied him this time and noticed he made a slight tensing movement of his neck a fraction of a second before his jump into a dive. Nature gave me the cue and after trying for so long I finally had my sequence of his lightning quick movements from jump to "nothin' but net". I felt it was a great day. The central insert was my bufflehead portrait from earlier in these articles.
 

It was a cool but sunny afternoon and a perfect time for photography. I hope you enjoyed these images from my hike. It was good to be creating images for their own sake, and just for fun.
 

Thanks for looking and thanks for all your comments and contributions to the discussions of these articles. Happy shooting. Go out and create memories or art or anything that makes yourself or others smile or think or wonder.
 

Addendum:
 

In the discussion after this article was first published in 2012, my friend Stephen, an expert in macro and micro photography, added his very knowledgeable observations:

Stephen: Thank you for an excellent article on macro, telemacro and close-up lenses. My guess about the otherworldly creatures was that they were bubbles in your beer.  It is just amazing that each bubble displays an image of the eye, with the result that all those eyes are peering out of the picture at us!  They really do look like little other-worldly creatures now that you pointed that out.
I wonder if defining macro as 1x magnification or greater is just a bit arbitrary.  That defines macro for a full-frame SLR, but the SX50 has a crop factor of 1200 mm / 215 mm = 5.58.  That means the SX50 has 5.58 times as many pixels per unit width of sensor as the full-frame SLR does.  So maybe macro for the SX50 should be defined as 1/5.58 = 0.18x magnification.
With the Raynox250 on the SX50 at full optical zoom you measured a field of view of 3.76 mm, giving a magnification of approximately 6.2 mm / 3.76 mm = 1.65.  With close-up lenses and infinite focus on the camera, you can get a pretty good estimate of the magnification by taking the ratio of the camera's actual focal length to the close-up lens' focal length:  215 mm / 125 mm = 1.72.  I have found that the measured values always come out a bit less than the estimated value.  Although I sometimes use digital zoom on my SX30 to get a bigger picture, I don't think it adds to the information content of the picture.
If you consider using a 400 mm lens plus the Raynox250 on a Compact SLR, the magnification would be 400 mm /125 mm = 3.2x.  So, does that mean that this combination gives you macro that is nearly twice as good as the SX50 + Raynox250?  I don't think so.  On several occasions, I have posted resolution calculations on this forum that seem to annoy some people and others feel are merely theoretical.   I have found, however, that the same set of resolution formulas gives good agreement with measured values on my SX30 for distant and near telephoto (telemacro), macro and with close-up lenses.  For the SX50 + Raynox250 @ 1200 mm at infinite focus, I calculate 3.0 microns resolution (9% MTF) using F/6.5.  For an 18 MP Compact SLR with 400 mm F/5.6 lens + Raynox250, I get 3.3 microns resolution, using F/10 as the sweet spot.  So, even though the SX50 + Raynox250 has only about half the magnification as the Compact SLR with 400 mm + Raynox250, the close-up resolution is similar.
The large zoom of the SX50 is an asset for telemacro and for close-up lenses because it increases the magnification of the image on the sensor.  I would also argue that the high pixel density of the small sensor benefits the resolution, although there may be some sacrifice of image quality.
Everything I have just said may be unnecessary because you have already proven than you can get impressive macro, telemacro and close-up pictures with the SX50.  Congratulations on a very fine and useful article.


Me: I was awaiting your observations because I knew I would both enjoy and learn from them. Defining macro as 1x magnification actually is arbitrary. I remember conversations from almost a half century ago when early "macro" lenses were being developed for 35mm film. The goal was to create an optical design to give a 1:1 factor on the film plane at close focus distance while also being able to focus to infinity. Early designs at 50mm would only go to 1:2, so a "life size" adapter (actually an extension tube) was included for "true macro capability" according to some of the marketing speak. It stuck and I remember we all referred to macro as 1:1 at the film plane, no matter whether the camera was 35, 620/120 or even larger. Or today, smaller. Much smaller. Totally arbitrary. I'll have to re-read your data again because I'm sure I'll catch something new to learn and I appreciate your knowledge. But it's late and after doing this article today, my brain is full. Thanks for jumping in.


For Galleries of images on this website taken with the cameras reviewed in this article, use these links to open them in a separate Tab on your Browser:

Canon Powershot SX50:    http://edwardmichaellach.zenfolio.com/p949383169

Canon Powershot SX40:    http://edwardmichaellach.zenfolio.com/p1016990742
 

(C) Edward Michael Lach 2016-04-19T17:10:07Z 2016-04-19T17:10:07Z
https://edwardmichaellach.zenfolio.com/blog/2016/4/canon-sx50-review-part-3-when-the-light-goes-down Canon SX50 Review Part 3: When the Light Goes Down

Prologue: This is the third in a series of articles I wrote on dpreview.com in November and December 2012 reviewing the Canon SX50 camera and comparing it to its older sibling, the SX40. Parts 1 & 2 are in separate Blog entries below. While the original articles remain on dpreview.com, the links to most of the example images were lost. By request of the readers on that website, I am republishing the articles here in my Blog with all the original example images intact.
 

Note that clicking on a Review image will open it in a Picture Gallery where some may be downloaded. Only test images are downloadable while pictorial images, which are copyrighted, are not. The caption of each image in the Picture Gallery will include a link back to this Article.
 

Everyone who has one knows that when properly handled, the SX50 can produce excellent results for a P&S camera when photographing in very bright to medium light. But what about its results when that light goes down? Since starting to write these articles, this is the question most asked of me in the discussions on this forum, in PMs, and from non-members who lurk in the shadows around here. Apparently my images posted over the last year here give me away in my teaching and photographic life. So the subject of Part 3 is to look at two tests of the SX50, one handheld of an outdoor scene at night, and one tripod mounted indoors under very dim controlled light. In each setting, I also shot the SX40 along with the SX50 for comparison images.
 

Before we get to the tests, I want to expand on my opening statement above by saying that when properly handled, the SX50 can give excellent results in dim light as well. The following images are presented as examples of what I find consistent in my work with this camera. The first is a landscape which portrays a dark moody atmosphere at Swan Lake in the middle of the day. As can be seen, it felt more like evening than early afternoon:
 

121128_0244_SX50 Swan Lake at Rockefeller Preserve121128_0244_SX50 Swan Lake at Rockefeller PreserveTo return to the SX50 Review - Part 3, click the link
http://edwardmichaellach.zenfolio.com/blog/2016/4/canon-sx50-review-part-3-when-the-light-goes-down
With the gathering heavy cloud cover and sun traveling very low in the southern sky, this early afternoon SX50 image of Swan Lake felt more like early evening with its dark shadows and impending gloom.
 

I point your attention to the very dark shaded area above just in front of the snowy hill on the middle right. The following image was taken there twenty minutes later in even dimmer light. While the coloring of the male Bufflehead can be credited somewhat in helping the camera, the definition and texture captured more than offset the rather well controlled noise. The Bufflehead is a very small duck. Moving quickly when hunting and diving, it can be difficult to capture well in bright light. While this image may not stand the test of a large gallery print, the SX50 captured both grace and detail in poor light in a way that should easily satisfy or exceed the needs expected from a P&S camera.
 

121128_0251_SX50 Bufflehead at Rockefeller Preserve121128_0251_SX50 Bufflehead at Rockefeller PreserveTo return to the SX50 Review - Part 3, click the link
http://edwardmichaellach.zenfolio.com/blog/2016/4/canon-sx50-review-part-3-when-the-light-goes-down
This male Bufflehead was captured by the SX50 in very dark shadows while I was testing the Sports mode.
 

And as a slight diversion, the Bufflehead did see something to eat and jumped into a dive. Sports mode on the SX50 was there to capture it as it broke the water. There's not very good IQ of course, but that just requires practice by this particular photographer, and is in the range of the camera.
 

121128_0268_SX50 Diving Bufflehead121128_0268_SX50 Diving BuffleheadTo return to the SX50 Review - Part 3, click the link
http://edwardmichaellach.zenfolio.com/blog/2016/4/canon-sx50-review-part-3-when-the-light-goes-down
This was the first image of a three shot burst in the SX50's Sports mode. In this mode, the photographer's reaction time appears to be the most critical component. The second and third images of the burst were nothing but bubbles on the water.
 

NOTE: For a better example of the SX50's Sports mode, see the Not a Review section of Part 4.
 

Now to the tests.
 

SCENE ONE - Outdoors at Night
 

The scene is the lit up Jacob Burns Film Center and ambient lit surrounding area in Pleasantville, NY at night. The village clock gave me some protection from the surrounding traffic as I stood in the dark. Initial test shots were to determine at what shutter speed I could get sharp handheld images with no camera shake in the chill 35°F night air. That turned out to be 1/3 second at ISO 320 on the SX50 and ISO 400 on the SX40. Turns out the SX50 also choose 1/3 second at ISO 400, so the comparison starts there. Both cameras were set to Av mode at 24mm at their widest apertures (f3.4 and f2.7). All settings were at defaults with SAFETYs turned OFF. One exception was that the SX50 was Superfine and the SX40 was Fine as in the prior articles. (Note: while reviewing the images back home, I noticed the SX50 was at -1/3 EC. This I don't believe has any large bearing for comparative purposes.) Focus and Evaluative metering were taken at the entrance doors of the theater and the image recomposed each time. Both cameras were in AWB mode. Of note is that I love the electronic level of the SX50 and it shows in the final compositions.
 

As far as handling the two cameras side by side, except for changing the ISO (ARRGGGH!!!, why did Canon switch its position), moving back and forth between cameras was seamless. Many people have asked this, so I'll get it out of the way. One camera at f3.4 and the other at f2.7 made no difference in the ability to get the shots. I just didn't notice. At ISO 200, neither camera could be hand held in the dark, so the wider f2.7 gave no help. At higher ISOs, the f2.7 lens gave only marginally faster shutters (see captions in the comparison images below) but the f3.4 was already within the ability to be handheld at the same ISO. In addition, the SX50's 1/3 stop ISO increments can give an advantage by allowing a fast enough exposure at a lower ISO than at the SX40's full stop ISO increments. Whether one prefers one result over the other in the final images may be worth discussion, but not the ability to take the picture in the dark.
 

The following are the outdoor night images, first with the SX50 then with the SX40, at ISO 400, 800, 1600 and 3200. My remarks are based on side by side comparisons at 600% on my production 30 bit graphics workstation.
 

63 121201_0283_SX50 ISO 400  f3.4 at .3 sec63 121201_0283_SX50 ISO 400 f3.4 at .3 secTo return to the SX50 Review - Part 3, click the link
http://edwardmichaellach.zenfolio.com/blog/2016/4/canon-sx50-review-part-3-when-the-light-goes-down
SX50 handheld at ISO 400 at 1/3 second.
 

64 121201_1357_SX40 ISO 400  f2.7 at .3 sec64 121201_1357_SX40 ISO 400 f2.7 at .3 secTo return to the SX50 Review - Part 3, click the link
http://edwardmichaellach.zenfolio.com/blog/2016/4/canon-sx50-review-part-3-when-the-light-goes-down
SX40 handheld at ISO 400 at 1/3 second.
 

At ISO 400 with both cameras choosing 1/3 second, the SX50 presents a more pleasing image with more contrast inducing visual sharpness, and better controlled halos adding to dynamic range shooting to the right. Ignoring contrast, pixel sharpness appears to be equal on both images at 600%. Loss of acuity from almost non-existent camera shake is limited to a level of only one pixel on either camera. The Superfine mode of the SX50 also retains more details in all facets of the image, especially the stone work of the theater. Unfortunately, the higher contrast appears to magnify the detail robbing effects of noise on the SX50, but in areas of equal luminance, that noise appears equal on both images. At ISO 400, the SX50 gives a clear, sharp well rounded night scene, overshadowing its older sibling. With proper noise reduction techniques and fine detail recovery and boost in post, results can stand well against lower ISO images shot in daylight.
 

67 121201_0287_SX50 ISO 800  f3.4 at .167 sec67 121201_0287_SX50 ISO 800 f3.4 at .167 secTo return to the SX50 Review - Part 3, click the link
http://edwardmichaellach.zenfolio.com/blog/2016/4/canon-sx50-review-part-3-when-the-light-goes-down
SX50 handheld at ISO 800 at 1/6 second.
 

68 121201_1359_SX40 ISO 800  f2.7 at .125 sec68 121201_1359_SX40 ISO 800 f2.7 at .125 secTo return to the SX50 Review - Part 3, click the link
http://edwardmichaellach.zenfolio.com/blog/2016/4/canon-sx50-review-part-3-when-the-light-goes-down
SX40 handheld at ISO 800 at 1/8 second.
 

At ISO 800, although the SX50 is now faster at 1/6 second as is the SX40 at 1/8 second, visual acuity lost to camera shake fell by 2 pixels for each camera. It’s more than likely lesser handholding technique on my part, but at least not so bad. However, the SX50 continues to show higher contrast, better control of halos and more details than the SX40, but less so than its own output at ISO 400. The SX40 at ISO 800, also slightly diminished from its ISO 400 output, is starting to catch up and even shows better range in the shadows. But overall, I still prefer the clarity of the SX50.
 

71 121201_0290_SX50 ISO 1600  f3.4 at .077 sec71 121201_0290_SX50 ISO 1600 f3.4 at .077 secTo return to the SX50 Review - Part 3, click the link
http://edwardmichaellach.zenfolio.com/blog/2016/4/canon-sx50-review-part-3-when-the-light-goes-down
SX50 handheld at ISO 1600 at 1/13 second.
 

72 121201_1360_SX40 ISO 1600  f2.7 at .067 sec72 121201_1360_SX40 ISO 1600 f2.7 at .067 secTo return to the SX50 Review - Part 3, click the link
http://edwardmichaellach.zenfolio.com/blog/2016/4/canon-sx50-review-part-3-when-the-light-goes-down
SX40 handheld at ISO 1600 at 1/15 second.
 

At ISO 1600, camera shake is nonexistent and the difference between cameras is fading fast. The SX50 is still slightly higher in contrast with better halo control, but the open shadows of the SX40 are adding to its visual presentation. What's most surprising is that the noise differential between ISO 1600 and ISO 800 is not easily discernible on either camera. Both give very usable results at ISO 1600 and my preference is a toss-up.
 

75 121201_0293_SX50 ISO 3200  f3.4 at .04 sec75 121201_0293_SX50 ISO 3200 f3.4 at .04 secTo return to the SX50 Review - Part 3, click the link
http://edwardmichaellach.zenfolio.com/blog/2016/4/canon-sx50-review-part-3-when-the-light-goes-down
SX50 handheld at ISO 3200 at 1/25 second.
 

76 121201_1361_SX40 ISO 3200  f2.7 at .04 sec76 121201_1361_SX40 ISO 3200 f2.7 at .04 secTo return to the SX50 Review - Part 3, click the link
http://edwardmichaellach.zenfolio.com/blog/2016/4/canon-sx50-review-part-3-when-the-light-goes-down
SX40 handheld at ISO 3200 at 1/25 second.
 

At ISO 3200 with both cameras at 1/25 second and no camera shake, I'm back to preferring the SX50 results. Not only does it maintain its slight edges in contrast, halos and details, but also shows an openness in the shadows that equals the SX40. That being said, noise patterns on both cameras are becoming more apparent in destroying fine detail. My judgment is that both cameras drop from very usable results at ISO 1600 to usable results for handheld night work at ISO 3200.
 

SCENE TWO - Indoors Under Very Dim Lighting
 

The second set of images was designed to show how both cameras hold fine detail at rising ISOs in very dim natural light. Both cameras were set to around 300mm and mounted side by side on a tripod from ten feet. The cameras were at identical settings with SAFETYs turned ON. Again the SX50 was Superfine. The focus rectangles were precisely matched on the head of the middle figurine. The textures of the granite, oak and painted wall were intended elements. The lighting was dimmed until both cameras' evaluative metering showed a one second exposure at ISO 400 with the lenses wide open. This was done to avoid defaulting to the ISO80/100limitation on these cameras with a longer exposure. Since the side of one camera covered the accessory door of the other preventing attaching a cable, the ten second timer was used for each shot.
 

To begin, the first image is in full light with the SX50 to provide baseline clarity for the test.
 

40 121127_0225_SX50 Full Overhead CFL Light at ISO 8040 121127_0225_SX50 Full Overhead CFL Light at ISO 80To return to the SX50 Review - Part 3, click the link
http://edwardmichaellach.zenfolio.com/blog/2016/4/canon-sx50-review-part-3-when-the-light-goes-down
This SX50 image in full light (non-flash) at ISO 80 was taken to provide a baseline for clarity compared to the following very dim light images at higher ISOs.
 

The following are indoor dim light images, again with the SX50 first and SX40 second at ISO 400, SX50 then SX40 at ISO 800, etc. My remarks are again based on side by side comparisons at 600% on my production 30 bit graphics workstation. What is readily noticeable is that at ISO 400, both cameras set to a one second shutter speed underexposed the scene. Even though the SAFETYs were turned ON, neither camera moved to a longer shutter and risk hitting the timing limitation for higher ISOs.
 

49 121127_0216_SX50 Very Low Luminence Level at ISO 40049 121127_0216_SX50 Very Low Luminence Level at ISO 400To return to the SX50 Review - Part 3, click the link
http://edwardmichaellach.zenfolio.com/blog/2016/4/canon-sx50-review-part-3-when-the-light-goes-down
SX50 at ISO 400. Under exposure is caused by the camera not exceeding its shutter limitations at high ISOs.
 

50 121127_1353_SX40 Very Low Luminence Level at ISO 40050 121127_1353_SX40 Very Low Luminence Level at ISO 400To return to the SX50 Review - Part 3, click the link
http://edwardmichaellach.zenfolio.com/blog/2016/4/canon-sx50-review-part-3-when-the-light-goes-down
SX40 at ISO 400. Under exposure is caused by the camera not exceeding its shutter limitations at high ISOs.
 

51 121127_0217_SX50 Very Low Luminence Level at ISO 80051 121127_0217_SX50 Very Low Luminence Level at ISO 800To return to the SX50 Review - Part 3, click the link
http://edwardmichaellach.zenfolio.com/blog/2016/4/canon-sx50-review-part-3-when-the-light-goes-down
SX50 at ISO 800.
 

52 121127_1354_SX40 Very Low Luminence Level at ISO 80052 121127_1354_SX40 Very Low Luminence Level at ISO 800To return to the SX50 Review - Part 3, click the link
http://edwardmichaellach.zenfolio.com/blog/2016/4/canon-sx50-review-part-3-when-the-light-goes-down
SX40 at ISO 800.
 

53 121127_0218_SX50 Very Low Luminence Level at ISO 160053 121127_0218_SX50 Very Low Luminence Level at ISO 1600To return to the SX50 Review - Part 3, click the link
http://edwardmichaellach.zenfolio.com/blog/2016/4/canon-sx50-review-part-3-when-the-light-goes-down
SX50 at ISO 1600.
 

54 121127_1355_SX40 Very Low Luminence Level at ISO 160054 121127_1355_SX40 Very Low Luminence Level at ISO 1600To return to the SX50 Review - Part 3, click the link
http://edwardmichaellach.zenfolio.com/blog/2016/4/canon-sx50-review-part-3-when-the-light-goes-down
SX40 at ISO 1600.
 

55 121127_0219_SX50 Very Low Luminence Level at ISO 320055 121127_0219_SX50 Very Low Luminence Level at ISO 3200To return to the SX50 Review - Part 3, click the link
http://edwardmichaellach.zenfolio.com/blog/2016/4/canon-sx50-review-part-3-when-the-light-goes-down
SX50 at ISO 3200.
 

56 121127_1356_SX40 Very Low Luminence Level at ISO 320056 121127_1356_SX40 Very Low Luminence Level at ISO 3200To return to the SX50 Review - Part 3, click the link
http://edwardmichaellach.zenfolio.com/blog/2016/4/canon-sx50-review-part-3-when-the-light-goes-down
SX40 at ISO 3200.
 

When viewing each pair of ISO images from the two cameras side by side at 600%, I have to say that I could not discern any noticeable variances. While it was easy to tell each camera in the outdoor night scenes, not even the Superfine of the SX50 appeared to make any difference in these images. As the ISOs progressed higher and higher, both cameras suffered loss of detail and increase in noise at a comparable rate. Very interesting results based on a single overall very low luminance level in this test versus the combination of bright, ambient, and dark levels in the first scene. When the cameras' DIGIC Vs don't have to work as hard, they produce comparable results. When the lighting gets more difficult, however, the SX50 appears to show some definite software improvements over its older sibling.
 

Now since this is a low light review, I'll add one more image from this series for your review, the SX50 at ISO 6400:
 

58 121127_0220_SX50 Very Low Luminence Level at ISO 640058 121127_0220_SX50 Very Low Luminence Level at ISO 6400To return to the SX50 Review - Part 3, click the link
http://edwardmichaellach.zenfolio.com/blog/2016/4/canon-sx50-review-part-3-when-the-light-goes-down
At ISO 6400, detail and clarity begin to get too mushy even for normal artistic intent. However it is available on the SX50 for reportage images or special artistic intent when needed.
 

HANDHELD NIGHTSCENE
 

And now there's one more feature of the low light arsenal presented here not for comparison, but just as information for those learning about these cameras. In low light, this feature takes three quick images with one press of the shutter and processes them in-camera for a single stacked image. Best results are attained by holding the camera very steady (or propped on something) during the exposures.
 

Last week after the snow, the temperature was rising slightly overnight and a light fog was rising to a heavy overcast sky backlit by the moon. It was about 2:30 AM when I arrived home, but I still went inside to grab my SX50 just to try to capture the eerie scene. As I set this feature to the camera, the moon broke through an opening in the clouds and I fired the shutter. Best viewed in a darkened room, and although a month late, this resulting image just screams "Halloween Night" at me. I'm waiting for the Headless Horseman to come riding through my trees.
 

121128_0226_SX50 Moonscape in the Rising Fog121128_0226_SX50 Moonscape in the Rising FogTo return to the SX50 Review - Part 3, click the link
http://edwardmichaellach.zenfolio.com/blog/2016/4/canon-sx50-review-part-3-when-the-light-goes-down
Handheld Nightscene mode on the SX50 captures the fog, heavy cloud cover and moon of this eerie 2:30 AM scenic.
 

The Bottom Line (Once Again, So Far):
 

For the most part in my retirement, I have been an outdoor nature photographer shooting in bright to medium bright light. Although I have attained some good results in darker conditions with these cameras before, I have never given them a real chance to see what they can do. These tests have allowed me a new perspective and I think I'll be out in the dark more often in the future. Yes both cameras, properly handled, take wonderful images in bright light. But as seen above, they are both quite capable, again properly handled, when the light goes down. My preference does go to the upgraded software of the newer SX50 model, but the SX40 is not that far behind.
 

Once again, I hope these articles help people better understand their cameras in the pursuit of fine images, or just help them decide which camera they may want to buy.
 

Addendum:
 

Edited excerpts from the discussion of this article when published on dpreview.com:
 

Bob wrote: This is the second time I have seen reference to SAFETY on or off and as much as I have dug into the guidance and the menu I can't find this anywhere. What do you mean by the term SAFETY?

SAFETY SHIFT is talked about on page 151 of the manual. It shows up as the 13th item on the shooting Menu. When set to ON in Tv mode, if the available f-stops can not balance the proper exposure, SAFETY automatically shifts the shutter speed up or down to compensate.  It’s the same in Av mode when a balancing shutter speed is not available. SAFETY further opens or closes the aperture. This feature allows you to maintain your chosen Tv or Av setting and if the light is beyond it, still get the shot when the need is to react and shoot quickly. If you have the time however, you can change Tv or Av or even ISO to meet your specific needs. In a way, SAFETY SHIFT is the shutter/aperture version of AutoISO.
 

In the outdoor night scene, I didn't want the Av setting of minimum aperture to change under any condition, so I set SAFETY SHIFT to OFF. In the indoor very dim light scene, I only wanted the Tv setting to capture the best exposure, so I allowed the shutter speed to change by turning SAFETY SHIFT to ON.
 

OpticGlass wrote: I wonder how good the IS is. I don't like flashes and tripods. What would you say is the minimum speed you can handhold the two cameras set to F3.4/F2.7 with both at ISO 200?
 

How steady an image can be attained from a camera has as much to do with the photographer's technique and experience as it does with IS. The IS on these cameras is fantastic, but that being said, it is just a tool and not an end. The position of the hands and elbows, how relaxed the muscles are, and good breathing techniques can all help getting steady shots as much as the IS, especially at the long end of the zoom.
 

As I wrote in the article above, I judge camera shake at the pixel level with the image magnified to 600%. If a high contrast transition (preferably black vs white) shows a consistent 2 pixels or less of intervening shades of gray in all directions, that is within an acceptable range of camera shake for me from a 12 megapixel camera. Less, of course is better. In the outdoor scenes from the test at 24mm, I was able to stay within this mark at 1/3 second. It wasn't until 1/13 second that the transitions had 0 pixels of gray. So for my technique including IS, these would be my low end shutter speeds for best results with this small light camera. Other photographers may be able to do better. In order to get to 0 pixels of gray at 1200mm, the slowest shutter speed I've been successful with so far is 1/40 second. At a slower 1/25 second I've been within the 2 pixel range. But I think I may need more practice with the big lens and again other photographers may do better.


For Galleries of images on this website taken with the cameras reviewed in this article, use these links to open them in a separate Tab on your Browser:

Canon Powershot SX50:    http://edwardmichaellach.zenfolio.com/p949383169

Canon Powershot SX40:    http://edwardmichaellach.zenfolio.com/p1016990742

Stay tuned as Part 4 of this review, Different Paths to Up Close and Personal, will be published soon.
 

(C) Edward Michael Lach 2016-04-17T20:21:21Z 2016-04-17T20:21:21Z
https://edwardmichaellach.zenfolio.com/blog/2016/4/canon-sx50-review-part-2 Canon SX50 Review Part 2: 24mm to 100mm and Part 2A: DRC

Prologue: This is the second in a series of articles I wrote on dpreview.com in November and December 2012 reviewing the Canon SX50 camera and comparing it to its older sibling, the SX40. Part 1 is in a separate Blog entry below. While the original articles remain on dpreview.com, the links to most of the example images were lost. By request of the readers on that website, I am republishing the articles here in my Blog with all the original example images intact.
 

Note that clicking on a Review image will open it in a Picture Gallery where some may be downloaded. Only test images are downloadable while pictorial images, which are copyrighted, are not. The caption of each image in the Picture Gallery will include a link back to this Article.
 

The original articles were divided into Part 2 and Part 2A. Those Parts will be combined below:
 

SX50 vs SX40 - Head to Head in the 24mm to 100mm Zoom Range - SCENE ONE:
 

When I first bought my SX40, I was thrilled by the long zoom and the ability to catch all sorts of subjects far in the distance. It was a while before I realized that the 24mm to 100mm range performed much better than I would have expected as well. In Part 1 of these reviews, we looked at the comparison of the SX50 and SX40 at 500mm and 840mm (or around that for the SX50). This time we'll look at the shorter side of the range where a lot of everyday shooting will occur, including scenic landscapes. Sure I'll throw in a few long zooms, mainly because I can't resist, but comparisons will mostly be at the short end.
 

Instead of setting up both cameras as closely alike as possible, this time I tried something different. That is, setting up each camera with what I think are its best settings. Here, the SX40 matches its settings in the first review, but since the SX50 has what I think are two very worthwhile improvements, they were both dialed in for the shoot. It makes sense since one of the reasons one buys an upgraded camera is for its new features. So the "advantage" the SX50 may have in this head to head, besides superfine mode, is turning on Dynamic Range Control for both auto highlights and for auto shadows. As stated in Part 1, this tends to give a flatter, brighter initial image, but with more details at either end of the luminance range from a perceived increase in dynamic range. It may be a digital increase and not an upgrade to the sensor, but it appears to work. And the flat, bright effect is easily corrected in post. At the end of the first scene of comparative images, I will post a corrected image for your review.
 

For the test, the cameras were tripod mounted, both set to their lowest ISO and both set to evaluative metering and Av mode. Sharpening, contrast, etc. are all at default. The test was during the mid-day hour in bright southern sky sunshine with some clouds and a light breeze shaking the leaves on the trees. The SX50 went first, progressively set for 24mm, 40mm, 55mm, and 90mm for the first scene; and 24mm, 35mm, 55mm and 90mm for the second. Except for the 24mm images, the SX40 sequence for each scene was composed in its EVF to match the same angle of view as seen on the SX50 EVF without regard to focal length, as close as the motorized zoom would allow. I had to be in Tarrytown, NY on business that day, so at lunchtime I took the cameras to the River Walk on the Hudson, just south of the 3 mile long Tappan Zee Bridge.
 

The first scene is pointing into the hidden sun, with the New York City skyline about 23 miles south on the mid left side. I chose this scene not only for its broad range of shadows, mid tones and highlights, but also to see what havoc the railroad ties fading into the distance in bright contrasty sun would play on the two cameras. And I just liked the 24mm composition. So here are the first set head to head, SX50 @ 24mm first, SX40 @ 24mm second, SX50 @ 40mm, etc., etc.
 

11 121114_0166_SX50 SOOC 24mm11 121114_0166_SX50 SOOC 24mmTo return to the SX50 Review - Part 2, click the link
http://edwardmichaellach.zenfolio.com/blog/2016/4/canon-sx50-review-part-2
SX50 at 24mm. Superfine with auto highlight and auto shadow DRC turned on.
 

12 121114_1338_SX40 SOOC 24mm12 121114_1338_SX40 SOOC 24mmTo return to the SX50 Review - Part 2, click the link
http://edwardmichaellach.zenfolio.com/blog/2016/4/canon-sx50-review-part-2
SX40 at 24mm. Fine
 

The combination of Superfine and Dynamic Range control (DRC) on the SX50 is doing its jobs. At 400%, more details are available in the brightened shadows with no noticeable increase in noise. And the sky shows higher definition and separation of the clouds. The details of the clothing of the track workers are also more easily discernible, as is the license plate on the maintenance truck. The sun flare on the truck is also more tightly controlled.
 

Focus for both images is on the cross members of the power line tower in the middle trees, and that focus at 400% is about dead even between both cameras. Highlights on the line shakles on the top two cross members, however, are better controlled and sharper on the SX50.
 

Going around the edges of the images is an interesting comparison. The SX50 gives the impression of having more details because the DRC lightens the shadows and better controls the flare in the highlights. But the SX40, with the non-flattened higher contrast sometimes appears sharper. The answer here may very well be up to the post processing decision of the user, but I tend to like having the extra details of the SX50.
 

Purple Fringing (PF) is mostly seen only around the edges of both images, but it is more pronounced on the SX50, especially in the back-lit upper left trees. But the SX40 has some along the right bottom tracks that does not show up in the SX50.
 

And now, those tracks. I followed them at 400%, side by side and inch by inch from the bottom right all the way up and over. And once again it's a toss-up between a little more but slightly lighter detail in the SX50 vs an apparent sharpness derived from higher contrast on the SX40. But what I didn't expect was that the power line towers in the distance on the SX50 are much sharper with greater contrast than on the SX40. So are the NY City skyline on the left and the power lines on the upper middle right. So, overall, at 24mm I would score this one for the SX50.
 

40mm - 42mm PICTURES: 
 

13 121114_0167_SX50 SOOC 40mm13 121114_0167_SX50 SOOC 40mmTo return to the SX50 Review - Part 2, click the link
http://edwardmichaellach.zenfolio.com/blog/2016/4/canon-sx50-review-part-2
SX50
 

14 121114_1339_SX40 SOOC 42mm14 121114_1339_SX40 SOOC 42mmTo return to the SX50 Review - Part 2, click the link
http://edwardmichaellach.zenfolio.com/blog/2016/4/canon-sx50-review-part-2
SX40
 

The results at 40mm are basically the same as at 24mm. For the SX50, PF is now a little better controlled and catching up to the SX40. For the SX40, the far power line towers are now catching up in sharpness and contrast to the SX50.
 

55mm - 70mm PICTURES:
 

15 121114_0168_SX50 SOOC 55mm15 121114_0168_SX50 SOOC 55mmTo return to the SX50 Review - Part 2, click the link
http://edwardmichaellach.zenfolio.com/blog/2016/4/canon-sx50-review-part-2
SX50
 

16 121114_1340_SX40 SOOC 70mm16 121114_1340_SX40 SOOC 70mmTo return to the SX50 Review - Part 2, click the link
http://edwardmichaellach.zenfolio.com/blog/2016/4/canon-sx50-review-part-2
SX40
 

The SX40 still continues to win for PF in the trees, but again also shows PF in the tracks where the SX50 doesn't. An interesting observation is that the SX40 is starting to catch up to the SX50 in shadow detail. But the SX50 still controls highlights better.
 

90mm - 100mm PICTURES:
 

17 121114_0169_SX50 SOOC 90mm17 121114_0169_SX50 SOOC 90mmTo return to the SX50 Review - Part 2, click the link
http://edwardmichaellach.zenfolio.com/blog/2016/4/canon-sx50-review-part-2
SX50
 

18 121114_1341_SX40 SOOC 104mm18 121114_1341_SX40 SOOC 104mmTo return to the SX50 Review - Part 2, click the link
http://edwardmichaellach.zenfolio.com/blog/2016/4/canon-sx50-review-part-2
SX40
 

It's starting to become rather difficult to tell the two cameras apart, even at 400%. Could we now be in the heart of the zoom range? Maybe the second set of comparison images will tell.
 

But before we do that, here are a couple of extra images from the SX50. The first shows the results of just a little post processing to bring up the tone levels of the DRC image. It now begins to match the higher contrast of the SX40 while also maintaining a little more detail.
 

121114_0173_SX50 Hudson River from Tarrytown to NYC121114_0173_SX50 Hudson River from Tarrytown to NYCTo return to the SX50 Review - Part 2, click the link
http://edwardmichaellach.zenfolio.com/blog/2016/4/canon-sx50-review-part-2
Using both auto shadow and auto highlight in Dynamic Range Correction on the SX50 can produce flat results but with slightly more detail and dynamic range. As shown in this image, it is easily corrected in post with a little tone and levels adjustment while maintaining the details and range.
 

And I couldn't resist, so here's the distant NY City skyline and George Washington Bridge with the full optical power of the SX50's 1200mm. Not too shabby for over 20 miles away.
 

121114_0175_SX50 Midtown Manhattan from the Tarrytown River Walk121114_0175_SX50 Midtown Manhattan from the Tarrytown River WalkTo return to the SX50 Review - Part 2, click the link
http://edwardmichaellach.zenfolio.com/blog/2016/4/canon-sx50-review-part-2
The New York City Skyline and George Washington Bridge in the haze from more than 20 miles up river with the 1200mm optical zoom of the SX50. This is an uncropped image with the bridge adjusted slightly darker in post.


SX50 vs SX40 - Head to Head in the 24mm to 100mm Zoom Range - SCENE TWO:
 

The second scene was chosen for its more neutral even lighting, a good example of a landscape image not as hard on the cameras.
 

24mm PICTURES:
 

21 121114_0180_SX50 SOOC 24mm21 121114_0180_SX50 SOOC 24mmTo return to the SX50 Review - Part 2, click the link
http://edwardmichaellach.zenfolio.com/blog/2016/4/canon-sx50-review-part-2
SX50 at 24mm. Superfine.
 

22 121114_1343_SX40 SOOC 24mm22 121114_1343_SX40 SOOC 24mmTo return to the SX50 Review - Part 2, click the link
http://edwardmichaellach.zenfolio.com/blog/2016/4/canon-sx50-review-part-2
SX40 at 24mm. Fine.
 

Results between the two cameras are relatively even. The SX50 still has slightly more PF in the trees against the sky, but still has slightly more details in the shadows. What's surprising, however, is that the bridge at 400% shows more contrast, and thus perception of sharpness. Once again, I'll score this focal length for the SX50.
 

35mm PICTURES:
 

23 121114_0181_SX50 SOOC 35mm23 121114_0181_SX50 SOOC 35mmTo return to the SX50 Review - Part 2, click the link
http://edwardmichaellach.zenfolio.com/blog/2016/4/canon-sx50-review-part-2
SX50
 

24 121114_1344_SX40 SOOC 35mm24 121114_1344_SX40 SOOC 35mmTo return to the SX50 Review - Part 2, click the link
http://edwardmichaellach.zenfolio.com/blog/2016/4/canon-sx50-review-part-2
SX40
 

For 35mm, the observations are the same as for 24mm.
 

55mm PICTURES:
 

25 121114_0182_SX50 SOOC 55mm25 121114_0182_SX50 SOOC 55mmTo return to the SX50 Review - Part 2, click the link
http://edwardmichaellach.zenfolio.com/blog/2016/4/canon-sx50-review-part-2
SX50
 

26 121114_1345_SX40 SOOC 55mm26 121114_1345_SX40 SOOC 55mmTo return to the SX50 Review - Part 2, click the link
http://edwardmichaellach.zenfolio.com/blog/2016/4/canon-sx50-review-part-2
SX40
 

The SX40 is now catching up to the SX50 and its higher contrast here is making for a very pleasing image straight out of the camera. Score this focal length for the SX40.
 

90mm PICTURES:
 

27 121114_0183_SX50 SOOC 90mm27 121114_0183_SX50 SOOC 90mmTo return to the SX50 Review - Part 2, click the link
http://edwardmichaellach.zenfolio.com/blog/2016/4/canon-sx50-review-part-2
SX50
 

28 121114_1346_SX40 SOOC 90mm28 121114_1346_SX40 SOOC 90mmTo return to the SX50 Review - Part 2, click the link
http://edwardmichaellach.zenfolio.com/blog/2016/4/canon-sx50-review-part-2
SX40
 

Once again it is hard to tell which image is from which camera. Though we haven't comparison tested the cameras from above 100mm to below 500mm (500-840mm was tested in the first mini-review), 100mm may be the beginning of the sweet spot for these lenses. These images are definitely a toss-up.
 

Now once again, I couldn't resist showing the long reach of the two cameras.
 

First at optical:
 

30 121114_1347_SX40 SOOC 840mm30 121114_1347_SX40 SOOC 840mmTo return to the SX50 Review - Part 2, click the link
http://edwardmichaellach.zenfolio.com/blog/2016/4/canon-sx50-review-part-2
Here the SX40 is at its full 840mm optical zoom. More area is included than in the longer SX50 below.
 

29 121114_0184_SX50 SOOC 1200mm29 121114_0184_SX50 SOOC 1200mmTo return to the SX50 Review - Part 2, click the link
http://edwardmichaellach.zenfolio.com/blog/2016/4/canon-sx50-review-part-2
The SX50 at 1200mm optical zoom gives closer details of the reconstruction work area under the roadbed.
 

And next with the Digital 2.0 TC engaged:
 

32 121114_1348_SX40 SOOC 1680mm with TC32 121114_1348_SX40 SOOC 1680mm with TCTo return to the SX50 Review - Part 2, click the link
http://edwardmichaellach.zenfolio.com/blog/2016/4/canon-sx50-review-part-2
Again the SX40 is first at 1680mm Digital TC 2.0 zoom.
 

31 121114_0185_SX50 SOOC 2400mm with TC31 121114_0185_SX50 SOOC 2400mm with TCTo return to the SX50 Review - Part 2, click the link
http://edwardmichaellach.zenfolio.com/blog/2016/4/canon-sx50-review-part-2
The SX50 however gives a closer inspection of the workers stopping for lunch with its 2400mm Digital TC 2.0 zoom. This image shows the lower left corner of the one above it.
 

These images are a good comparison of the range of these cameras. But I suggest that a more practical comparison be done a little differently. Everyone usually compares the 2°-3° longest telephoto view against the 84° angle at 24mm. We as humans can perceive this 84° angle in the periphery of our vision, but we usually only pay attention to about 46°. This is about the angle of view of a 50mm lens. So when doing your comparison, start with the 55mm images above and compare those to the 24mm images to see how wide the lenses are, and then 55mm to the longest focal length to see their reach.
 

The Bottom Line (Once Again, So Far):
 

I hope this review segment has been helpful to those deciding to upgrade, or just choosing between the two cameras. It may even help you choose another camera instead. That's quite fine, happy to help. But what I think it does show is that either camera is a versatile instrument. And either, with practice, can take wonderful pictures. I'm still leaning to the increased features of the SX50, but I'm glad I still have both.
 

Addendum to SX50 Review Part 2 from comments (with edits) in its discussion:
 

James wrote: Very nice work. The graphs and charts used by review sites are all well and good, but I prefer your presentation. Most of us can relate to real life photos, such as yours . . .
 

Thanks James. I've certainly done my time pouring over charts and graphs for equipment before I've bought it. That has mostly been for big ticket items when having to decide which very expensive lens will work better and give me what I need with which expensive body. For my next dSLR and glass purchase, I'll probably do the same. For these P&S little marvels, matching equipment has already been done for us. And honestly, we already expect compromises. So to me, the most important question is "How do we like the pictures it takes?" Sure, for example, one camera may have a little more PF which for practical purposes is usually not that visible. Or another camera may handle a little faster or easier than the other. But those are questions one should ask only after seeing if one likes the look of the pictures first. I wouldn't want to take visually inferior looking pictures with a different camera just because it is faster or easier, or, technically at least, “more perfect”. So I do appreciate when people realize why I take this approach.
 

Part 2A - Continued Discussion of DRC
 

All of the SX50 images used as examples in Part 2 of my mini-review series had both auto highlight and auto shadow turned on in Dynamic Range Control (DRC). The features worked very well in the examples taken in higher contrast sunlight shining towards the lens. They also gave more detail to the images in which over the shoulder light was not at all harsh. In the discussion, Dale pointed out that even though these effects can help many pictures, one shouldn't use it all the time.  Many times you just want higher contrast and less detail that segregates the subject and adds a feeling of sharpness. That is very true. In addition, others have been telling me about their confusion on when to use these features. So I’ve added two more images today as examples of DRC's use.
 

The first image I call "Walking Giants Out For A Stroll." As I was driving my car, I saw this image that I thought had possibilities, so I pulled over to the side of the road. I was intrigued by the graphic qualities of the silhouetted towers and wires sitting atop a rock based grassy hill. all against a partly cloudy bright noon sky. Turns out the rock base bordered a flood plain, so my shoes and pants got a little wet. But what we do for our art.
 

In order to get the composition I liked, the camera had to go right down on  the wet grass, LCD extended and turned up. Even those of us who prefer the EVF know when to shut up and use the right tool. But the sun was so bright coming into the lens that the towers were being blown away, the wires invisible, and the grass and rocks black. If this was how the LCD reacted, I could imagine the sensor not being that happy either. So it was time to set DRC to both auto highlight and auto shadow. Here's the result:
 

121119_0202_SX50 Walking Giants Out For A Stroll121119_0202_SX50 Walking Giants Out For A StrollTo return to the SX50 Review - Part 2, click the link
http://edwardmichaellach.zenfolio.com/blog/2016/4/canon-sx50-review-part-2
"Walking Giants Out For A Stroll"  -  SX50 at 24mm directly into the mid-day sun with DRC.
 

This image would have been just one black and white silhouette (and some may have liked it that way) without DRC. Note that it is best viewed in a room with subdued light to see the texture in the lower section. There was a little post to bring up the highlights on the stone wall and then rebalance the levels a bit, but the camera did most of the work. So this is a case when DRC especially comes in handy.
 

The second example is called "Fall Fading Into Winter" and was taken when I got home. Here the dying blooms against the still colorful fall palette provided their own contrast on nature. And it raised a question of whether to use DRC or not. Looking through the viewfinder, the dying flowers showed very little detail with burned out highlights. Decreasing the exposure a bit helped but started darkening everything else too much to be pleasing. It appeared to me that the best case was to turn on auto highlight control. At the same time, the faded brown leaves along the bottom and right hand corner had already started to go black. I originally was going to keep it this way, but on second thought felt it may be too harsh in the overall subtle palette. So I turned on auto shadow control to preserve the brown hues and detail. Here's the result:
 

121119_0205_SX50 Fall Fading into Winter121119_0205_SX50 Fall Fading into WinterTo return to the SX50 Review - Part 2, click the link
http://edwardmichaellach.zenfolio.com/blog/2016/4/canon-sx50-review-part-2
"Fall Fading Into Winter"  -  SX50 at about 200mm with DRC
 

I like the color palette and the way the luminance levels separate the fore and backgrounds. Others may have chosen not to use shadow control for higher contrast from darker leaves and stems, thus giving more separation. Even others may have not used highlight control taking the dying blooms farther to the right, adding even more contrast and separation.
 

Although I think the first example shows a clear indication of how useful DRC can be, the second example may be a toss-up for some and worth further discussion. Either way people may now have a better idea of when to use it, or when to stay away, choosing based on needs dictated by the light or just for artistic expression.
 

For Galleries of images on this website taken with the cameras reviewed in this article, use these links to open them in a separate Tab on your Browser:

Canon Powershot SX50:    http://edwardmichaellach.zenfolio.com/p949383169

Canon Powershot SX40:    http://edwardmichaellach.zenfolio.com/p1016990742

Stay tuned as Part 3 of this review, SX50 and SX40 When the Light Goes Down, will be published soon.
 

(C) Edward Michael Lach 2016-04-16T19:41:47Z 2016-04-16T19:41:47Z
https://edwardmichaellach.zenfolio.com/blog/2016/4/canon-sx50-review---reprisal-of-an-article-i-wrote-on-dpreview-com-in-december-2012 Canon SX50 Review Part 1: A reprisal of articles I wrote on dpreview.com in November/December 2012

Prologue:  After photographing with Canon's Powershot SX40 superzoom camera during 2012, Canon upgraded it to the more powerful SX50 towards the end of the year. The SX50 had about a dozen new features I thought would be very useful, so I purchased one. On dpreview.com where I contribute under the name VisionLight, many readers inquired about those new features to help them decide about upgrading. Since I had both cameras, I set about creating a series of articles addressing their questions. The articles are still on the dpreview.com site, but due to a procedural error I made a couple of years ago, the supporting images were lost. Regularly over the years since, members have asked if I could in some way reprise the full articles with those images intact. Answering these requests has now become the first blog entry on my website. In many ways, it is a way to say Thank You to the dpreview.com readers that support my website with visits every day. I hope everyone enjoys the chance to revisit this discussion on a camera that remains extremely popular even today.
 

Note that clicking on a Review image will open it in a Picture Gallery where some may be downloaded. Only test images are downloadable while pictorial images, which are copyrighted, are not. The caption of each image in the Picture Gallery will include a link back to this Article.
 

For Christmas in 2012, I combined all the articles into a very lengthy publication on dpreview.com to aid all readers who found a new SX50 under their Christmas tree. To make it easier to read here, this Blog will revert to the individual article format with updated text from the combined article. Here is Part 1:
 

First, I appreciate all your support for this project as well as your contributions to the discussions. Together we learned much about this versatile little camera. I now have mine set up to do just about everything I ask of it. Here's hoping this compilation will be helpful to new owners, and possibly generate new discussions of capabilities we may not have even tried yet. Here are the original articles (sometimes slightly edited per replies in the original discussions):
 

SX50 Review Part 1: Initial Observations, SX50 vs SX40, and Images:
 

With Super Storm Sandy and no power or communications for a week, followed by a Nor'easter and a half a foot of snow, I have not had a lot of time to play with my new SX50. But after two weeks of owning it, I have now taken about 100 images and can start my mini-review. (Note: all data and images are based on using mostly Tv mode, some Av mode and some P mode for flash. I have not tried AUTO. BUT, I may be expanding my horizons and (gulp) trying AUTO mode in the future. Even us old dogs can learn new tricks, so stay tuned for a possible thread on my observations.)
 

Initial Observations:
 

I'm going to have to get used to the new button placements. With the SX40 I've learned to hit all buttons without taking my eye from the EVF. What I do like on the SX50 is that the picture review button is placed away from the right back edge of the camera. Many times while placing the camera in its bag, I've accidently hit that button and turned the camera on. The switch between the ISO and self timer buttons is going to take a while since I use both often. The switch of the zoom assist button will also take a while, moving from my right thumb to my left thumb. I actually liked that button's placement on the SX40. But I'm also going to have to relearn how to hold the camera since my left thumb now naturally falls across the two zoom assist buttons. I have already hit them a couple of times by mistake. Now one thing I do not like is the new larger raised dots on the right thumb rest (15 higher larger dots on the SX50 vs 18 smaller dots on the SX40). I find the new layout uncomfortable and actually distracting. Otherwise, the new camera handles just like its older sister and is very familiar in my hands. I've even set the EC at a default of -1/3, just like the SX40.
 

SX50 vs SX40 Telephoto Images Side by Side:
 

In my SX40 mini-review 11 months ago, I displayed comparison pictures of a cupola on my friends property. Although she moved south and no longer owns the property, the new owner is also neighborly. So it's back to the cupola, which you'll see has been somewhat damaged by Super Storm Sandy. The comparative images were tripod mounted with IS left on for both cameras. Both are set at evaluative metering and all settings equalized between the cameras as close as possible, except that the SX50 is Superfine. Both compositions were also matched as closely as possible at 840mm and around 500mm. For most practical purposes, the images from both cameras are nearly the same. I'll get more into the Superfine in a moment, but some of you may see the slight difference here.
 

 SX50_490mm SUPERFINE - Tripod mounted SX50 from 100 feet at around 500mm: 07_SX50_0035 490mm SUPERFINE07_SX50_0035 490mm SUPERFINETo return to the SX50 Review - Part 1, click the link  
 

SX40_485mm FINE - Tripod mounted SX40 from 100 feet at around 500mm: 08_SX40_1335 485mm FINE08_SX40_1335 485mm FINETo return to the SX50 Review - Part 1, click the link
 

 SX50_772mm SUPERFINE - Tripod mounted SX50 from 100 feet at around maximum optical zoom of SX40: 05_SX50_0033 772mm SUPERFINE05_SX50_0033 772mm SUPERFINETo return to the SX50 Review - Part 1, click the link
 

SX40_840mm FINE - Tripod mounted SX40 from 100 feet at maximum optical zoom of 840mm: 06_SX40_1334 840mm FINE06_SX40_1334 840mm FINETo return to the SX50 Review - Part 1, click the link
 

SX50 Superfine vs Fine:
 

Here are two comparisons for your judgment, one at 2400mm using 2.0TC and one at 1200mm. For general viewing, again they look pretty much the same. But in this case, doing a little pixel peeping, superfine does in deed carry the day. In the bright light of these examples I do not really see the increased noise (at least in the blue channel) that I've heard about. This of course bears further testing, especially in the green channel where noise may be more apparent. But so far, I do like Superfine and since its memory footprint doesn't bother me, I've set it as the default on my SX50.
 

SX50_1200mm FINE - Tripod mounted from 100 feet : 04_SX50_0029 1200mm FINE04_SX50_0029 1200mm FINETo return to the SX50 Review - Part 1, click the link
 

SX50_1200mm SUPERFINE - Tripod mounted from 100 feet: 03_SX50_0028 1200mm SUPERFINE03_SX50_0028 1200mm SUPERFINETo return to the SX50 Review - Part 1, click the link
 

SX50_2400mm FINE - Tripod mounted from 100 feet: 02_SX50_0027 2400mm FINE02_SX50_0027 2400mm FINETo return to the SX50 Review - Part 1, click the link
 

SX50_2400mm SUPERFINE - Tripod mounted from 100 feet: 01_SX50_0026 2400mm SUPERFINE01_SX50_0026 2400mm SUPERFINETo return to the SX50 Review - Part 1, click the link
 

Telemacro:
 

One of the first things I wanted to know about the SX50 was how its telemacro "feature" compared to the SX40. In my mini-review of the SX40 I posted images showing that the SX40 could focus on an object 1¾ inches wide from 4½ feet away with its full optical zoom and 2.0TC (effective 1680mm lens in full frame equiv.). Here is a 1200mm image with additional 2.0TC with the SX50:
 

SX50 at 2400mm with 2.0TC from 4½ feet gives a horizontal field of view of 1 3/16 inches: 121029_0017 2400mm from 4½ feet121029_0017 2400mm from 4½ feetTo return to the SX50 Review - Part 1, click the link
http://edwardmichaellach.zenfolio.com/blog/2016/4/canon-sx50-review---reprisal-of-an-article-i-wrote-on-dpreview-com-in-december-2012


So, a horizontal field of view of 1 3/16 inches can be captured at the minimum focus distance of 4½ feet with the SX50. Since many of the uncropped images I've posted here over the last 10 months have been of flora and fauna only an inch or two in size, I guess I'm going to get even closer to nature in the coming year. I'm looking forward to it. In addition, here is another close-up showing nice clarity of a back-lit fabric leave taken from about 10 feet at full optical zoom:    
 

121108_0071_SX50 Backlit Fabric Leave Test121108_0071_SX50 Backlit Fabric Leave TestTo return to the SX50 Review - Part 1, click the link
http://edwardmichaellach.zenfolio.com/blog/2016/4/canon-sx50-review---reprisal-of-an-article-i-wrote-on-dpreview-com-in-december-2012
SX50 at 1200mm optical zoom from about 10 feet shows the details of a back-lit fabric leaf.
 

Focus Speed and Zoom Assist:
 

Like most others have reported about the SX50, I also find that in medium to bright light that the focus speed and shot to shot handling has improved greatly from the SX40. Well done. HOWEVER, in side by side tests with the SX40 in dim to dark conditions, the SX40 has won every single time. In fact, sometimes I found the SX50 to be down right slow after the SX40 already obtained focus. Maybe it's just my unit, but I find this an interesting result. The speed of the zoom assist coupled with the faster focusing in bright to medium light really impresses me. The second zoom assist button also came in very handy to stabilize the 240mm zoom. With the SX40 I was not very good in tracking birds in flight. But the other day three hawks were circling my home hunting for a final meal in the setting sun. Although I knew I would only get silhouettes in the fading light, I grabbed my SX50 and set the 2.0TC. Using the Zoom Assist set to medium, I was excited as it was finally easy to zoom in and focus on the gliding birds who were flying high enough to half fill the frame at 2400mm. Four shots and four in focus hits . Also took a fifth shot as one came gliding down through the treetops. Although I erased the first four as just silhouettes and tests, I liked the composition of the last one and it showed that the camera responded right on time to capture the hawk as it hit the opening:
 

121104_0043_SX50 Hawk Hunting before Sunset121104_0043_SX50 Hawk Hunting before SunsetTo return to the SX50 Review - Part 1, click the link
http://edwardmichaellach.zenfolio.com/blog/2016/4/canon-sx50-review---reprisal-of-an-article-i-wrote-on-dpreview-com-in-december-2012
Using Zoom Assist, I was able to track this hawk from about 200-300 feet high down through the treetops, zooming in and out, and was able to capture it just as it hit the opening, in focus no less.
 

Dynamic Range Correction and Landscapes:
 

I like highlight control on the Canon S100 and did not like shadow control on either the S100 or the SX40. In either case I felt the shadow control produced too blotchy and noisy a result for my taste and I would rather handle it in post. Since the SX50 now has both like the S100, I immediately set and liked the highlight control for brightly lit scenes. I then tested shadow control in auto one more time. I was surprised with what looked like better results than the other cameras. Now I did not yet push it to deeper shadows, but gave it easier targets to start. And it handled them quite well. The downside is that when both highlight and shadow is set, resulting images are very flat and need level or curve adjustment in post. But the added detail and dynamic range, at least so far, is worth it. Here are some landscape examples followed by descriptions:
 

121108_0066_SX50 Emerging from the Nor'easter121108_0066_SX50 Emerging from the Nor'easterTo return to the SX50 Review - Part 1, click the link
http://edwardmichaellach.zenfolio.com/blog/2016/4/canon-sx50-review---reprisal-of-an-article-i-wrote-on-dpreview-com-in-december-2012
Highlight control was used to retain the details in the white snow of the plant that survived Sandy and emerged from the snow. The original was a little too blue, so I added a 50% No. 85 filter in Photoshop and tweaked the highlight levels to 245.
 

121109_0120_SX50 Swan Lake at Rockefeller Preserve121109_0120_SX50 Swan Lake at Rockefeller PreserveTo return to the SX50 Review - Part 1, click the link
http://edwardmichaellach.zenfolio.com/blog/2016/4/canon-sx50-review---reprisal-of-an-article-i-wrote-on-dpreview-com-in-december-2012
I went down to Swan Lake at the Preserve to check how much damage the storms did. This landscape used both highlight and shadow control with the original image being very flat but full of detail. I created four layers (the snow, the sky, the mountain and its reflection, and the sky reflection in the lake) and enhanced each separately to create the final image. I think it was worth the trouble, given the good bones from the original.
 

121109_0121_SX50 Rockefeller Preserve at Sunset121109_0121_SX50 Rockefeller Preserve at SunsetTo return to the SX50 Review - Part 1, click the link
http://edwardmichaellach.zenfolio.com/blog/2016/4/canon-sx50-review---reprisal-of-an-article-i-wrote-on-dpreview-com-in-december-2012
This image from the Preserve was also taken with highlight and shadow control, adding detail and range to both the shadows and the snow. The flat results were also enhanced in Photoshop by adding separate levels adjustments to the snow, the luminance levels of the combined grasses and highlights in the woods, and the trees themselves.
 

121108_0082_SX50 Autumn Sunset121108_0082_SX50 Autumn SunsetTo return to the SX50 Review - Part 1, click the link
http://edwardmichaellach.zenfolio.com/blog/2016/4/canon-sx50-review---reprisal-of-an-article-i-wrote-on-dpreview-com-in-december-2012
This image, taken from my kitchen window the evening after the nor'easter, had auto highlight control turned on to maintain details around the bright highlights. Its only post was the removal of the edge of a roof eave in the lower left side. The image itself was certainly bright and colorful enough to need no other post. And I just love sunsets from the comfort of my window.
 

Flash:
 

It took some testing, but I finally was able to set the C1 mode of my SX50 with usable flash settings for 2 foot to 12 foot subject distances. First thing that I noticed is that setting white balance to AWB works better than setting it to Flash. Also that an FEC of -1/3 to -2/3 coupled with an EC of -1/3 also tended to give better results. With the SX40 I usually attached a Canon Speedlight for best results, but I wanted the convenience of not having to do so with the SX50. I'll still do that comparison, internal vs speedlight, but at a later time with the SX50. Here are some flash examples, first at close distance and then a wider field. The vine tomato was from about 2½ feet and results are pleasing to me. The kitchen utility area image shows the effects of different lightings in the room which was not corrected by the DIGIC5 processor (see the green on the near cabinets from the fluorescent lights in the family area of the room and the red highlights from the overhead halogens). I've read that the DIGIC5 will automatically correct these differences in AWB under some circumstances, but apparently not when using Flash. By the way, the kitchen was a gift to my wife when I retired. I've been a photographer, worked in high finance and technology and various other fields, but I have always been first and foremost a carpenter. I custom designed and personally hand built the entire kitchen for her, using handpicked red oak timbers and age old techniques and joinery. I proudly tell people that, except for the wall studs and attaching my crown mouldings, there is not a single nail used in the entire kitchen (you're only seeing about a third of it). I do love photography, but designing and building cabinetry and furniture is where my head is really at. But I digress. Back to the pictures:
 

121108_0109_SX50 Flash Study on the Vine121108_0109_SX50 Flash Study on the VineTo return to the SX50 Review - Part 1, click the link
http://edwardmichaellach.zenfolio.com/blog/2016/4/canon-sx50-review---reprisal-of-an-article-i-wrote-on-dpreview-com-in-december-2012
Vine tomato study with the onboard flash of the SX50 from about 2½ feet.
 

121108_0116_SX50 Wide Field Flash Test121108_0116_SX50 Wide Field Flash TestTo return to the SX50 Review - Part 1, click the link
http://edwardmichaellach.zenfolio.com/blog/2016/4/canon-sx50-review---reprisal-of-an-article-i-wrote-on-dpreview-com-in-december-2012
The DIGIC5 did not correct for the multiple light sources in this SX50 onboard flash kitchen image. AWB however did a much better job than the Flash White Balance setting did. Overall, the flash did do a very nice job of lighting this wide image without all the room's lights turned on.
 

The Bottom Line (so far):
 

Except for the cupola pictures above, I haven't posted anything here showing the strength of the SX50's massive zoom with its tremendous wide range. Since many have already celebrated it here, that's basically a done deal. But I will in future parts of this Review. Here I wanted to give some initial observations of other facets of this very versatile camera. And after two weeks of use, the bottom line is that it is definitely a keeper. It has enough new features to differentiate it from its older sibling and yet still feels comfortably similar. Image quality appears to have improved, slight as it may be with the superfine setting, and dynamic range can be helped with the combined highlight/shadow settings (again, with help in post). And I can't wait to start aiming its 2400mm (2.0TC) lens at nature's tinier offerings from 4½ feet.
 

Addendum to SX50 Review Part 1 from comments in its discussion:
 

The 12 main new features of the SX50 compared to the SX40 were not included in the original article, but we compiled them in the comments:
 

1200mm zoom, of course
 

Superfine jpegs

Faster focus and handling

Better LCD

Raw files

Larger view in EVF with sharper text

DRC for high contrast lighting situations

Electronic level (I really like this one)

FAL for the long end of the zoom handheld

Slightly faster zoom assist (or so it seems to me)

Better, surer hand grip to steady the camera handheld

Silent motors for video zooming and focusing
 

Dale brought up a number of items. People basically agree that the SX50 handles and focuses much faster than the SX40 in bright light, but Dale and I both did tests on their focus speed comparison in very low light. There were interesting results. For white or gray objects, focus speed was slow but about even. But objects with colors had different results with the SX50 faster or SX40 faster dependent on those colors. Dale noticed that the focus assist light colors of the two cameras are different, possibly leading to these results. While doing these tests, Dale also noticed that the EVF on the SX50 appears noticeably larger with the text easier to read on the newer camera. It appeared to me that eye relief was also a bit longer, as the bezel does not smudge my glasses like the SX40's does.
 

I hadn't paid attention to the new grip until Dale mentioned it. It's actually much surer in your hand with less chance of accidently having the camera slip from your grasp. Plus there's an added bonus of making the camera much steadier in preventing vertical shake when hand holding the long zoom.
 

Mario started a discussion about the Focus Assist Lock (FAL). After a number of tests, I believe people agree that while a pretty neat tool for stabilizing the viewfinder, there is probably little or no effect on the actual image for still photography. We did not discuss video. And this gives me one more chance to rant a little about its placement. When I grab the camera, my left thumb naturally hits the FAL. I worry that not noticing and hitting another button (e.g. ON/OFF) at the same time may have unwanted effects.
 

CaptainEJR noticed the purple fringing in the comparison photos. It does appear that it can be pronounced on the SX50 for high contrast edges in very bright light, but gets much better when luminance levels go down a little.
 

And in answer to a post from Beach Bum, we discussed the light path in the long zoom lens and it's f-stop transitions. The SX50's widest aperture of f5.6 at 840mm is actually slightly faster than the SX40's widest aperture of f5.8 at 840mm, the SX40's longest focal length in Full Frame equivalent terms. Due to the motorized zoom, it is hard to get a consistent reading between 975mm and 1025mm of where the SX50's widest aperture drops to f6.5. This chart shows at what focal lengths the widest aperture steps down for the SX50:


Focal Length (Full Frame equivalent) - F-stop Transition
 

4.3 mm (24mm) - f3.4
 

4.5mm (25mm) - f3.5
 

6.3mm (35mm) - f4.0

10.1mm (55mm) - f4.5

15.2mm (85mm) - f5.0

33.8mm (190mm) - f5.6
 

Somewhere between 174.7mm (975mm) and 183.6mm (1025mm) - f6.5 .
 

For Galleries of images on this website taken with the cameras reviewed in this article, use these links to open them in a separate Tab on your Browser:
 

Canon Powershot SX50:    http://edwardmichaellach.zenfolio.com/p949383169
 

Canon Powershot SX40:    http://edwardmichaellach.zenfolio.com/p1016990742
 

Stay tuned as Part 2 of this review, SX50 vs SX40 - Head to Head in the 24mm to 100 mm Zoom Range, will be published soon.


(C) Edward Michael Lach 2016-04-11T06:08:10Z 2016-04-11T06:08:10Z